Safe Gunhandling Rules
There are several sets of rules regarding safe gunhandling. All the sets of rules emphasize the concerns of their originators. However, many similar things are said but stated in different ways.
Which set of rules you choose to use is less important than picking a set and following it scrupulously. Firearms are instruments of ultimate personal responsibility and can be very unforgiving of even a moment of carelessness. Gunhandling is just as important as marksmanship, but many people are careless about the way they handle firearms, which can result in death or serious injury.
The National Rifle Association’s set. Link
The National Shooting Sports Foundation’s set. Link
Glock has its own set. Link
Like most competitors in the Action Shooting Sports, I use The Four Rules originally developed by Jeff Cooper. Lists of more than three or four items are difficult to memorize, so I still prefer them. There are minor variations but they all follow the same pattern.
- All guns are always loaded.
- Never let the muzzle cover anything you are not willing to destroy.
- Keep your finger off the trigger till your sights are on the target.
- Identify your target, and what is behind it.
When talking about gun safety, we need to be careful about taking our subject matter knowledge for granted, especially nuance. Each of the Four Rules has a given amount of unstated subject matter knowledge inherent in them. I have had this discussion before and I continue to maintain the following: telling people with little experience four sentences and expecting 100 percent positive results is ridiculous.
The Four Rules are a memory aid like OCOKA, not a teaching paradigm. Glibly reciting them and expecting people to understand the depth involved in them is like showing someone a flashcard about algebraic formulas and then expecting the person to understand Mass-energy equivalency. The written explanation I provide my students about the Four Rules is three pages long with multiple (2-7) subsections explaining the nuances of each Rule. In the case of Rule #2, there are seven subsections.
“Never point your gun at something you’re not prepared to destroy,” to someone who doesn’t know much about firearms, can be easily interpreted as “Don’t horseplay around with your gun and act like a toothless buffoon by pointing it at your wife or dog.” There are multiple nuances that are not immediately apparent in a one sentence reading. For instance, here is one subsection of my handout:
“c. In many cases, you will have to choose between pointing the gun at an inanimate object, such as the floor or gun cabinet, or pointing the gun at a person; always choose the inanimate object, never point the gun at a person.”
I speak for no one else but there’s nothing in a gun shop I am prepared to destroy when I handle a gun. However, the choice between shooting a gun cabinet and shooting the person behind the counter is fairly easy to make.
Granted a few people are exceptionally stupid. For instance, the guy who disabled his hand by negligently shooting it and then did it a second time because he insisted the only way he could manipulate the slide was by pushing it against his disabled palm. He posted pictures of the second incident on GlockTalk years ago and almost seemed proud of them. People like that are untrainable.
I think most people would be much more competent if we in the industry didn’t take so much for granted. People who have never operated a handheld device more complicated or dangerous than a coffee maker need an explanation first and the memory aid second to reinforce the explanation.
When explaining the Four Rules, I always include the statement:
In addition to the Four Rules, always store firearms so that they are not accessible to unauthorized persons.
The attached explanation is NOT all inclusive of the implications of the Four Rules. However, it is a starting point to allow shooters to think about the proper way to handle guns safely. Feel free to distribute the PDF to anyone.
Make the first shot count
This is an article I wrote for beginning shooters on the National Shooting Sports Foundation First Shots blog. That doesn’t mean experienced shooters can’t benefit from it, as well.
The shot that is missed most often in pistol shooting is the very first shot of a string of fire. One of the best ways to correct this is to make first shots the majority of your practice.
For this drill, take any large target at your range and turn it over. Make six dots about 3 inches in diameter on it, spaced roughly evenly apart. If your range carries the bright orange Tar-dots, those are ideal but a magic marker works fine, too. You will also need a magic marker for later in the drill. This drill consists of 48 rounds total. Many people will find that 5 yards is a good place to start. It’s deceptively challenging.
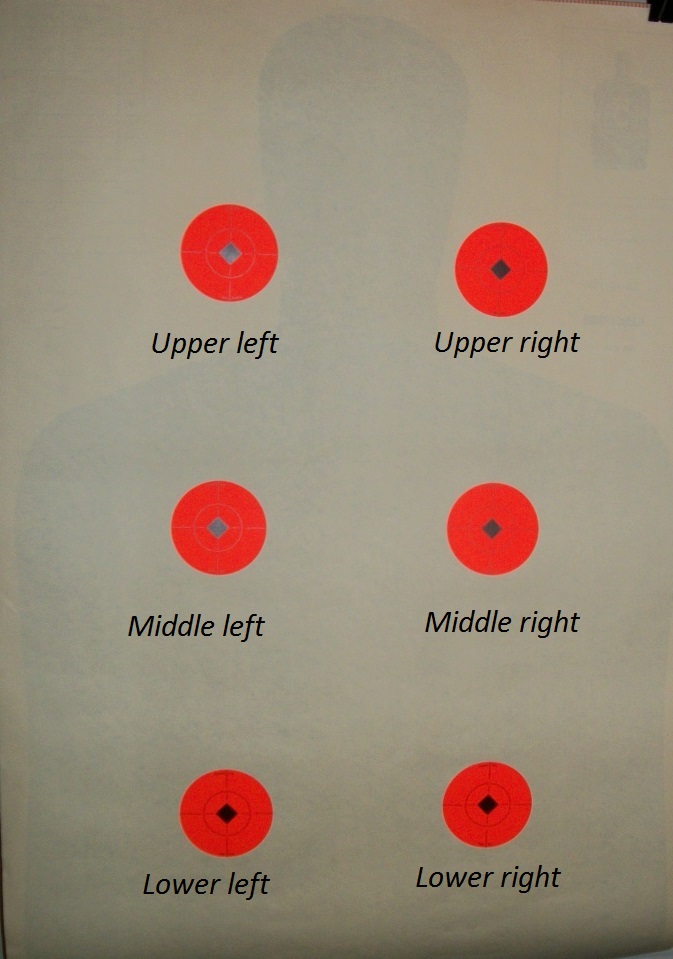
- Starting with pistol aimed at the bottom of target, fire 1 shot on upper left dot. Return to the bottom of target. Decock, if your pistol has a decocker. Repeat five more times for a total of six shots. Starting position for each shot is aimed at the base of the target and you will fire only one shot each time.
- Starting with pistol at a compressed ready, fire 1 shot on upper right dot. Return to compressed ready each time. Decock after every shot, if your pistol has a decocker. Repeat five more times for a total of six shots. Starting position for each shot is compressed ready.
- Starting with pistol aimed at bottom of target, fire 1 shot on middle left dot, then one shot on middle right dot. Return to bottom of target. Decock, if your pistol has a decocker. Repeat twice more for a total of three shots on each dot. Starting position for each string is aimed at the base of the target.
- Starting with pistol aimed at bottom of target, fire 1 shot on middle right dot, then one shot on middle left dot. You are moving in the opposite direction from String 3. Return to bottom of target. Decock, if your pistol has a decocker. Repeat twice more for a total of three shots on each dot. Start position each time is aimed at the base of the target.
- Starting with pistol at compressed ready, fire 1 shot on bottom left dot, then one shot on bottom right dot. Return to compressed ready. Decock, if your pistol has a decocker. Repeat twice more for a total of three shots on each dot. Starting position for each string is compressed ready.
- Starting with pistol at compressed ready, fire 1 shot on bottom right dot, then one shot on bottom left dot. You are moving in the opposite direction from String 5. Return to compressed ready. Decock, if your pistol has a decocker. Repeat twice more for a total of three shots on each dot. Starting position for each string is compressed ready.
- Mark all the hits on your target with a magic marker.
- On the dot where you had the least hits, i.e., your group was the largest/worst, fire six individual aimed shots, resting between each shot.
- On the next worst dot, fire a six shot slow fire group as one string of fire. That concludes the drill.
You will find that your marksmanship improves much faster when you concentrate on your first shot and you can tell where each shot goes.
Here is a PDF of the drill you can take to the range on your SmartPhone.

You must be logged in to post a comment.