Shooting To Live for the 21st Century – Session 2
Shooting Practice for a Criminal Encounter
#fridayfundamentals a little late
I think of my year long series about practicing on Shooting Illustrated as an update to Shooting To Live. Fairbairn and Sykes didn’t talk about followon training and practice at all. This is understandable given their time and resource constraints but won’t lead to as good results as periodic practice will.
This is the February 2024 article. https://www.shootingillustrated.com/content/shooting-practice-for-a-criminal-encounter/ It’s unclear how long the Shooting Illustrated website will be up since the publication was discontinued, so here’s a reprint of the entire article.
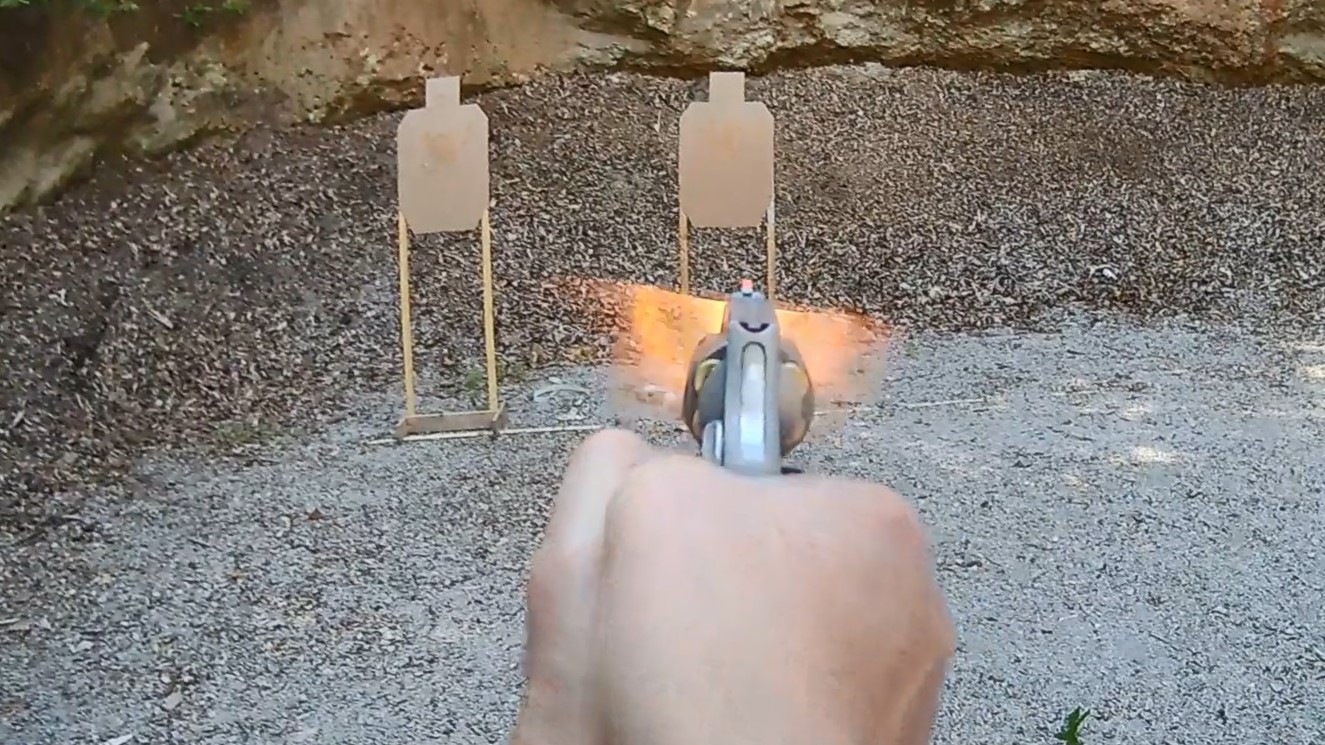
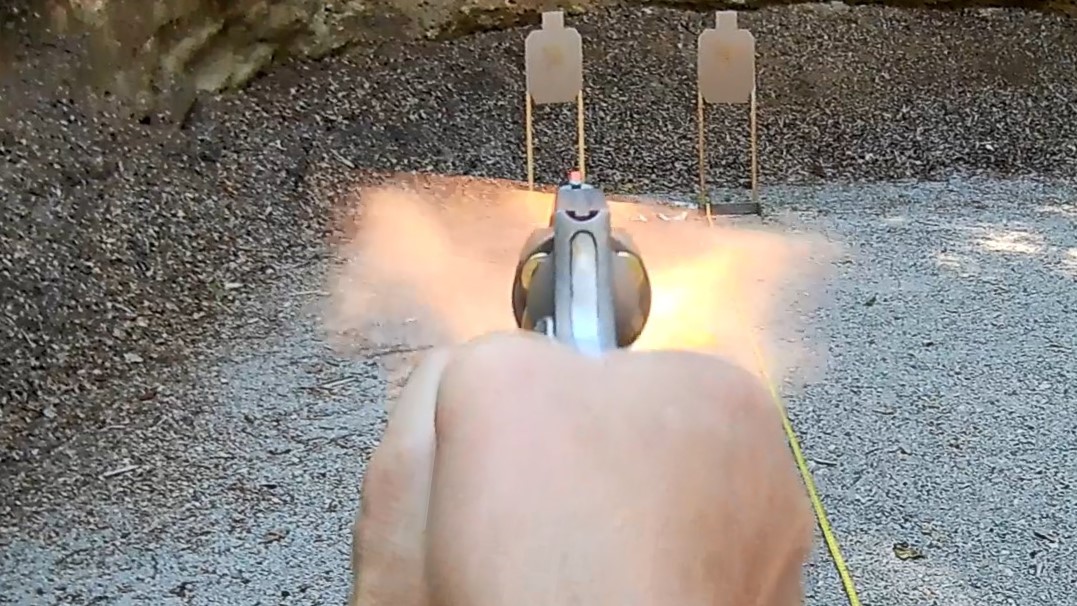
The second installment of this series will use the Louisiana Concealed Handgun Permit Qualification Course as the basis for structuring a Live Fire Practice Session. The Louisiana Course itself is fairly simple, as most CCW Qual Courses are. Some variations are included in this article to increase the Course’s value as practice for self-defense and personal protection.
The basic Louisiana requirements are to shoot a live range fire session of a minimum of 12 rounds each at 6 feet, 10 feet, and 15 feet for a total of 36 rounds. The shooter must complete at least one safe reload of the handgun at each distance. The target is the NRA B-27 and the shooter must score 100 percent hits within the silhouette portion. Having a 100 percent standard is what makes the Louisiana Course a little different from most States’ qualification courses. Typically, other States require a 70 to 80 percent hit standard.
The Louisiana Concealed Handgun Permit Laws And Administrative Rules are available at https://www.lsp.org/media/e04occ5m/chrulebook.pdf .
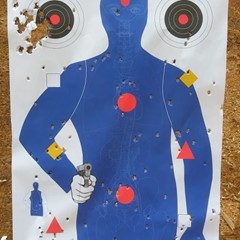
To use the Course as practice for self-defense, include some variations that go beyond the bare minimum requirements. The B-27 target is extremely large. To make it more challenging, accept only hits inside the 8 ring. An even more difficult variation would be to use a sheet of paper on the B-27 target as your acceptable hit zone.
Additional variations are to break the 12 shots into shorter strings and include some one-hand shooting during the six feet phase. Hold something in your non-dominant hand to simulate a situation in which you are carrying something valuable and have to shoot with one hand only.
Six feet Phase
- Load with 6 rounds
- Two hand shooting
- Come to Low Ready. Any time you come to Low Ready, the pistol should point completely below the target.
- String 1 – Fire 1 shot. Return to Low Ready.
- String 2 – Fire 2 shots. Return to Low Ready.
- String 3 – Fire 3 shots.
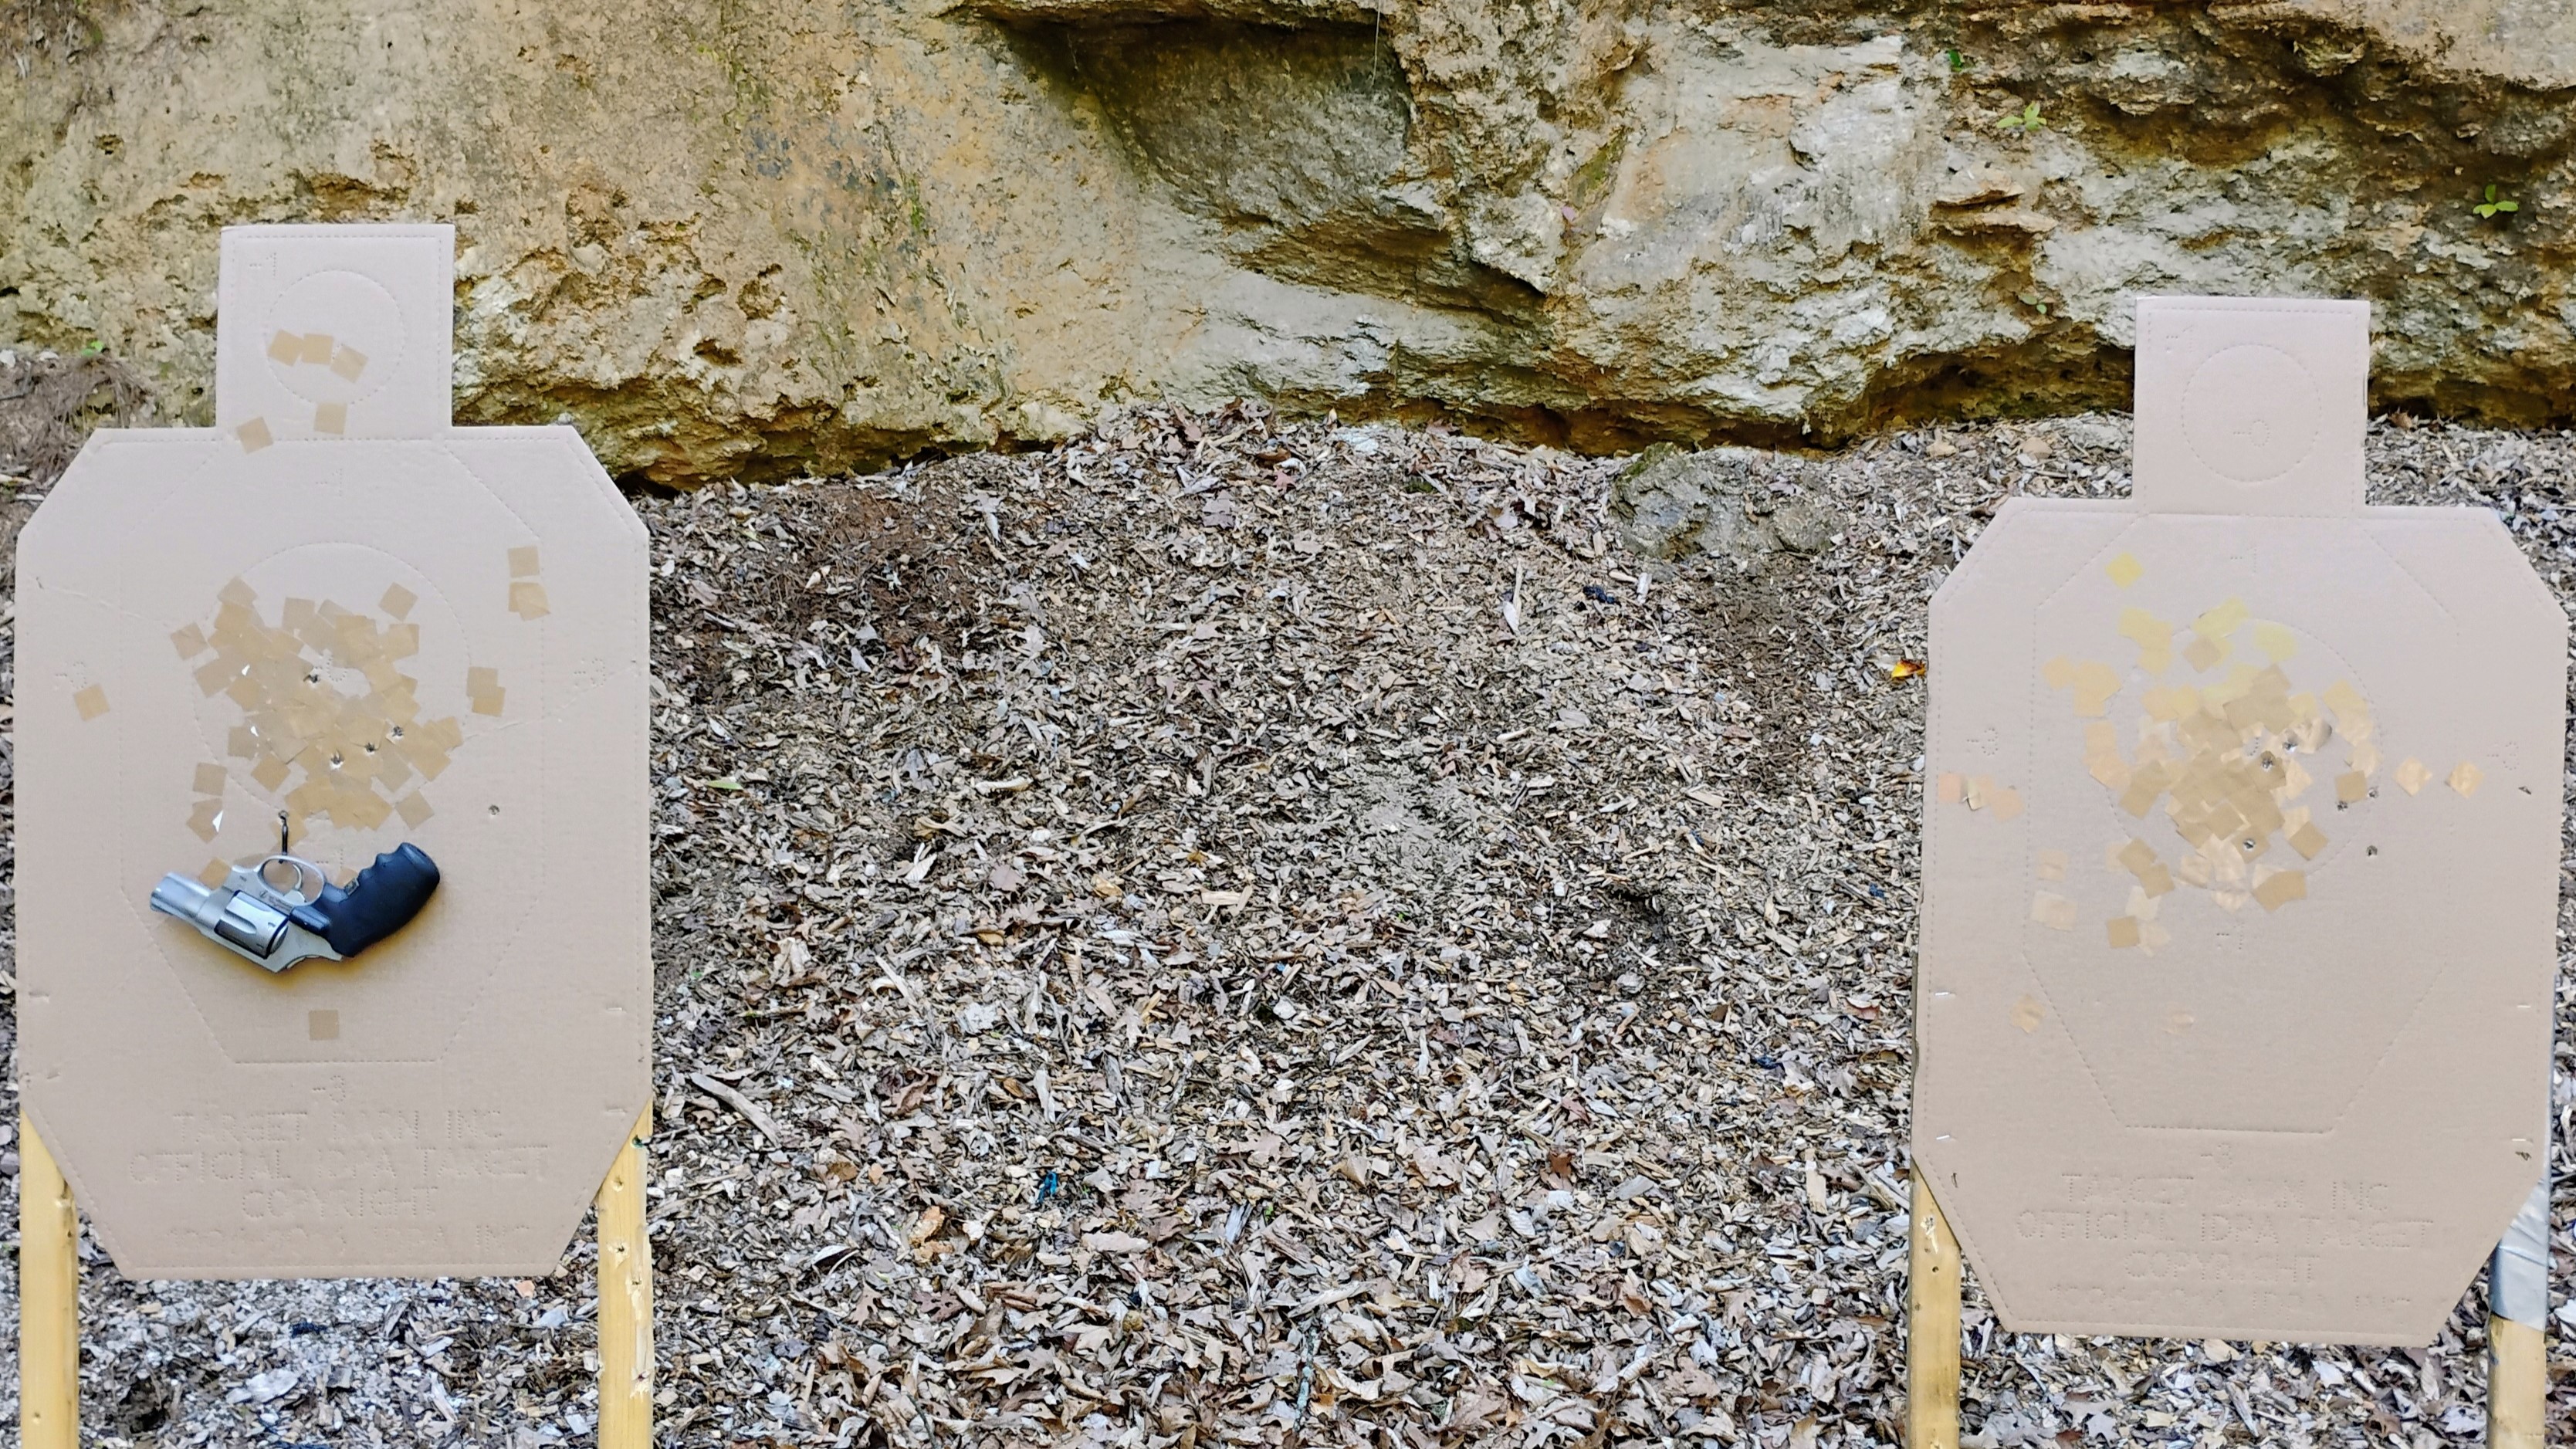
- Check the hits on your target and cover your hits with masking tape.
Checking your hits regularly and then covering them with masking tape or pasters is a crucial part of marksmanship development. A target should have no more than 12 unmarked hits at a time.
Shooters often blast an entire box of ammunition at the target without checking and then marking it consistently. This is one of the worst mistakes that can be made when practicing for marksmanship development and self-defense.
Best practice is to check and mark your target after every string. When shooting this practice session, check and mark the target after every six shots.
- Reload with 7 rounds
- Primary hand shooting
- Place the pistol in the Primary Hand only. This is the hand you write with. Hold something like a briefcase or range bag in your other hand. Come to Low Ready.
- String 1 – Fire 1 shot. Return to Low Ready.
- String 2 – Fire 2 shots. Return to Low Ready.
- String 3 – Fire 3 shots.
- Unload
- Remove the magazine.
- Work the slide at least 3 times.
- Visually and physically check that the pistol is clear of all ammunition.
- Check the hits on your target and cover your hits with masking tape.
Ten feet Phase
At this distance, continue shooting shorter strings and include a malfunction clearance practice.
- Load with 6 rounds
- Begin at Low Ready
- String 1 – Fire 1 shot. Return to Low Ready.
- String 2 – Fire 2 shots. Return to Low Ready.
- String 3 – 3 shots.
- Check the hits on your target and cover your hits with masking tape.
- Remove the empty magazine.
- Let the slide go forward but do not press the trigger. Leave the pistol cocked.
- Reload with 7 rounds
- Begin at the MidPoint of the Drawstroke. At the MidPoint, the pistol is at chest level, the line of the sights is underneath the dominant eye, and the bore is parallel to the ground.
- String 4 – Aim at the target.
- Press the trigger to get a click. Work the slide to put a round in the chamber. This simulates either Empty Chamber Carry or having a malfunction. At the click, notice if the sights bounce around when encountering the empty chamber. If they do, it’s a sign of flinching.
- Fire 1 shot.
- Return to the MidPoint.
- String 5 – Fire 2 shots. Return to the MidPoint.
- String 6 – Fire 3 shots.
- Unload
- Remove the magazine.
- Work the slide at least 3 times.
- Visually and physically check that the pistol is clear of all ammunition.
- Check the hits on your target and cover your hits with masking tape.
Fifteen feet Phase
- Load with 6 rounds
- Begin at Low Ready
- String 1 – Fire 1 shot. Return to Low Ready.
- String 2 – Fire 2 shots. Return to Low Ready.
- String 3 – 3 shots.
- Check the hits on your target and cover your hits with masking tape.
- Remove the empty magazine
- Let the slide go forward but do not press the trigger. Leave the pistol cocked.
- Reload with 7 rounds
- Begin at the MidPoint of the Drawstroke.
- String 4 – Aim at the target.
- Press the trigger to get a click. Clear the malfunction just as you did at 10 feet.
- Fire 1 shot.
- Return to the MidPoint.
- String 5 – Fire 2 shots. Return to the MidPoint.
- String 6 – Fire 3 shots.
- Unload
- Remove the magazine.
- Work the slide at least 3 times.
- Visually and physically check that the pistol is clear of all ammunition.
- Check the hits on your target and cover your hits with masking tape.
Additional Practice
At 10 feet
- Load with 6 rounds
- Aim at a specific spot on the target
- Shoot the smallest group you can at the spot.
- Unload and check that the pistol is clear.
- Check the hits on your target and cover your hits with masking tape.
At 15 feet
- Load with 6 rounds
- Aim at a specific spot on the target
- Shoot the smallest group you can at the spot.
- Unload and check that the pistol is clear.
- Check the hits on your target.
Total – 48 rounds for the session.
In this session, you will have fired almost a box of ammunition and included several additional tasks relevant to self-defense. Firing short strings of fire and marking your target regularly will accelerate your marksmanship development. The MidPoint starting position is acceptable at ranges that do not permit drawing from a holster but starting from the MidPoint builds the skill of acquiring the sights as early as possible in the drawstroke. Beginning the strings from different positions and practicing clearing malfunctions are important self-defense skills that go beyond basic marksmanship. You will also have practiced unloading your pistol with a round in the chamber and ensuring that it is clear. The one sheet pump target is available at https://thetacticalprofessor.net/ . The sheet has the image of a gun on it, so no one can say you’re practicing to shoot unarmed people.
Friday Fundamentals – Getting Started
#Fridayfundamentals
Shooting To Live for the 21st Century – Concealed Carry Skills and Drills
Session 1
This session derives from two contemporary Courses of Fire, the original Michigan Council On Law Enforcement Standards Basic Pistol Safety Training Assessment and the New York State Concealed Carry License Live-Fire Proficiency Assessment https://troopers.ny.gov/minimum-standards-new-york-state-concealed-carry-firearm-safety-training to mimic and expand on the Recruit Training Programme described by Fairbairn and Sykes in their classic text Shooting To Live. Together the Assessments mimic the first live fire Practices of the RTP. To expand on it, the distance is increased from two yards used by F&S to 4 yards, the boundary in Proxemics between Social Space and Public Space.
The target consists of three sheets of printer paper stacked vertically in landscape mode. Fold one in half and use it as the top sheet. Put this array on whatever target backer is convenient. The Shoot-N-C is an optional addition on the middle sheet, used as the ‘aiming mark’ mentioned in STL.

This session can be done either at an outdoor range or almost all indoor ranges. The draw for the NYS Assessment is dry, i.e., no ammo in the gun, and most indoor ranges will permit it. There is no time limit so even ranges that require shooting no faster than one shot every three seconds can be placated.
Part I – MCOLES Safety Training Assessment
- String 1
- Load five rounds in the pistol and come to Low Ready.
- Bring the pistol to eye level, acquire a sight picture, and fire one shot.
- Return to Low Ready.
- Repeat four more times for a total of five shots.
- String 2
- Repeat String 1 for another five individual shots.
- String 3
- Load five rounds in the pistol and come to Low Ready
- Bring the pistol to eye level, acquire a sight picture, and fire two shots.
- Return to Low Ready.
- Bring the pistol to eye level, acquire a sight picture, and fire three shots.
The passing standard established by MCOLES was hybrid. Of the three strings, two had to have all five shots hit anywhere on all three sheets of paper. So it’s basically a 100% standard but you get to throw out your worst String.
The second part of this session is the New York State Concealed Carry License Live-Fire Proficiency Assessment. It uses the same target as the MCOLES Assessment. The distance is also four yards.
Part II – NYS CCL Live-Fire Proficiency Assessment
- Verify that the pistol is unloaded.
- Safely holster without loading.
- Draw the unloaded pistol, acquire a sight picture on the target, and dry snap one time.
- Safely holster without loading
- Draw the pistol and load with five rounds.
- To load, use the push method of loading as described by Fairbairn and Sykes.
- “To load the pistol, turn it over, grasping the slide firmly with the thumb and forefinger of the left hand.”
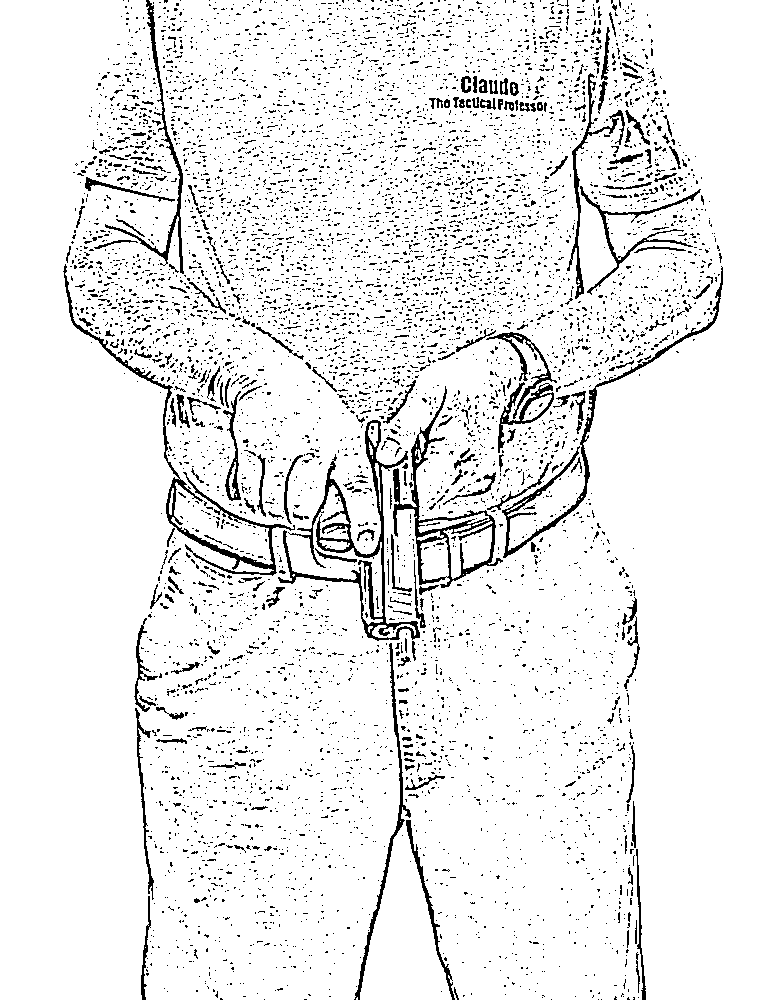
“Push forward with the right hand until the slide is felt to be open to its fullest extent.”

“Immediately that point is reached, release the hold with the left hand. The slide flies forward, taking with it and forcing into the breech, the topmost cartridge of the magazine, the pistol pointing to the ground meanwhile.”

- Achieve a proper firing grip and come to Low Ready.
- Bring the pistol to eye level, acquire a sight picture, and fire five shots.
- Verify that the pistol is unloaded.
- Safely holster
The passing standard for the NY State Proficiency Assessment is that 4 of the 5 shots (80%) must hit somewhere on the three sheets of paper.
The total round count for this session is twenty rounds. While that may seem low by some people’s standard, it is as much as many owners of snub nose revolvers and small pistols like the Ruger LCP will want to fire at one session. As a beginning, shooting this session provides some familiarity with shooting the pistol, what its concussion and recoil feel like, and an indicator of the shooter’s capability within a distance envelope that most criminal victimizations take place in.
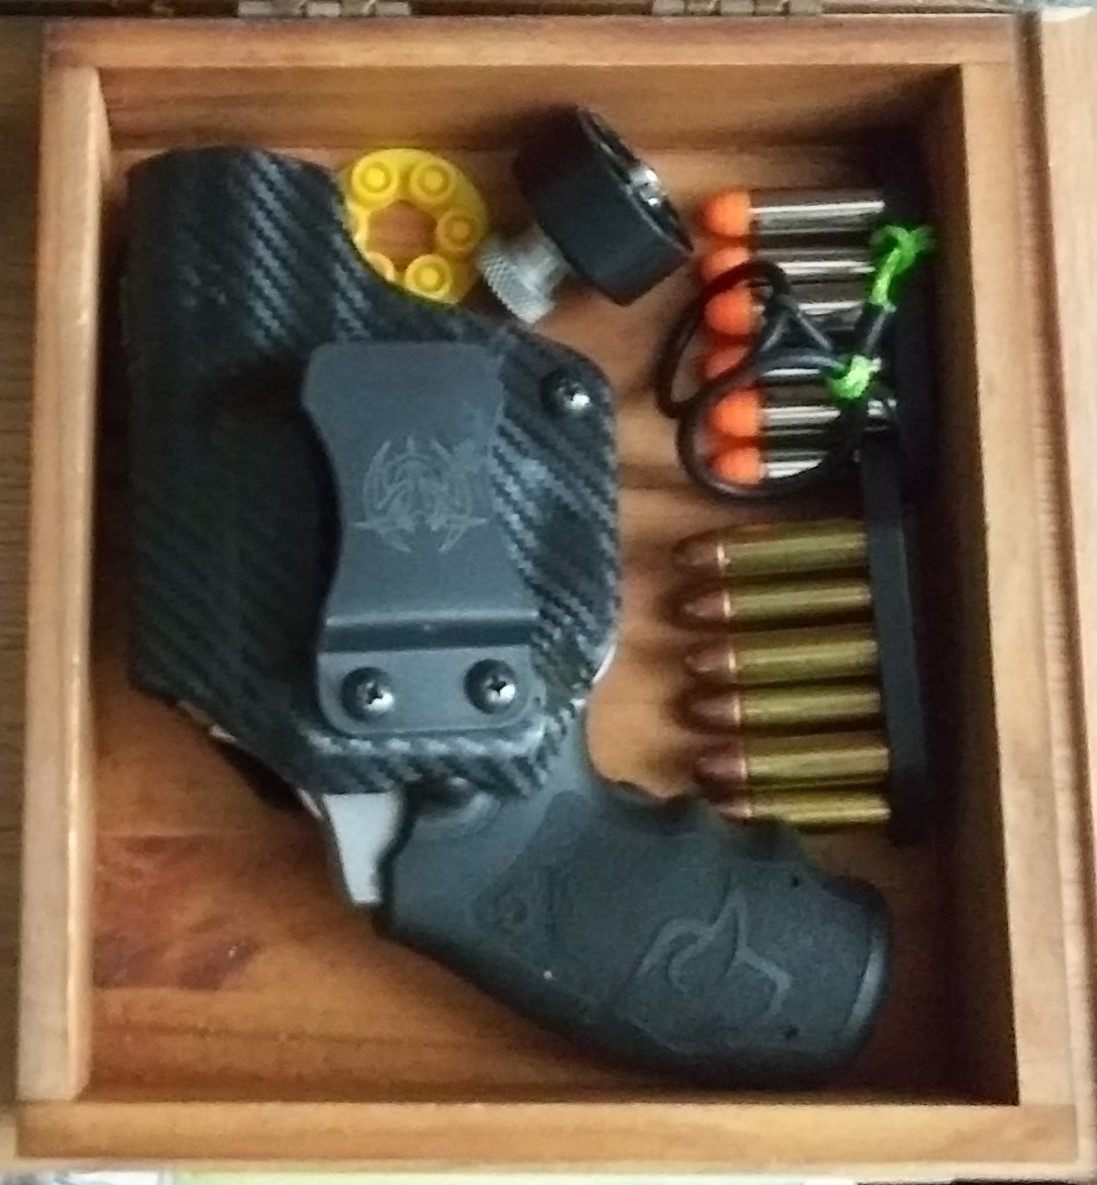
Final SCCY Report
Now that SCCY Industries https://sccy.com/ is out of business, it’s probably moot but some thoughts about my experiences with the guns are in order.
My first SCCY was provided to me in 2015 at no cost as a Testing and Evaluation sample. It was produced in 2014, as best I can tell by the serial number. At the time it was furnished, I was doing my second iteration of 1,000 Days of Dry Fire and I used it extensively for dry practice. I also eventually fired about 1,600 live rounds through it. The firing pin broke after about 10,000 dry snaps. During live fire, I had two Failures to Feed between 400 and 500 rounds. No other malfunctions. The ejector broke about the 1200 round mark but it still ejected, just sluggishly and erratically. In both cases, SCCY serviced the pistol and it then ran fine.
Last year (2024), I purchased a SCCY Gen 3 with my own money because I wanted to see what the upgrades had been. This time, it was a disappointment. The gun had a Failure to Chamber every 25 rounds. I traced this to sharp edges around the chamber mouth. SCCY sent me a new barrel and two more magazines, gratis, but the chamber in it had very noticeable machining rings. I didn’t know if it would work but installed it anyway.
A couple of months ago, I purchased an early production used Gen 2, produced in 2013, for $80 at a local range. The trigger on it was much better than my original Gen 2. Whether it has the original mainspring or a replacement, IDK. It had occasional Failures to Eject. The source of those Failures turned out to be a broken ejector. I bought a replacement on eBay and installed it.
For Memorial Day, in remembrance of my Army friends who are dead, I took all three to the range and practiced the destruction of the enemies of our great Nation. Since I’m going to be teaching the NRA Defensive Pistol Course https://www.nrainstructors.org/CatalogInfo.aspx?cid=41 for a Private lesson soon, the Course of Fire I chose was the DP Qualification Course. It consists of 34 rounds fired at distances of 3 to 10 yards. I shot it once with each of them.

All three SCCYs made it through without a malfunction. That’s not a 10,000 round torture test but probably more than 99 out of 100 gunowners will ever fire their handguns. Although they’re not target pistols, they all were sufficiently accurate to group in the eight inch 10 ring of the NRA AP-1.

Bottom line of the whole exercise is that when purchasing a pistol, shoot at least a box of ammo through it to be sure it works. Preferably a structured and measured session. Feeling the trigger and knowing the results it can produce is useful. Inspect the pistol for broken parts after shooting it. My colleague, the late Paul Gomez, was fond of saying “Shoot Yor Guns!” and that’s good advice.
The Demi-Practical Event
#wheelgunwednesday
Caleb Giddings of Taurus inspired me to design a Course of Fire derived from the Bianchi Cup Practical Event. I wanted something that wouldn’t demoralize newer shooters by making them shoot a demanding par time course at a long distance though.
The Bianchi Cup https://thecmp.org/competitions/cmp-pistol-program/cmp-bianchi-cup/ is being shot now at the Green Valley Rifle & Pistol Club in Missouri. The Cup goes back to 1979 and it is one of the most prestigious and lucrative shooting contests in the world. There are four Events at Bianchi, The Practical being one of them. It consists of 48 shots. There are 4 stages, fired at 10, 15, 25, and 50 yards, with 3 series of 2, 4 and 6 shots in each stage. Two targets are set up 1 yard apart, each having a four inch X Ring and a 10 point scoring ring 8 inches in diameter. The target is much larger overall but a competitor who sends more than one or two hits of the 48 outside the 10 ring doesn’t have a chance. The X Ring is to break ties.
Three series are shot at each distance. One shot on each of the targets, two shot on each target, and three shots on each target. At 10 yards, the three shot series is fired with the Support hand after drawing and transferring the pistol from the Primary hand to the Support hand. A nice thing about Bianchi is that it is six shot revolver neutral and there is no reloading on the clock.
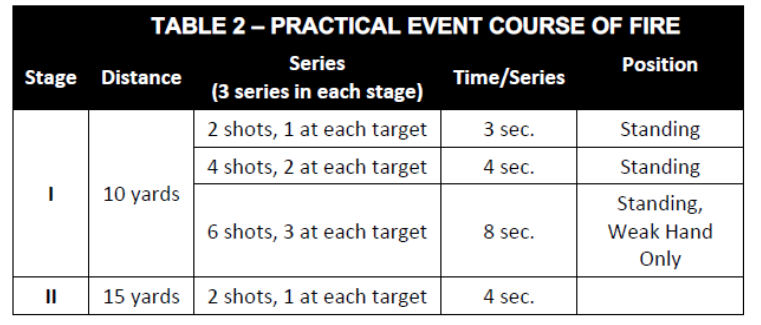
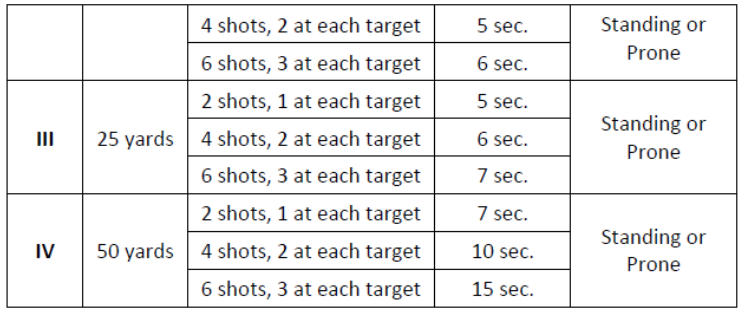
Since shooting a pistol at 50 yards would be soul crushing to most shooters, the Event I created is called the Demi-Practical, demi- meaning half https://www.merriam-webster.com/dictionary/demi-. The 50 yard stage is eliminated and the other distances are halved. This gives us a 36 round Event shot at 5 yards, 7 yards, and 12 yards. The Support hand shooting is changed to Primary hand only shooting with a time change to 6 seconds since there is no hand transfer. All shooting is done from the Standing position.
Since the AP1 is not a common target commercially, I substituted the IDPA target. Points down scoring works fine as a practical marksmanship metric. Par timing makes it easier to administer and score.
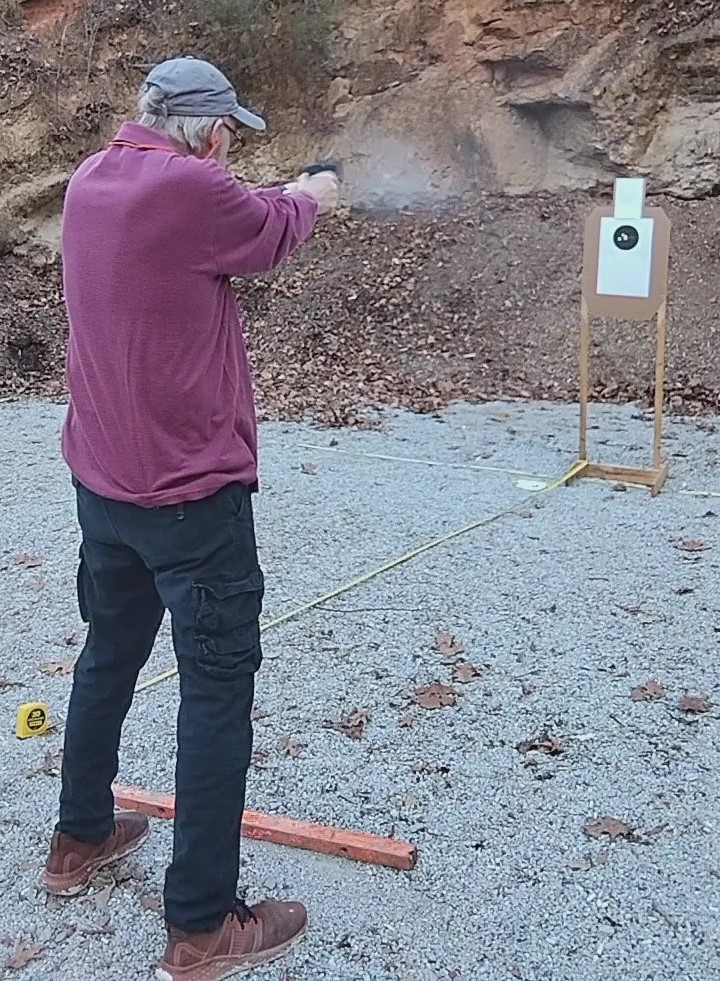
Today was a beautiful day so I took the opportunity to go shooting. My Taurus 856 snub was one of the test subjects.
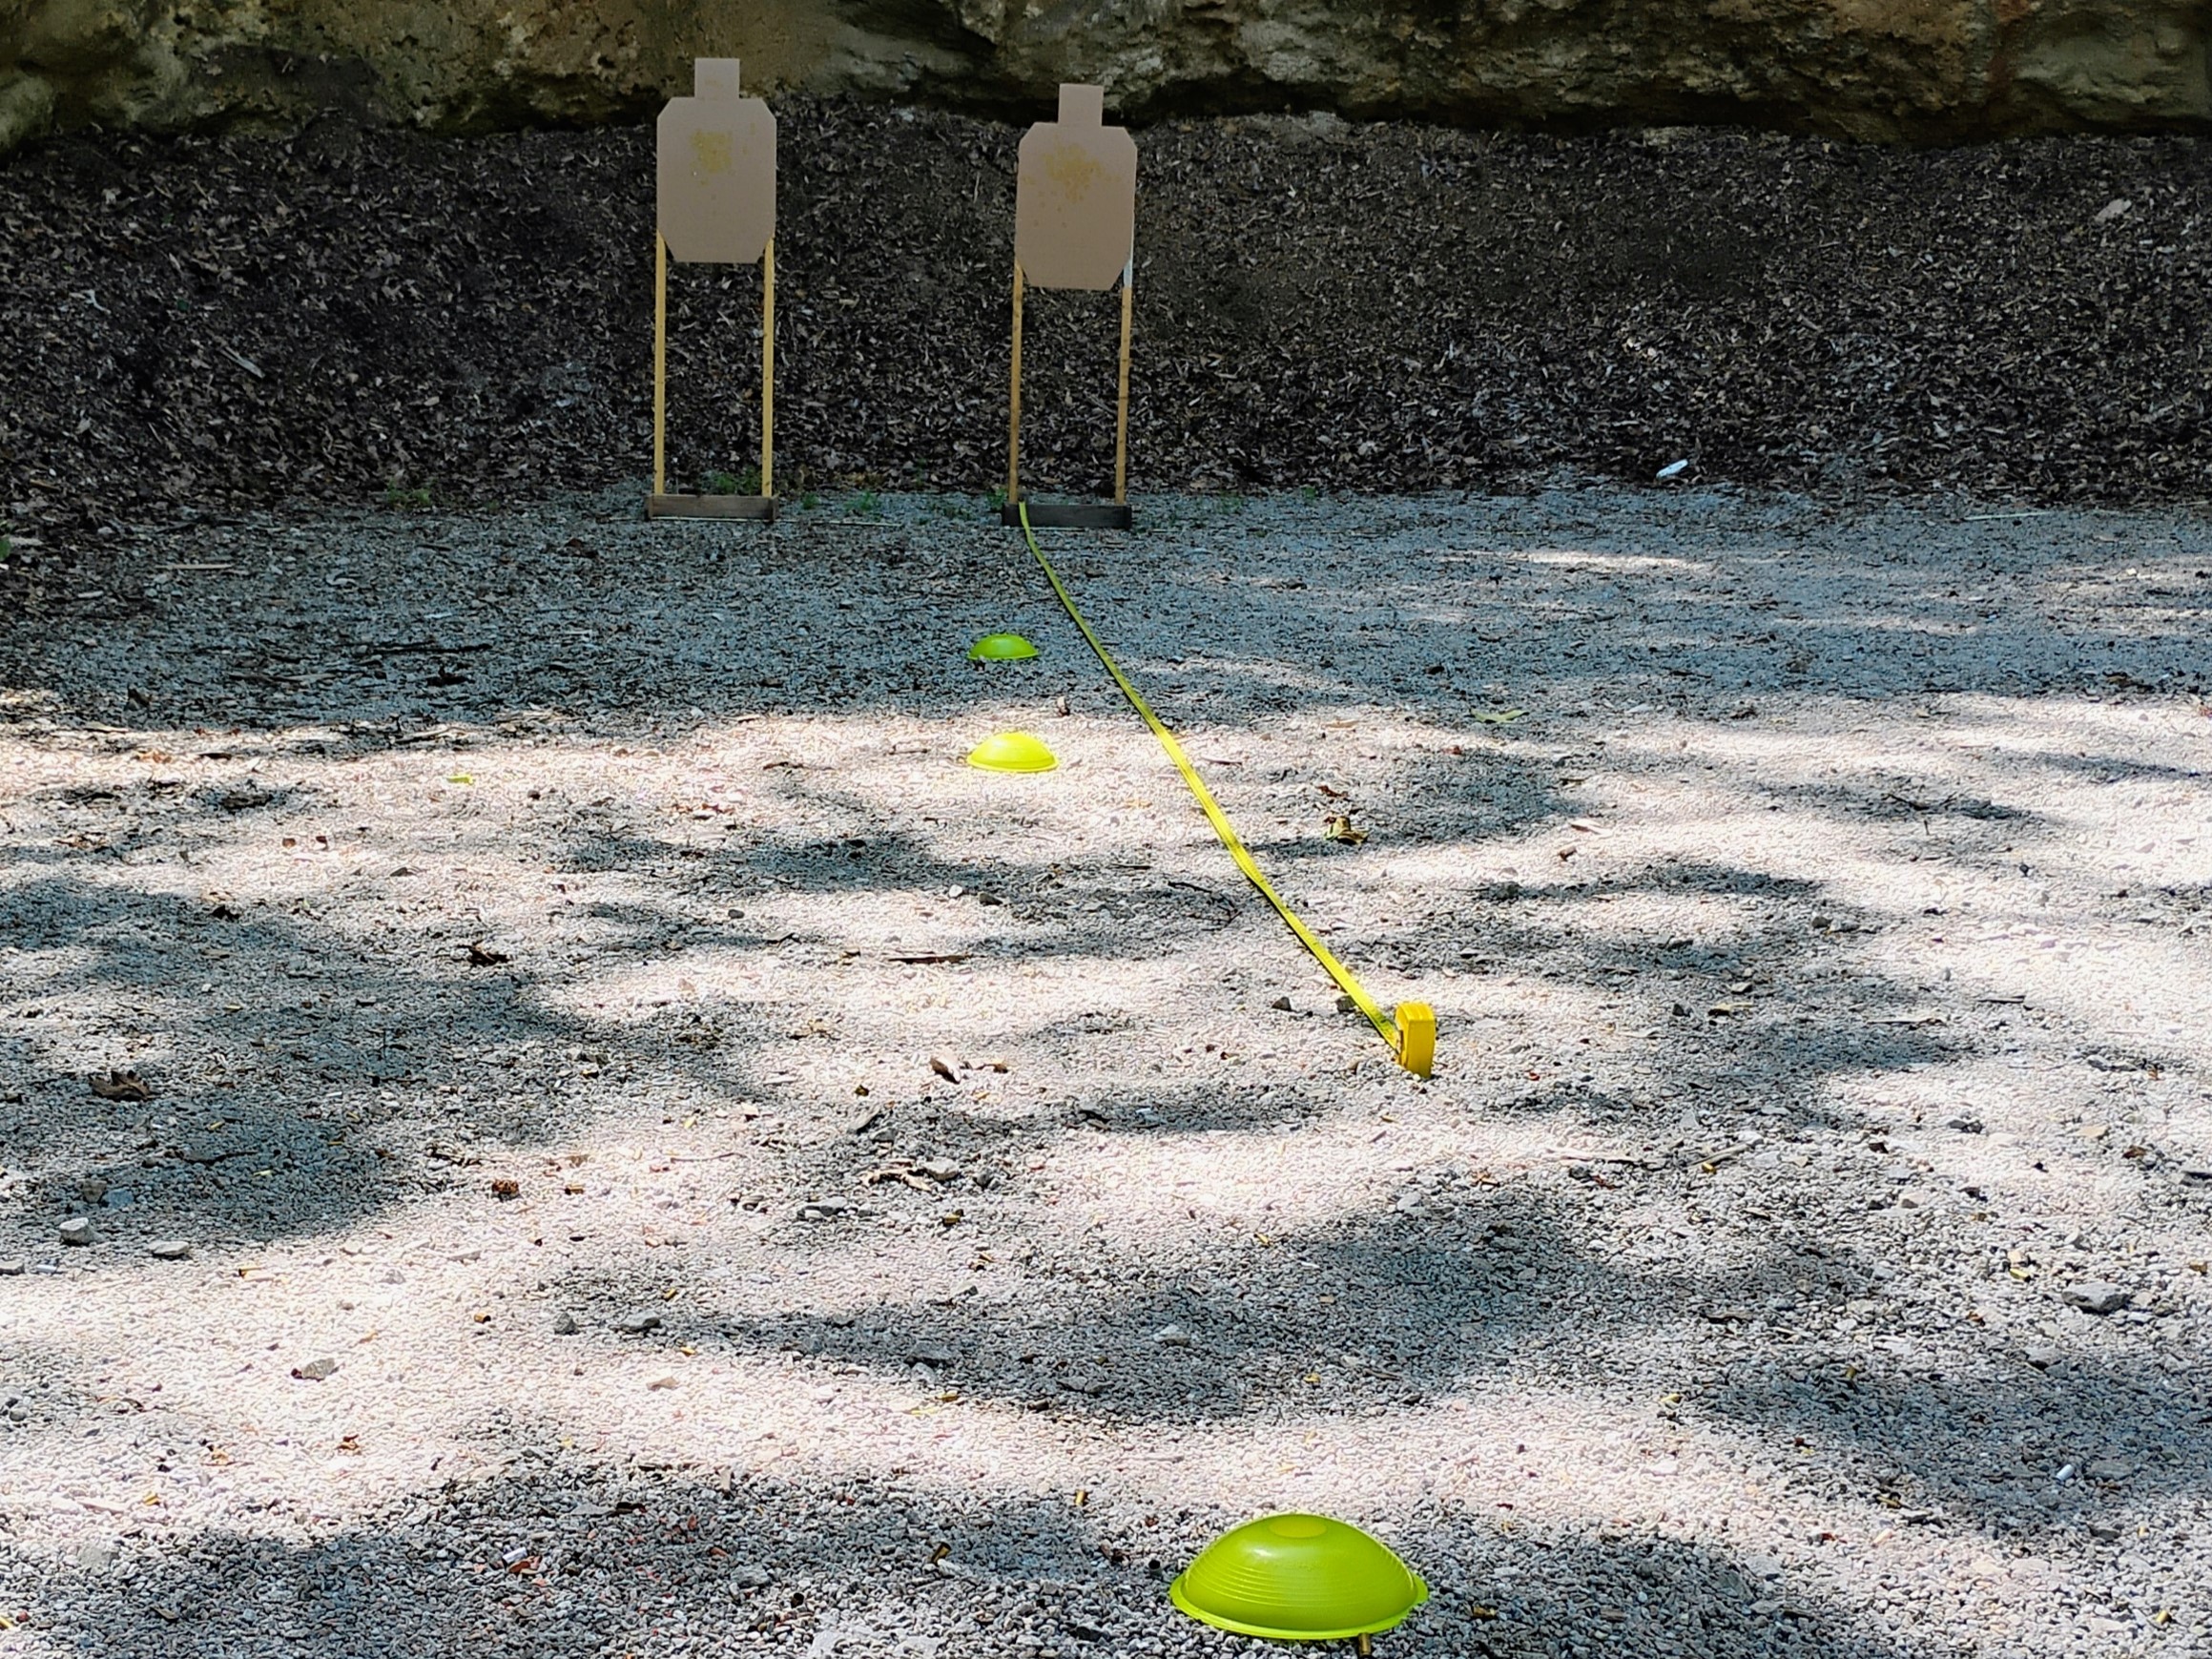
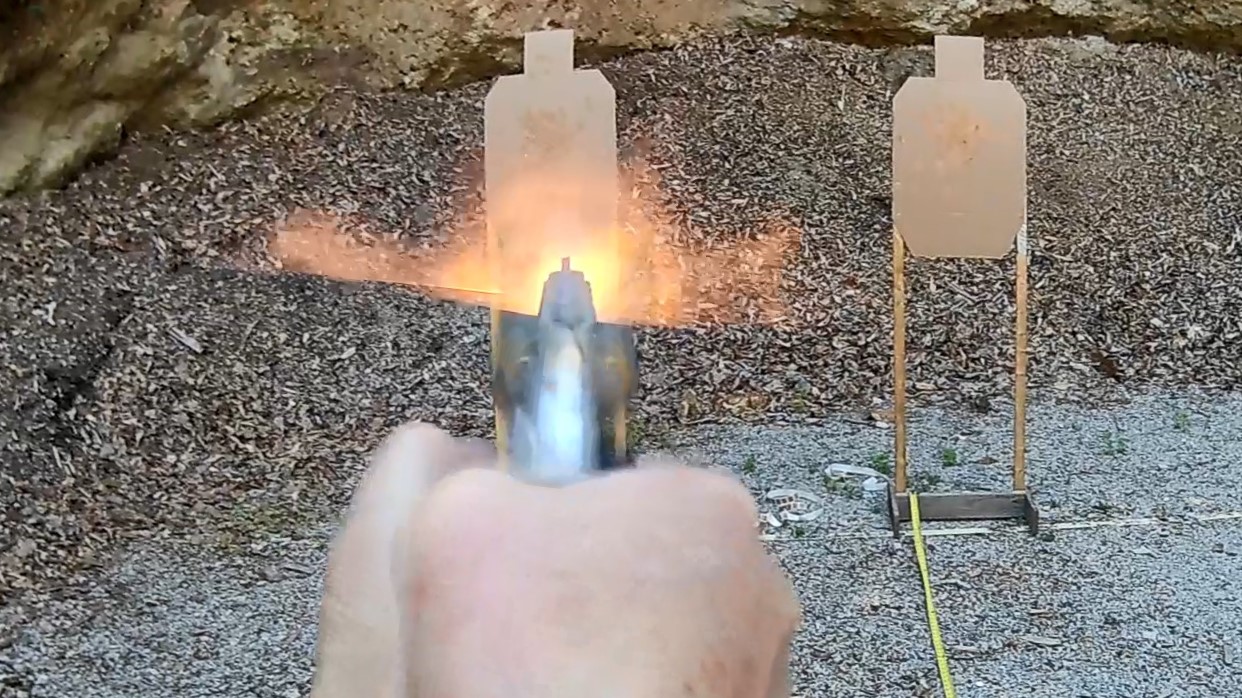
At 5 yards, I was 2 points down on the right target. At 7 yards, I was able to shoot both clean. At 12 yards, I was 1 point down on each target.
I had a good time shooting it. You might enjoy shooting it, too.
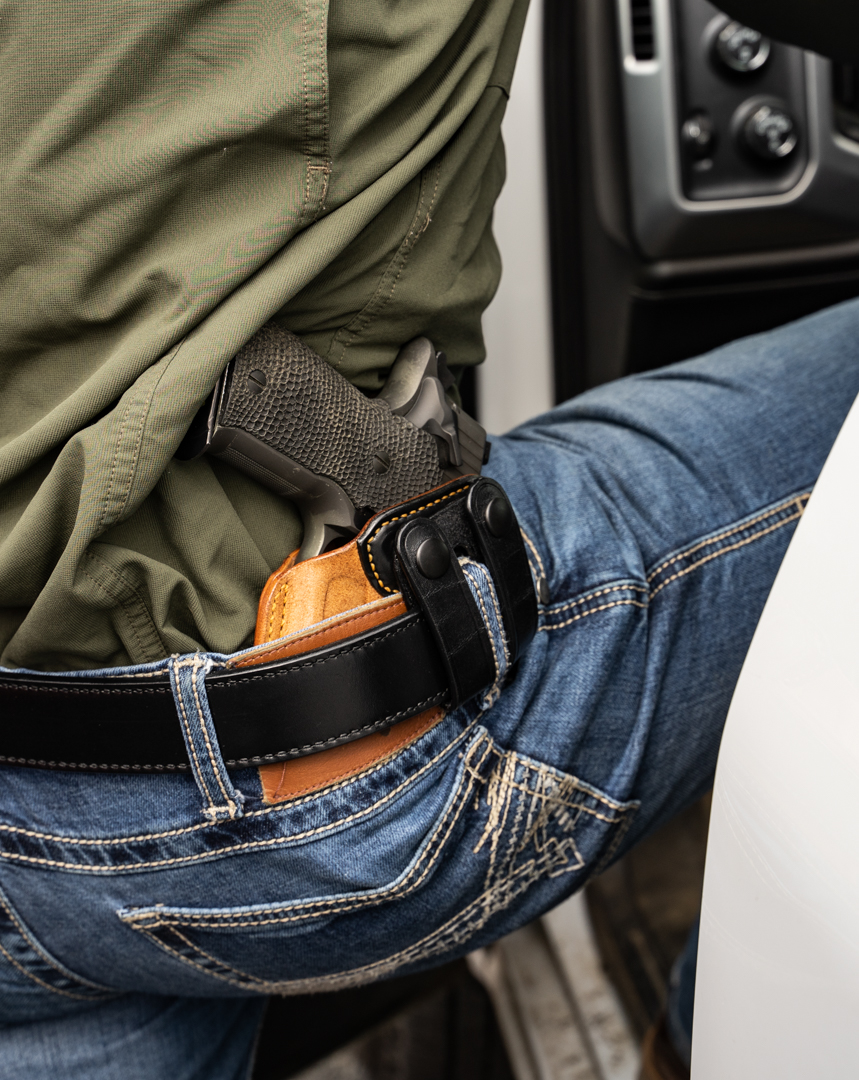
Open Carry v. Doofus Carry
A video is circulating on the Interwebz now about an unfortunate situation in which a man’s gun was snatched from him in a gas station. He chased the thief and was subsequently shot with his own gun.
Although I am not a fan of Open Carry, let’s analyze the situation in a little more depth. The proximate cause of the snatch was that he simply stuck his gun in his back pocket unconcealed and then walked into a crowded environment where a bunch of lowlifes were coming and going.
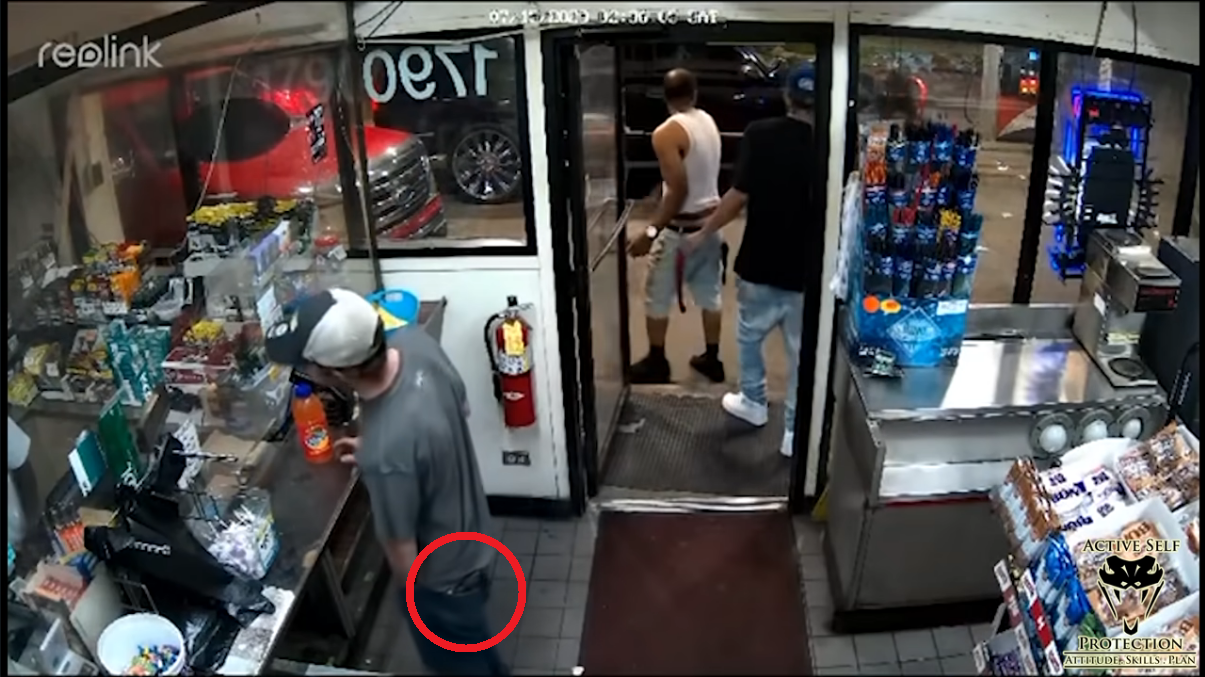
As a result, a ne’er-do-well nonchalantly walked up behind him and simply grabbed the gun out of his pocket.

The carry technique the man was using is more correctly described as “Doofus Carry,” having two parts. There’s no back story to the incident but it wouldn’t be surprising to find that his usual carry technique is in the side door pocket of his car. If so, then when he pulled into the gas station and saw a bunch of lowlifes going in and out, he decided to stick his gun in his pocket when he went in. He probably didn’t stick it in the front of his waistband because he had a striker fired gun and was concerned about ‘shooting his junk off.’
Sticking a gun in a back pocket is not the same thing as having it in a proper holster attached to the belt.
If my hypothesis is correct, it leads more credence to something the late Pat Rogers often said:
“Your car is not a holster.”
To reiterate, I’m not advocating Open Carry. But, if you’re going to carry a gun, at do it right. Have a decent holster and belt. Use it all the time when you leave home. If it’s uncomfortable and you don’t like wearing it, get a better holster or consider getting a more comfortable gun. “Your gun should be comforting not comfortable” is possibly the most ridiculous statement that’s ever been made about firearms.
The one good piece of advice in these retellings is that if your gun does get taken from you, Let it go. https://www.patreon.com/posts/let-it-go-107811846 The thief is now armed and you’re not. Chasing the felon means you’re going unarmed to a potential shooting. That’s a Serious Mistake. Don’t be foolish and assume the thief isn’t familiar and experienced with guns. As this incident shows, that’s the formula for a Negative Outcome.
If you like my work, join me on Patreon where I post more in-depth articles about shooting, marksmanship, and incident analysis.
Periodic Personal Evaluation
#saturdayskillsczech
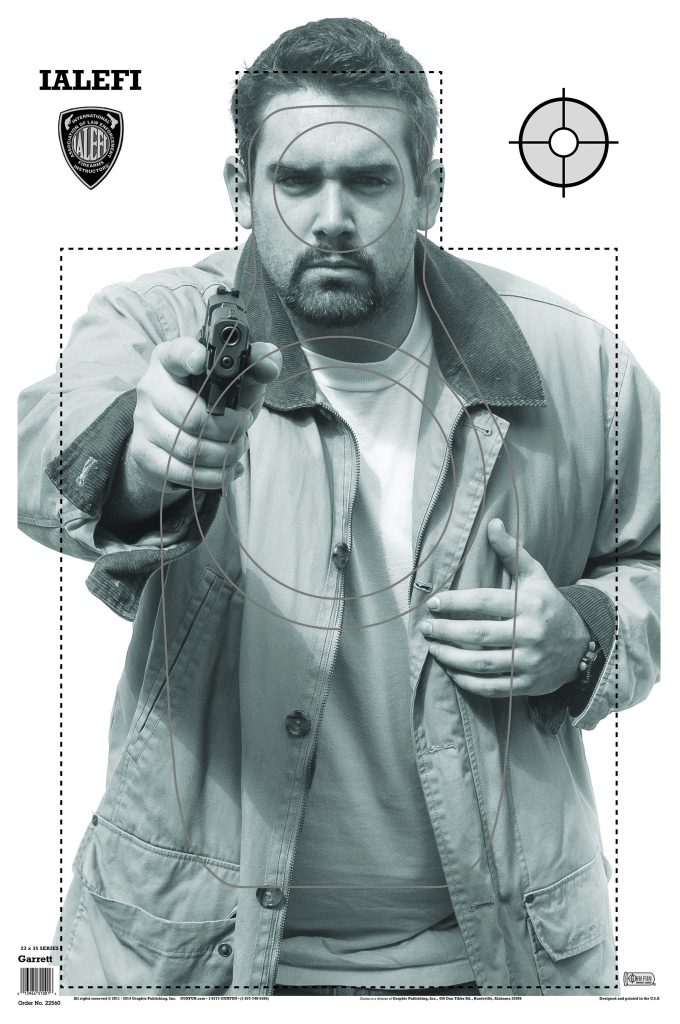
My December article for Shooting Illustrated is entitled Near to Far Marksmanship Practice.
https://www.shootingillustrated.com/content/near-to-far-marksmanship-practice/
Although New Jersey made a strong try to keep people from getting their License To Carry, the qualification course itself is a decent practice regimen. It’s also a useful metric for measuring your skill periodically.
Try shooting it on an IALEFI-Q and score it by the rings. Center ring gets 5 points, next ring get 4 points, balance of the Q receives 3 points. Hits inside the face circle score 5 points. Anything outside the Q scores 0. A Possible would be 250 points (5 x50 shots). If you don’t have an IALEFI target, just trace around a paper plate in approximately the same place on your silhouette. Your scoring is then 5 points for the circle and 3 points for the rest of the silhouette.
To make it a good tune-up and personal evaluation, shoot the course as a version of Jimmy Cirillo’s 1-2-3-6 drill. Instead of 6, fire 4 shots for the final string. Start loaded with 6 rounds only. Draw and fire 1 shot, reholster, draw and fire 2 shots, reholster, draw and fire 3 shots, reload, and immediately fire 4 shots. Bear in mind that the second most missed shot in shooting is the shot immediately following clearing a stoppage. The reality of transitioning back to trigger control after doing a gross motor manipulation can be tricky.
Since CCARE starts at 3 yards, at that distance shoot all face shots. Repeat the same sequence at 5 yards, 7 yards, 10 yards, and 15 yards but shoot for the 8 inch circle. After shooting each distance, tape your hits before moving to the next distance. At the end of the course of fire, place your pistol in whatever condition you wish to when you leave the range.
Although the CCARE is rather stringent for a CCW qualification, it has value as a practice regimen. It includes a minimum of 10 presentations to the target or 15 if you use the 1-2-3-4 sequence. There are multiple opportunities to practice reloading, and it’s highly manageable with wheelguns. Even J-Frames can work, just reload in a slightly different sequence. It’s a good use for a box of practice ammo.
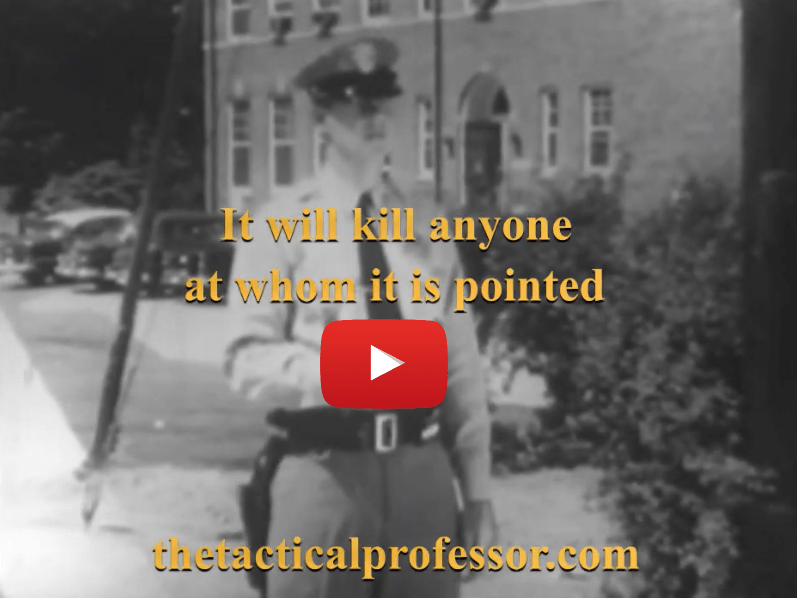
Historical Lessons – Gunpointing
Some lessons stand the test of time. Being prudent about whom guns are pointed at is one.
This is the first in a series of short videos that recall worthy lessons from historical films.
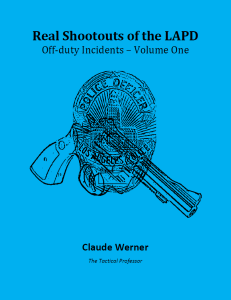
If you would like to purchase my ebook Real Shootouts of the LAPD, click on the image below.
ETA: This was posted on my Facebook page and it’s too good to not share.
Mr. Happy/Frowny Face Decisional Drill
For this drill you will need paper plates, a silhouette target, a deck of cards, and a table or platform to put the cards on. The object of this drill is to practice thinking with a gun in hand.
Draw faces on two paper plates. One plate with a happy face (no shoot), one with a frowny face (shoot). Different color markers for each plate, one Red and one Black.
Put the two paper plates on a silhouette.
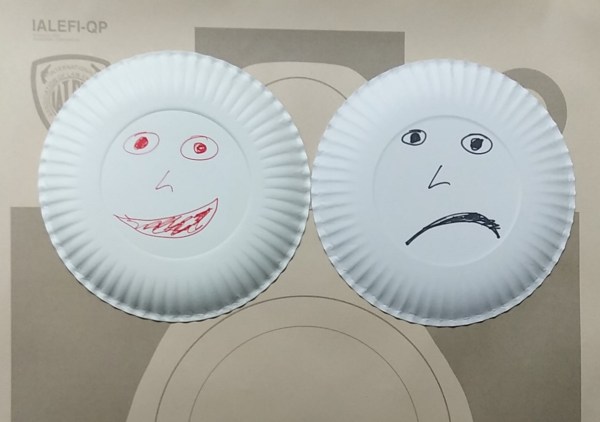
Place the silhouette at 4 yards
Use only the Ace, Two, and Three cards of all suits from a deck of cards and then shuffle those cards.
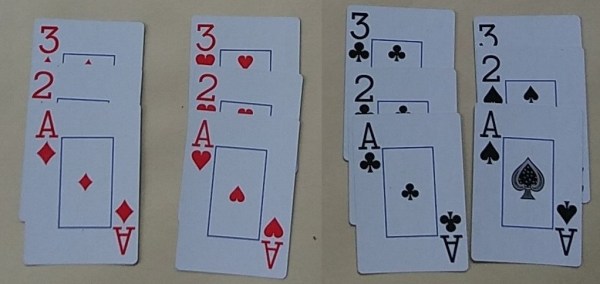
Place the cards face down on the table in front of you.
Sequence 1
Turn a card over.
If the card is the color on the frowny face, draw or present the pistol and then shoot the frowny face plate with the number of rounds indicated by the number of the card. I.e., if the card is the 3, then shoot 3 shots. The Ace is one shot.
If the card is the color on the happy face, don’t draw or present, i.e., no shooting.
Pistols having a capacity of less than 12 rounds will require reloading. This is a good opportunity to practice reloading skills under a bit of stress. Pistols with capacities more than 12 rounds can start loaded with less than 12 rounds to gain this additional practice opportunity.
After all 12 cards have been turned over, there should be 12 hits on Mr. Frownyface and NO hits on Mr. Happyface.
This drill can also be done at home using a SIRT pistol, a toy pistol, a water pistol, or some other simulation. The marksmanship might not be measured but the decision-making and thinking skills are the primary purpose of the drill.
The drill has several variations but for most people, this is a good start to work on decision-making.
Tactical Professor books (all PDF)
- Serious Mistakes Gunowners Make http://seriousgunownermistakes.com
- Indoor Range Practice Sessions http://indoorrangepracticesessions.com
- Concealed Carry Skills and Drills http://concealedcarryskillsanddrills.com
- Advanced Pistol Practice http://bit.ly/advancedpistolpractice
- Shooting Your Black Rifle http://shootingyourblackrifle.com
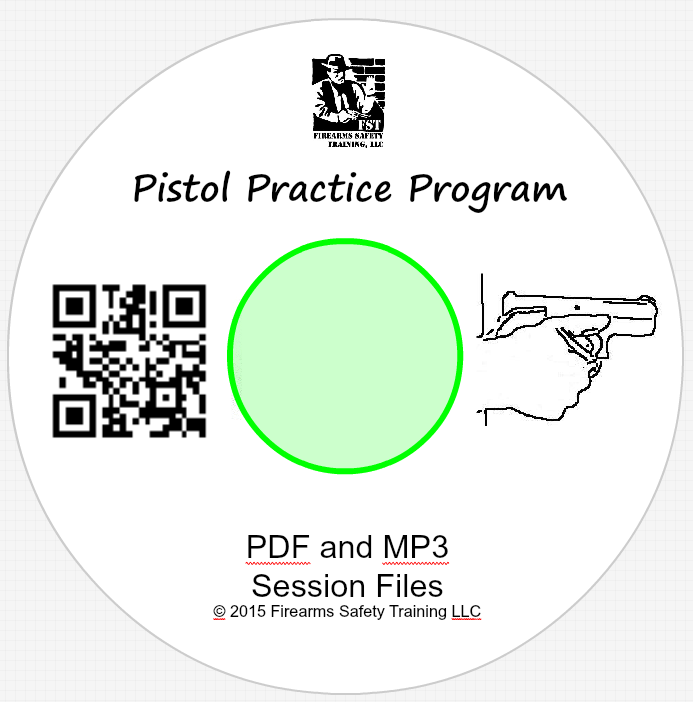
The Tactical Professor’s Pistol Practice Program
Why a Practice Program and not a training program?
I created the Pistol Practice Program (PPP) to fill a need for many gunowners. Most gunowners are self-taught and generally are not familiar with a structured approach to skill development. There is a great deal of information available now on how to shoot a pistol. However, there is much less information available on how to practice firearms skills over a period of time to achieve greater confidence and proficiency. As Aristotle said:
We are what we repeatedly do. Excellence, then, is not an act, but a habit.
My goal was to create a program that would get gunowners into the habit of shooting well. I created a step by step approach tailored to the needs of the casual shooter but challenging enough to satisfy the enthusiast. Designed as a series of range sessions, you can practice at your own pace as your schedule permits.
In the case of those who have attended training, your instructor probably said that a firearms class only provides a foundation of skills. To maintain those skills and improve, people who own pistols need to practice after training. Having a program also makes shooting more fun because the shooter develops a sense of accomplishment from the practice. This program is not concerned with what particular technique the shooter uses. Over time and by working the PPP, shooters will determine what works best for them.
The vast majority of gunowners only have access to indoor or public ranges where the type of practice they can do is rather restricted. The PPP takes that constraint into account and presents drills that are indoor range friendly and yet relevant to skill development. The livefire range sessions are then supplemented by dryfire sessions that can be done safely at home. Doing so allows you to develop skills that usually cannot be practiced at an indoor range. How to practice at home safely is thoroughly explained.
The PPP is available on CD. Its contents are mobile device friendly so you can copy the drills to your smartphone or tablet. If your device can access a PDF reader, you can easily take the exact drills to the range with you without having to lug along a book or write down the contents of a DVD. You can also put the dryfire audio sessions on your device for maximum convenience.
Those who are teaching a friend or loved one how to shoot a pistol will find the PPP provides a solid structure for their time at the range. For those who have attended a training class, the PPP provides a way to maintain and build the skills they learned in class. Law enforcement officers can use the PPP to keep your shooting skills tuned up in between qualifications and make qualifications less stressful. Put whatever practice ammo you receive from the department to good use instead of frustrating yourself by shooting the qual course over and over.
Contents of the PPP
- A Program Guide to get you started
- A Log Sheet to keep track of your progress
- 12 Primary Livefire Sessions (50 rounds and Indoor range friendly)
- 12 Secondary Livefire Sessions (50 rounds) for those who want more practice activity each time at the range
- 12 Structured scenarios designed to emphasize and train the interactive aspects of personal protection
- 6 audio guided Dryfire sessions (less than five minutes each)
- Tip sheets on firearms safety, interacting with law enforcement, common mistakes, etc.
I have drawn on a wide range of training experience, from teaching NRA Basic Pistol classes to my time as the Chief Instructor of the elite Rogers Shooting School, to create this Program. There is no doubt in my mind that shooters at all levels of skill and experience can benefit from it.
The PPP CD is available on my webstore. At $19.95, it’s about the cost of one box of centerfire ammo. Bonus: the first 100 orders will receive a Rogers Tap-Rack-Training aid, a $5.00 value, at no charge.
Hardware solutions to software problems
Several times, I have been pointed to an article about a cop who decided he needed to carry a lot more ammo on the job. The story is an excellent example of having the answers right in front of you and then ignoring them. While I don’t disagree with the idea of having plenty of ammo, it wasn’t the real solution to the problem in his case.
The nitty gritty of the story is that a cop got into an extended shootout with a determined attacker. The shootout went on for quite a while with a lot of spraying and praying on both sides. Eventually, the cop shot the suspect in the head and the situation was over.
As the incident progressed, he figured out that the answer to his problem was a software solution.
Then I told myself, ‘Hey, I need to slow down and aim better.’
My mother used to frequently comment about life in general, “If you don’t take the time to do it right in the first place, what makes you think you’ll have the time to do it over?” That’s a good commentary about situations like the one the officer encountered.
In retrospect, the officer mentioned that there were also other software solutions available. “ ‘I didn’t have time to think of backing up or even ramming him,’ Gramins said. ‘I see the gun and I engage.’ ” I’ve never put it on a timer but I bet that stepping on the gas pedal is faster than drawing from a security holster while seat belted in a car. Just recently a police officer proved the efficacy of this solution. As Massad Ayoob said many years ago, “What is a car to a pedestrian? A multi-ton high speed battering ram.”
But the officer’s overall conclusion about his experience was a hardware solution, i.e., ‘Be ready to do a bunch of spraying and praying’ by carrying 145 rounds of ammo on his person. His conclusion doesn’t follow from his self-evaluation of the solution to his problem. Perhaps, despite being a “master firearms instructor [I’m not sure what that means] and a sniper on his department’s Tactical Intervention Unit” he needs to learn to shoot a handgun on demand in a way that gets good results.
He did draw one conclusion I agree with, to wit: the mighty .45 ACP isn’t all it’s cracked up to be. The officer switched from carrying a Glock .45 to a Glock 9mm. He’s not the first police officer I know of who has drawn that conclusion after a gunfight.
In one of the incidents my colleague Tom Givens describes in the DVD Lessons from the Street, the citizen came to the conclusion that he needed a larger caliber pistol. My analysis in that case was similar to the solution the author of the story about the police officer’s situation drew, “Practice head shots.”
I often see people draw erroneous conclusions from their experiences. While we think about ‘the fog of war’ as occurring during the battle, it often sets in afterward, too.

You must be logged in to post a comment.