Revolvers do break
The two loudest sounds when shooting are:
- A bang when expect a click
- A click when you expect a bang
A click when you expect a bang with centerfire revolvers often means that tools will be involved in fixing the problem. An example is a broken hammer nose on older Smith & Wesson revolvers. Until the 1990s, these revolvers had the ‘firing pin’ integral with the hammer. S&W refers to this part as the ‘hammer nose.’ If it breaks, nothing short of replacing it will make the revolver fire.
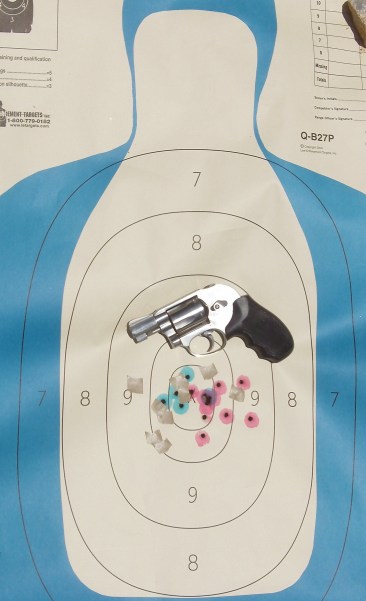
Two steel J Frame revolvers are compared in this picture. The tip of the hammer nose circled in red has broken off. It will require replacement before the snub will be functional again.

S&W changed the design of its revolvers before the Turn of the Century. The firing pin was moved to the frame from the hammer. But there are millions of older S&W revolvers that have the hammer nose design. Issues have arisen in the past because S&W has not manufactured the part in many years. They were available on the used part market but the supply was spotty. There are now two sources for newly manufactured J Frame hammer noses.
This part is best installed by a qualified gunsmith. It may require minor fitting. The hammer nose rivet that holds it in place may also need to be replaced.
The Model 36 with the broken hammer nose was manufactured sometime before 1975. It has been through considerable live fire and dry practice. When using an older gun, it’s a good idea to inspect them on a regular basis to see if any parts have broken. The hammer nose in particular will not cause an obvious change in function if it breaks but the gun will not fire.
The ‘Wizard Drill’ and the J Frame
Ken Hackathorn created a very simple skill evaluation drill that he calls the ‘Wizard Drill.’ It only requires five rounds of ammo and can be shot on any range that allows work from the holster
Take an IDPA or IPSC (USPSA) target and place a 4 inch circle centered in the head of the target. You will shoot 4 strings of fire at 3, 5, 7, and 10 yards. Each string of fire has a time limit of 2.5 seconds with 2.7 allowable because of the length of the buzzer’s beep. The drill is shot from a concealed holster. If you use a pocket holster, you may start with the gun in your pocket and your hand on the gun. Otherwise, hands normal at sides, not touching the gun until the buzzer.
Caveat Emptor
Know what you’re buying. This is even more important when you can’t see it in person. When it’s an intangible, such as information, you must be especially careful.
As part of my research for The J Frame Project, I was perusing eBay last night for J Frame stocks. One of the items I came across was a ‘Hogue Tamer‘ for a very low price. It didn’t look quite right (a color I didn’t recognize Hogue ever making) so I czeched into it a bit further. I realized that someone had replaced the stock on their Polymer Bodyguard with the Tamer and then put the Bodyguard stock back in the Tamer package.

Friday Fundamentals – Ball and Dummy
What is ball and dummy?
Sometimes, we instructors take our subject matter knowledge for granted. A friend posted that she was pulling a few of her shots low and left. She’s right handed. My reply was ‘ball and dummy.’ She then asked me what that meant.
Ball and dummy means interspersing dummy (inert) ammunition among your live ammunition during a practice session. It’s a key training tool at the elite Rogers Shooting School. The dummies can be random, e.g., three or four dummies in a 15-17 round magazine. They can also be alternating; i.e., live, dummy, live, dummy, live, dummy, etc. for the entire magazine.
The purpose of ball and dummy is to watch the sights when the dummy round is clicked on to learn how smoothly, or not, you are pressing the trigger. Ball and dummy for marksmanship training is NOT the same as an Immediate Action Drill. For an IAD, you want to clear the malfunction as quickly as possible. With ball and dummy, you want to observe the sights for at least 300 milliseconds (about 1/3 of a second) after the hammer or striker falls to see what your trigger press was like and THEN clear the malfunction. A useful benchmark is to count ‘One thousand’ after the hammer/striker fall and then clear the malfunction. That’s called ‘followthrough.’
Alternating ball and dummy is both the most soul crushing and, at the same time, the most productive marksmanship drill you can do. You’ll see just exactly how smoothly you’re pressing the trigger when you do this drill. For most people, the answer is about as smoothly as Stephen Hawking, the genius theoretical physicist who has had ALS for decades.
With a revolver, for instance the iconic J frame, this exercise is extremely easy. Load a cylinder of ammo. After each shot, followthrough for one second. After you have completed your followthrough, open the cylinder, spin it, and then close it. Press the trigger smoothly until another round fires. Then open, spin, close, and repeat. Do this until you have fired all the rounds in the cylinder. Continue doing this for about four cylinders.
Whether using a revolver or autoloader, you gain useful visual feedback about what a good trigger press feels like. There’s a reason we refer to ‘hand-eye coordination.’ The visual process teaches the tactile process as to what works and what doesn’t. After a while, you will become annoyed with seeing the sights nosedive and begin to press the trigger smoothly. That’s the point where you start to become a marksman.
Tactical Professor Information Products
STOPP Presentation at Rangemaster Tactical Conference
https://tacticalprofessor.wordpress.com/2021/09/14/stopp-presentation-now-available/
https://www.payloadz.com/go?id=3381307
Books (all PDF)
- Thinking Clearly about Self-defense and Personal Protection https://www.payloadz.com/go?id=3377208
- Real Shootouts of the LAPD https://realshootoutsofthelapd.com/
- Serious Mistakes Gunowners Make http://seriousgunownermistakes.com
- Indoor Range Practice Sessions http://indoorrangepracticesessions.com
- Concealed Carry Skills and Drills http://concealedcarryskillsanddrills.com
- Advanced Pistol Practice http://bit.ly/advancedpistolpractice
- Shooting Your Black Rifle http://shootingyourblackrifle.com
- Package deal of Thinking Clearly about Self-defense and Personal Protection, Serious Mistakes, Indoor Sessions, Concealed Carry, and Shooting Your Black Rifle (50% off) https://store.payloadz.com/details/2644448-ebooks-sports-shooting-drills-package.html

You must be logged in to post a comment.