S&W Revolver Frame Sizes (part II)
#Smith&WessonSunday
Broadly speaking, Smith & Wesson swing out cylinder (Hand Ejector) revolvers come in nine frame sizes. In order of increasing size, they are: M, I, Improved I, J, J Magnum, K, L, N, and X frame.
Perceiving a market for a more powerful pocket sized revolver, S&W introduced the J Magnum frame in 1995. It was created to accommodate the length of the .357 Magnum cartridge in a J frame revolver, having a longer cylinder and larger frame opening. This frame was first introduced as the Model 640-1 in 1995. Since then, other J frames, even .38 Specials, have been offered in this frame size. In 1996, the Model 60 (60-9) and 642 (642-1) were changed to the J Magnum sized frame.
The K frame was the original .38 caliber Hand Ejector frame introduced in 1899 as the Military & Police 1st Model. It served as the service revolver for the US Army in .38 Long Colt caliber until the adoption of the Colt 1911 autoloading pistol. The K frame was the most widely used and issued POlice revolver for nearly a century. The US Air Force continued to issue K frame revolvers to its Security POlice until almost the end of the 20th Century. It has been produced in a wide variety of calibers from .22 Long Rifle up to .357 Magnum but .38 S&W Special was the most popular.

Model 10-5 (K frame) on reduced Langrish Limbless target from the 1930s
Bill Jordan, of the US Border Patrol, convinced S&W to make the K frame size revolver in the .357 Magnum cartridge for POlice service. The .357 had only been produced in N frame revolvers until 1955. His original idea was to practice with .38 Special and only occasionally use .357s. As people started shooting .357 Magnums in quantity, they found that it was hard on a K frame. This led to the introduction of the L frame, which along with the other larger frame sizes will be covered in the next installment.
Tactical Professor books
Indoor Range Practice Sessions http://indoorrangepracticesessions.com
Concealed Carry Skills and Drills http://concealedcarryskillsanddrills.com
Advanced Pistol Practice http://bit.ly/advancedpistolpractice
Shooting Your Black Rifle http://shootingyourblackrifle.com
Serious Mistakes Gunowners Make http://seriousgunownermistakes.com
Part I of the series
https://tacticalprofessor.wordpress.com/2019/09/08/sw-revolver-frame-sizes-part-i/
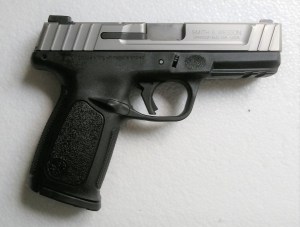
Shooting the S&W SD9VE
I like inexpensive pistols. Not everyone can afford ‘mid-priced’ ($500-700) pistols, so I like to give those folks some options. Over a year ago, I picked up a S&W SD9VE on sale for about $300. It proved serviceable and reliable but the trigger was a little heavy. It wasn’t unmanageable but it was hard to shoot to the level I like to with it. The three dot sights had to go, so I blacked out the rear dots with a black marker and painted the front sight orange.
Shortly afterward, Apex Tactical Specialties was selling their upgrade kit at the NRA Annual Meeting for half price, so I bought it. It consists of several replacement springs and an ‘Action Enhancement Trigger.’ I didn’t care much for the hinged trigger on the gun, so I bought the kit. After installing just the spring kit, the trigger pull became noticeably easier to use. It lightened up enough that I didn’t even install the trigger.
Yesterday, I decided to install the trigger also. It is a Glock® style trigger with a safety bar that also reduces the length of travel and pull weight. Contrary to what the common taters on the Apex YouTube installation videos said, it was easy to install and didn’t mess up my gun. Some people have no mechanical aptitude and simply should not work on mechanical devices more complicated than a ball point pen, much less firearms kept for personal protection.
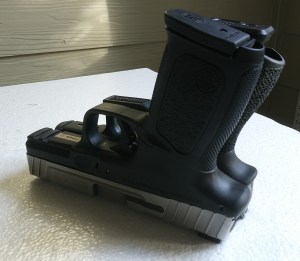
Another interesting factoid I discovered was that the SD9VE is actually the Glock 19 sized pistol that people have been clamoring for S&W to make for as long as I can remember. When I put the two pistols side by side, it was obvious they were in the same size class.
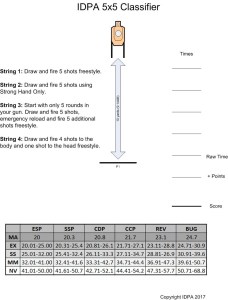
To test out what I could do with it, today I shot the IDPA 5×5 Classifier. The Classifier is a simple yet challenging test of equipment and shooter. It is only 25 rounds, requires only one target, and can be set up and shot in less than five minutes. It’s a little difficult for newer shooters, so I didn’t include it in Concealed Carry Skills and Drills.
I was able to shoot an overall score of 23.37 (3 points down), which put me squarely in the middle of Expert classification. Considering how little centerfire ammunition I’ve shot in the past few months, I think that gives a good indication of the pistol’s potential.
My gun has fired close to 1,000 rounds without a malfunction, so it has proven to be very reliable. Overall, this is a very underrated pistol. I’m looking forward to putting more rounds through it.
Note that I bought the pistol and the upgrade kit with my own money. I get no promotional consideration for writing about it, I just like the gun.
Comparing capabilities
For a long time, I’ve wanted to do a comparison of two very popular pocket pistols; the Airweight J Frame and the Ruger LCP. This #wheelgunwednesday, I made it happen. In this case, I used a S&W 642-2 for the Airweight.
The test I used for the comparison was the Nevada Concealed Firearms Permit Qualification Course. I used this as the graduation exercise in my Snub Nose Revolver Classes many times. It’s still one of my favorite CCW qualification courses. The course goes as follows:
The humanoid target, B27 or B21 or equivalent as determined by the firearm instructor shall be utilized.
For 6 shot or higher capacity:
3 yards 6 rounds No time limit Freestyle
5 yards 12 rounds No time limit Freestyle
7 yards 12 rounds No time limit Freestyle
For 5 shot or lower capacity:
3 yards 5 rounds No time limit Freestyle
5 yards 10 rounds No time limit Freestyle
7 yards 10 rounds No time limit Freestyle
A total of 30 rounds for 6 shot or larger capacity, 25 rounds for 5 shot capacity must be fired. A 70% minimum (18/25, 21/30) must be scored to pass.
Notice that as with the majority of State Qualification Courses for Private Citizens, drawing from the holster is not required. Nevada is not one of the States that forbid drawing from the holster, so I include a little holster work.
The way I did the test was to:
- Use the -1 zone of the IDPA target. Then, I fold the bottom tapered part up behind the target. This gives an area approximating the FBI QIT target, which I like.
- Shoot 25 rounds with both guns, even though the LCP would fall into the ‘6 shot of higher capacity’ category. This gives an apples to applies comparison of the two guns.
- Conduct the first Stage as five individual one shot draws.
- Do the second and third stages as two individual strings of five shots each.
- Carry the 642-2 in an AIWB holster, concealed under a polo shirt.
- Carry the LCP in a pocket holster.
- Start the draws with hand on gun.
- Start the Five shot strings with the gun at Low Ready, aimed below the base of the target.
In the end, I was able to achieve slightly better results with the 642-2 (19.87 seconds) than with the LCP (20.71 seconds). I’m not sure a 4% difference is worth writing home to Mom about, though.


Both guns were mostly stock. The front sights on both are painted with Fluorescent Orange paint. The LCP has a Hogue Hybrid Handall installed. This makes the gun much more pleasant to shoot and I highly recommend it. The 642-2 wears Sile rubber stocks, which are no longer made, unfortunately. No special trigger work has been done on either, other than a fair amount of dry practice.
In the end, either of these in your pocket will provide more personal protection than some big honking clunky autoloader that gets left home. What’s the best concealed carry handgun? The one you have on you.
How much does barrel length matter?
The timer and the target sometimes tell interesting and unexpected tales. A long held opinion is that a longer barrel is easier to shoot, both in terms of accuracy and shot to shot recovery, than a shorter barrel. For #wheelgunwednesday, I decided to put this theory to the test. Several different revolvers of varying frame sizes, weights, and barrel lengths were used to shoot a standard drill and compare results.
Justin Dyal wrote an article for SWAT Magazine about a drill he created called Five-Yard Roundup. It was used as the semi-final test at the Rangemaster 2018 Tactical Conference. Especially in the context of snub revolvers, it’s a good test of skills that may be required for personal protection.
Wheelgunning at the Tactical Conference
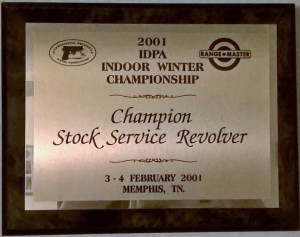
This past weekend, Friday through Sunday, was the 20th Anniversary Rangemaster Tactical Conference. I have a long history of wheelgunning at the Conference, having shot it with a revolver in 1999 through 2001.
This year was no exception. I’ve also taught for many years at the Conference. This year I decided to re-visit teaching my Intro to Snubby Skills block of instruction. One of the other trainers had to cancel due to a family emergency. This gave me the opportunity to conduct my class on both Friday and Saturday. A total of 37 shooters took the two classes. I kept it to two hours and less than 50 rounds. Shooters sometimes lose their focus if the class is longer or the round count is higher and I want to set them up for success.
The topics I focused on were:
- Grip the snub firmly
- See the sights
- Press the trigger smoothly
- Followthrough
We did all the drills dry first and then live. For the live practice, most included spinning the cylinder after a few shots to create a ball and dummy drill. Revolvers do this much more efficiently than autoloaders. I also emphasize loading with loose rounds because speedloaders are not as secure an ammunition holding device as an autoloader’s magazine.
Photo credit: Roka Arms
As the final exercise, the shooters fired all five shots into an eight inch circle, reloaded with two loose rounds and then fired both shots at a facial target 3 inches by 4 inches. This is a good exercise for practicing shooting quickly and then accurately.
After the second class, I then shot the Pistol Match with a Model 65 S&W revolver. Out of 186 people who chose to shoot the Match, two of us used revolvers. The Match featured turning targets, which made it both challenging and fun. The entire match is shot with the shooter’s equipment concealed.
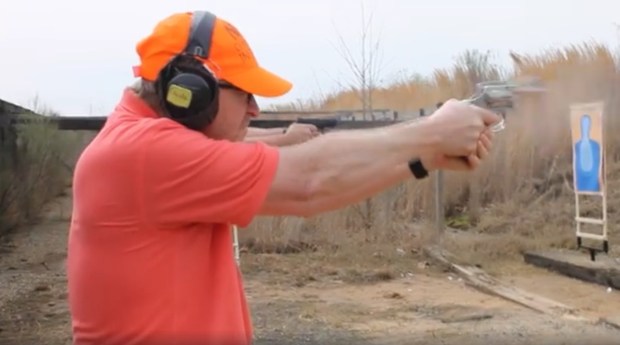
Photo credit: Philip Young III
I’ve been using a Galco Walkabout holster for my J Frame so I used a homemade Kydex centerline speedloader carrier. I’m finding that a speedloader carrier at the centerline is extremely fast. One observer noted that on the Stage that required a mandatory reload, I finished first among my squad.

For each string, we had to shoot a given number of rounds in a fixed amount of time while the target faced. Those who fired a perfect score made it into the Semi-Finals.

The Semi-Finals were held on Sunday morning. Turning targets were used again but this time the Course of Fire was only 10 rounds and was shot on a B-8 25-Yard Timed and Rapid Fire Target. The Course of Fire is revolver neutral but I threw two shots into the 7 ring and that put me out of the running for the Final Shootoff.
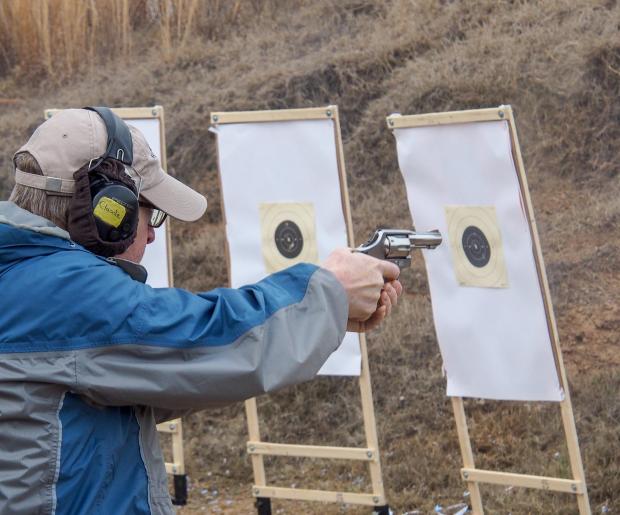
Photo credit: Tamara Keel
The Final Shootoff was a single elimination contest shot on reactive falling targets. Two mannequins with a concealed steel hit area had to be knocked down first. Then a mini Pepper Popper had to be knocked down. Whichever shooter knocked down the Popper first was the winner. The competition was fierce and Mr. Gabe White was the winner.
The Ladies did not have a Semi-Final and the top eight Lady shooters of the Match went straight to the Shootoff. It followed the same format as the Men’s Shootoff. Once again, the competition was fierce. Ms. Melody Lauer was the Winner.
Three days of good training was a true pleasure. There were more blocks of instruction, both live fire and lecture, than can be attended. It was a great time and I’m glad I was able to attend and present again.
Next year’s Conference will be held just north of New Orleans on March 15-17, 2019. It is open to all those interested in personal protection.
If you would like to purchase my eBook Concealed Carry Skills and Drills, the link to the downloadable ebook is here. http://concealedcarryskillsanddrills.com
If you would like to purchase my eBook Indoor Range Practice Sessions, the link to the downloadable ebook is here. https://store.payloadz.com/details/2501143-ebooks-education-indoor-range-practice-sessions.html
Revolvers do break
The two loudest sounds when shooting are:
- A bang when expect a click
- A click when you expect a bang
A click when you expect a bang with centerfire revolvers often means that tools will be involved in fixing the problem. An example is a broken hammer nose on older Smith & Wesson revolvers. Until the 1990s, these revolvers had the ‘firing pin’ integral with the hammer. S&W refers to this part as the ‘hammer nose.’ If it breaks, nothing short of replacing it will make the revolver fire.
Two steel J Frame revolvers are compared in this picture. The tip of the hammer nose circled in red has broken off. It will require replacement before the snub will be functional again.

S&W changed the design of its revolvers before the Turn of the Century. The firing pin was moved to the frame from the hammer. But there are millions of older S&W revolvers that have the hammer nose design. Issues have arisen in the past because S&W has not manufactured the part in many years. They were available on the used part market but the supply was spotty. There are now two sources for newly manufactured J Frame hammer noses.
This part is best installed by a qualified gunsmith. It may require minor fitting. The hammer nose rivet that holds it in place may also need to be replaced.
The Model 36 with the broken hammer nose was manufactured sometime before 1975. It has been through considerable live fire and dry practice. When using an older gun, it’s a good idea to inspect them on a regular basis to see if any parts have broken. The hammer nose in particular will not cause an obvious change in function if it breaks but the gun will not fire.
Caveat Emptor
Know what you’re buying. This is even more important when you can’t see it in person. When it’s an intangible, such as information, you must be especially careful.
As part of my research for The J Frame Project, I was perusing eBay last night for J Frame stocks. One of the items I came across was a ‘Hogue Tamer‘ for a very low price. It didn’t look quite right (a color I didn’t recognize Hogue ever making) so I czeched into it a bit further. I realized that someone had replaced the stock on their Polymer Bodyguard with the Tamer and then put the Bodyguard stock back in the Tamer package.


You must be logged in to post a comment.