Determining Your Ability – Friday Fundamentals
The famous Chinese philosopher Lao Tzu is quoted as having said:
The journey of a thousand miles [li] begins with one step.
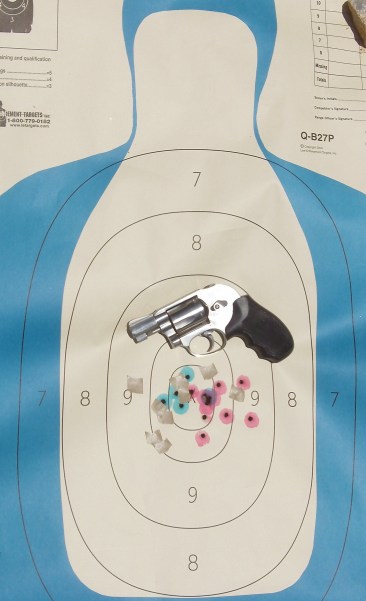
This is only partially correct. The journey really begins with knowing where you are in the first place. This is also true about the journey to proficiency with firearms. Especially for newer gun owners, it’s important to gain an understanding of what their current capabilities are, if they want to improve. Many people who have purchased handguns made the purchase with the intent of personal protection. In this light, a good first step in gauging proficiency is the Michigan State CCW Basic Pistol Safety Training Assessment Course of Fire. It is a simple course of fire that can easily be done at any indoor or outdoor range. It’s also extremely manageable with a J Frame revolver. The Michigan course of fire is the first evaluation in the Indoor Range Practice Sessions program. It also can serve as the basis for a more challenging evaluation.
The target consists of three 11 inch x 8½ inch letter size pieces of paper stacked vertically. The combined sheets of paper are quite close to the FBI Q target both in area (280.5 square inches v. 275 square inches, respectively) and in general shape (a target much taller than it is wide). The target is placed at 4 yards,

(Note: FBI Q drawn for reference)
Four yards happens to be the boundary between Public Space and Social Space in the study of proxemics. Proxemics is a subject that is worthy of study by anyone interested in the Art of personal protection.

Diagram by WebHamster
There is no time limit. Shooting is done with both hands. You will shoot 5 rounds in three separate sequences. Start with the handgun loaded with five rounds and aimed below the target.
- When ready, aim at the target and fire all 5 rounds.
- Reload with five rounds and repeat the firing sequence.
- Reload with five rounds and repeat the firing sequence one more time.
- At this point, you should have fired five shots at the target three separate times.
- To successfully complete the assessment, at least 2 out of 3 of the sequences must have had five (5) hits within the 25½ inch by 11 inch outline of the three pieces of paper.

While experienced shooters will consider this course quite easy, for new owners of J Frame revolvers, it frequently is not. This course can also be used as a measure of the effectiveness of Indexed Shooting (shooting without using the sights) by taping up the sights of the gun, in this case a Model 36 S&W snub nose revolver.

To use this method, bring the gun into the eye-target line and then place the outline of the cylinder or slide on the target. The great NYPD gunfighter Jimmy Cirillo taught this technique to NYPD Officers as a way of effectively using their revolvers at close range in situation where the sights could not be seen. It’s sometimes referred to as ‘metal on meat.’
If the group shot in the first three sequences meets the requirement, then try reshooting the exercise with only one piece of paper. Taking the tape off and using the sights may yield better results.

While this course of fire is simple, many newer gun owners may find it challenging. As can be seen in the pictures, the target is smaller than the silhouette target that many Private Citizens and POlice Officers are accustomed to shooting at. It also has the requirement of a 100% standard for the sequences. The 100% standard is the start of having a mindset of being accountable for every round.
Dear Instructors, Get a Real Job
In this Ballistic Radio interview, I offer some opinions about problems and solutions with the firearms training industry. The industry needs to do some real work if it expects to get in touch with normal people.
Dear Instructors, Get a Real Job
The ‘Wizard Drill’ and the J Frame
Ken Hackathorn created a very simple skill evaluation drill that he calls the ‘Wizard Drill.’ It only requires five rounds of ammo and can be shot on any range that allows work from the holster
Take an IDPA or IPSC (USPSA) target and place a 4 inch circle centered in the head of the target. You will shoot 4 strings of fire at 3, 5, 7, and 10 yards. Each string of fire has a time limit of 2.5 seconds with 2.7 allowable because of the length of the buzzer’s beep. The drill is shot from a concealed holster. If you use a pocket holster, you may start with the gun in your pocket and your hand on the gun. Otherwise, hands normal at sides, not touching the gun until the buzzer.
Caveat Emptor
Know what you’re buying. This is even more important when you can’t see it in person. When it’s an intangible, such as information, you must be especially careful.
As part of my research for The J Frame Project, I was perusing eBay last night for J Frame stocks. One of the items I came across was a ‘Hogue Tamer‘ for a very low price. It didn’t look quite right (a color I didn’t recognize Hogue ever making) so I czeched into it a bit further. I realized that someone had replaced the stock on their Polymer Bodyguard with the Tamer and then put the Bodyguard stock back in the Tamer package.

What do you teach the students?
What do you teach the students in your classes, Claude?
That question was posed to me recently by an older gentleman at my gun club.
I teach them how to handle guns safely and how to hit the target, Ray.
He looked at me quizzically when I said that. He’s a competent shooter who can hit a six inch plate at 50 yards with a handgun. I could tell he didn’t understand so I told him a story.
I received a call a while ago from a range I used to teach at, which has subsequently burned down. The call was from the guy working the counter where they sign people into the range. “Can you come down right now and give a lady with a snub nose revolver a lesson right now? She will pay you and she’s willing to wait for you to get here.” It was 20 minutes away so I grabbed my gear and went.
The lady had a very nice 2 inch Model 15 Combat Masterpiece. She had purchased it at a gun shop when her husband died. This was her second visit to the range to ‘practice.’

Sometimes I say the damndest things
I was recently interviewed on Civilian Carry Radio. It was an interesting discussion.
Accidentally
Muzzle direction is the primary safety. Always has been and always will be.
–Bill Rogers
Garland man accidentally fatally shot in head while teaching son to shoot
What’s so sad is how many different recent incidents the search string ‘son accidentally shoots father‘ brings up. Both fathers and sons are on the receiving end.
Firearms are relentlessly unforgiving of the slightest lapse in attention or knowledge of their manuals of arms. The details of this incident aren’t stated but they’re almost irrelevant. Does anyone think that poor boy will ever have a well adjusted life? I doubt it. Who’s fault is that? Certainly not the boy’s.
Just because a person “has been around guns all my life” doesn’t mean they know anything about them. All that frequently parrotted phrase means is that the person has beaten the odds so far. Don’t be ‘that guy.’ It’s not a hair dryer; learn about your firearm(s) and any of the sets of basic safety rules. The number of people who can’t recite, from memory, at least one set of firearms safety rules is astonishing.
There are several sets of safety rules. The NRA Rules are a good start.
ALWAYS Keep The Gun Pointed In A Safe Direction
This is the primary rule of gun safety. Common sense dictates the safest direction, depending on different circumstances.
ALWAYS Keep Your Finger Off The Trigger Until Ready To Shoot
When holding a gun, rest your finger alongside the frame and outside the trigger guard. Until you are actually ready to fire, do not touch the trigger.
ALWAYS Keep The Gun Unloaded Until Ready To Use
If you do not know how to open the action or inspect the chamber(s), leave the gun alone and get help from someone who does.
Let’s be careful out there.
No one is above the rules
One of the students involved in this went up and took the blank gun … from the instructor’s [emphasis mine] waistband and placed that against the instructor’s back and fired
Friday Fundamentals – Ball and Dummy
What is ball and dummy?
Sometimes, we instructors take our subject matter knowledge for granted. A friend posted that she was pulling a few of her shots low and left. She’s right handed. My reply was ‘ball and dummy.’ She then asked me what that meant.
Ball and dummy means interspersing dummy (inert) ammunition among your live ammunition during a practice session. It’s a key training tool at the elite Rogers Shooting School. The dummies can be random, e.g., three or four dummies in a 15-17 round magazine. They can also be alternating; i.e., live, dummy, live, dummy, live, dummy, etc. for the entire magazine.
The purpose of ball and dummy is to watch the sights when the dummy round is clicked on to learn how smoothly, or not, you are pressing the trigger. Ball and dummy for marksmanship training is NOT the same as an Immediate Action Drill. For an IAD, you want to clear the malfunction as quickly as possible. With ball and dummy, you want to observe the sights for at least 300 milliseconds (about 1/3 of a second) after the hammer or striker falls to see what your trigger press was like and THEN clear the malfunction. A useful benchmark is to count ‘One thousand’ after the hammer/striker fall and then clear the malfunction. That’s called ‘followthrough.’
Alternating ball and dummy is both the most soul crushing and, at the same time, the most productive marksmanship drill you can do. You’ll see just exactly how smoothly you’re pressing the trigger when you do this drill. For most people, the answer is about as smoothly as Stephen Hawking, the genius theoretical physicist who has had ALS for decades.
With a revolver, for instance the iconic J frame, this exercise is extremely easy. Load a cylinder of ammo. After each shot, followthrough for one second. After you have completed your followthrough, open the cylinder, spin it, and then close it. Press the trigger smoothly until another round fires. Then open, spin, close, and repeat. Do this until you have fired all the rounds in the cylinder. Continue doing this for about four cylinders.
Whether using a revolver or autoloader, you gain useful visual feedback about what a good trigger press feels like. There’s a reason we refer to ‘hand-eye coordination.’ The visual process teaches the tactile process as to what works and what doesn’t. After a while, you will become annoyed with seeing the sights nosedive and begin to press the trigger smoothly. That’s the point where you start to become a marksman.
Tactical Professor Information Products
STOPP Presentation at Rangemaster Tactical Conference
https://tacticalprofessor.wordpress.com/2021/09/14/stopp-presentation-now-available/
https://www.payloadz.com/go?id=3381307
Books (all PDF)
- Thinking Clearly about Self-defense and Personal Protection https://www.payloadz.com/go?id=3377208
- Real Shootouts of the LAPD https://realshootoutsofthelapd.com/
- Serious Mistakes Gunowners Make http://seriousgunownermistakes.com
- Indoor Range Practice Sessions http://indoorrangepracticesessions.com
- Concealed Carry Skills and Drills http://concealedcarryskillsanddrills.com
- Advanced Pistol Practice http://bit.ly/advancedpistolpractice
- Shooting Your Black Rifle http://shootingyourblackrifle.com
- Package deal of Thinking Clearly about Self-defense and Personal Protection, Serious Mistakes, Indoor Sessions, Concealed Carry, and Shooting Your Black Rifle (50% off) https://store.payloadz.com/details/2644448-ebooks-sports-shooting-drills-package.html

You must be logged in to post a comment.