Passing a gun to someone else
A discussion developed on Facebook about carrying a gun for another person. I have done this in the past for a girlfriend who was a proficient shooter but didn’t carry because her tight and skimpy clothing didn’t permit it. The gun I carried for her was a small auto or J frame in an ankle holster.

However, an implied task of this situation is developing and practicing a protocol to make sure there isn’t a negligent discharge while the weapon is being passed to them or they are accessing it from the carrier. This implied task is not as cut and dried as it might seem.
My colleague Greg Ellifritz thought this was a good enough topic to put on his blog. Since I respect Greg’s opinion, I will reproduce my thoughts here.
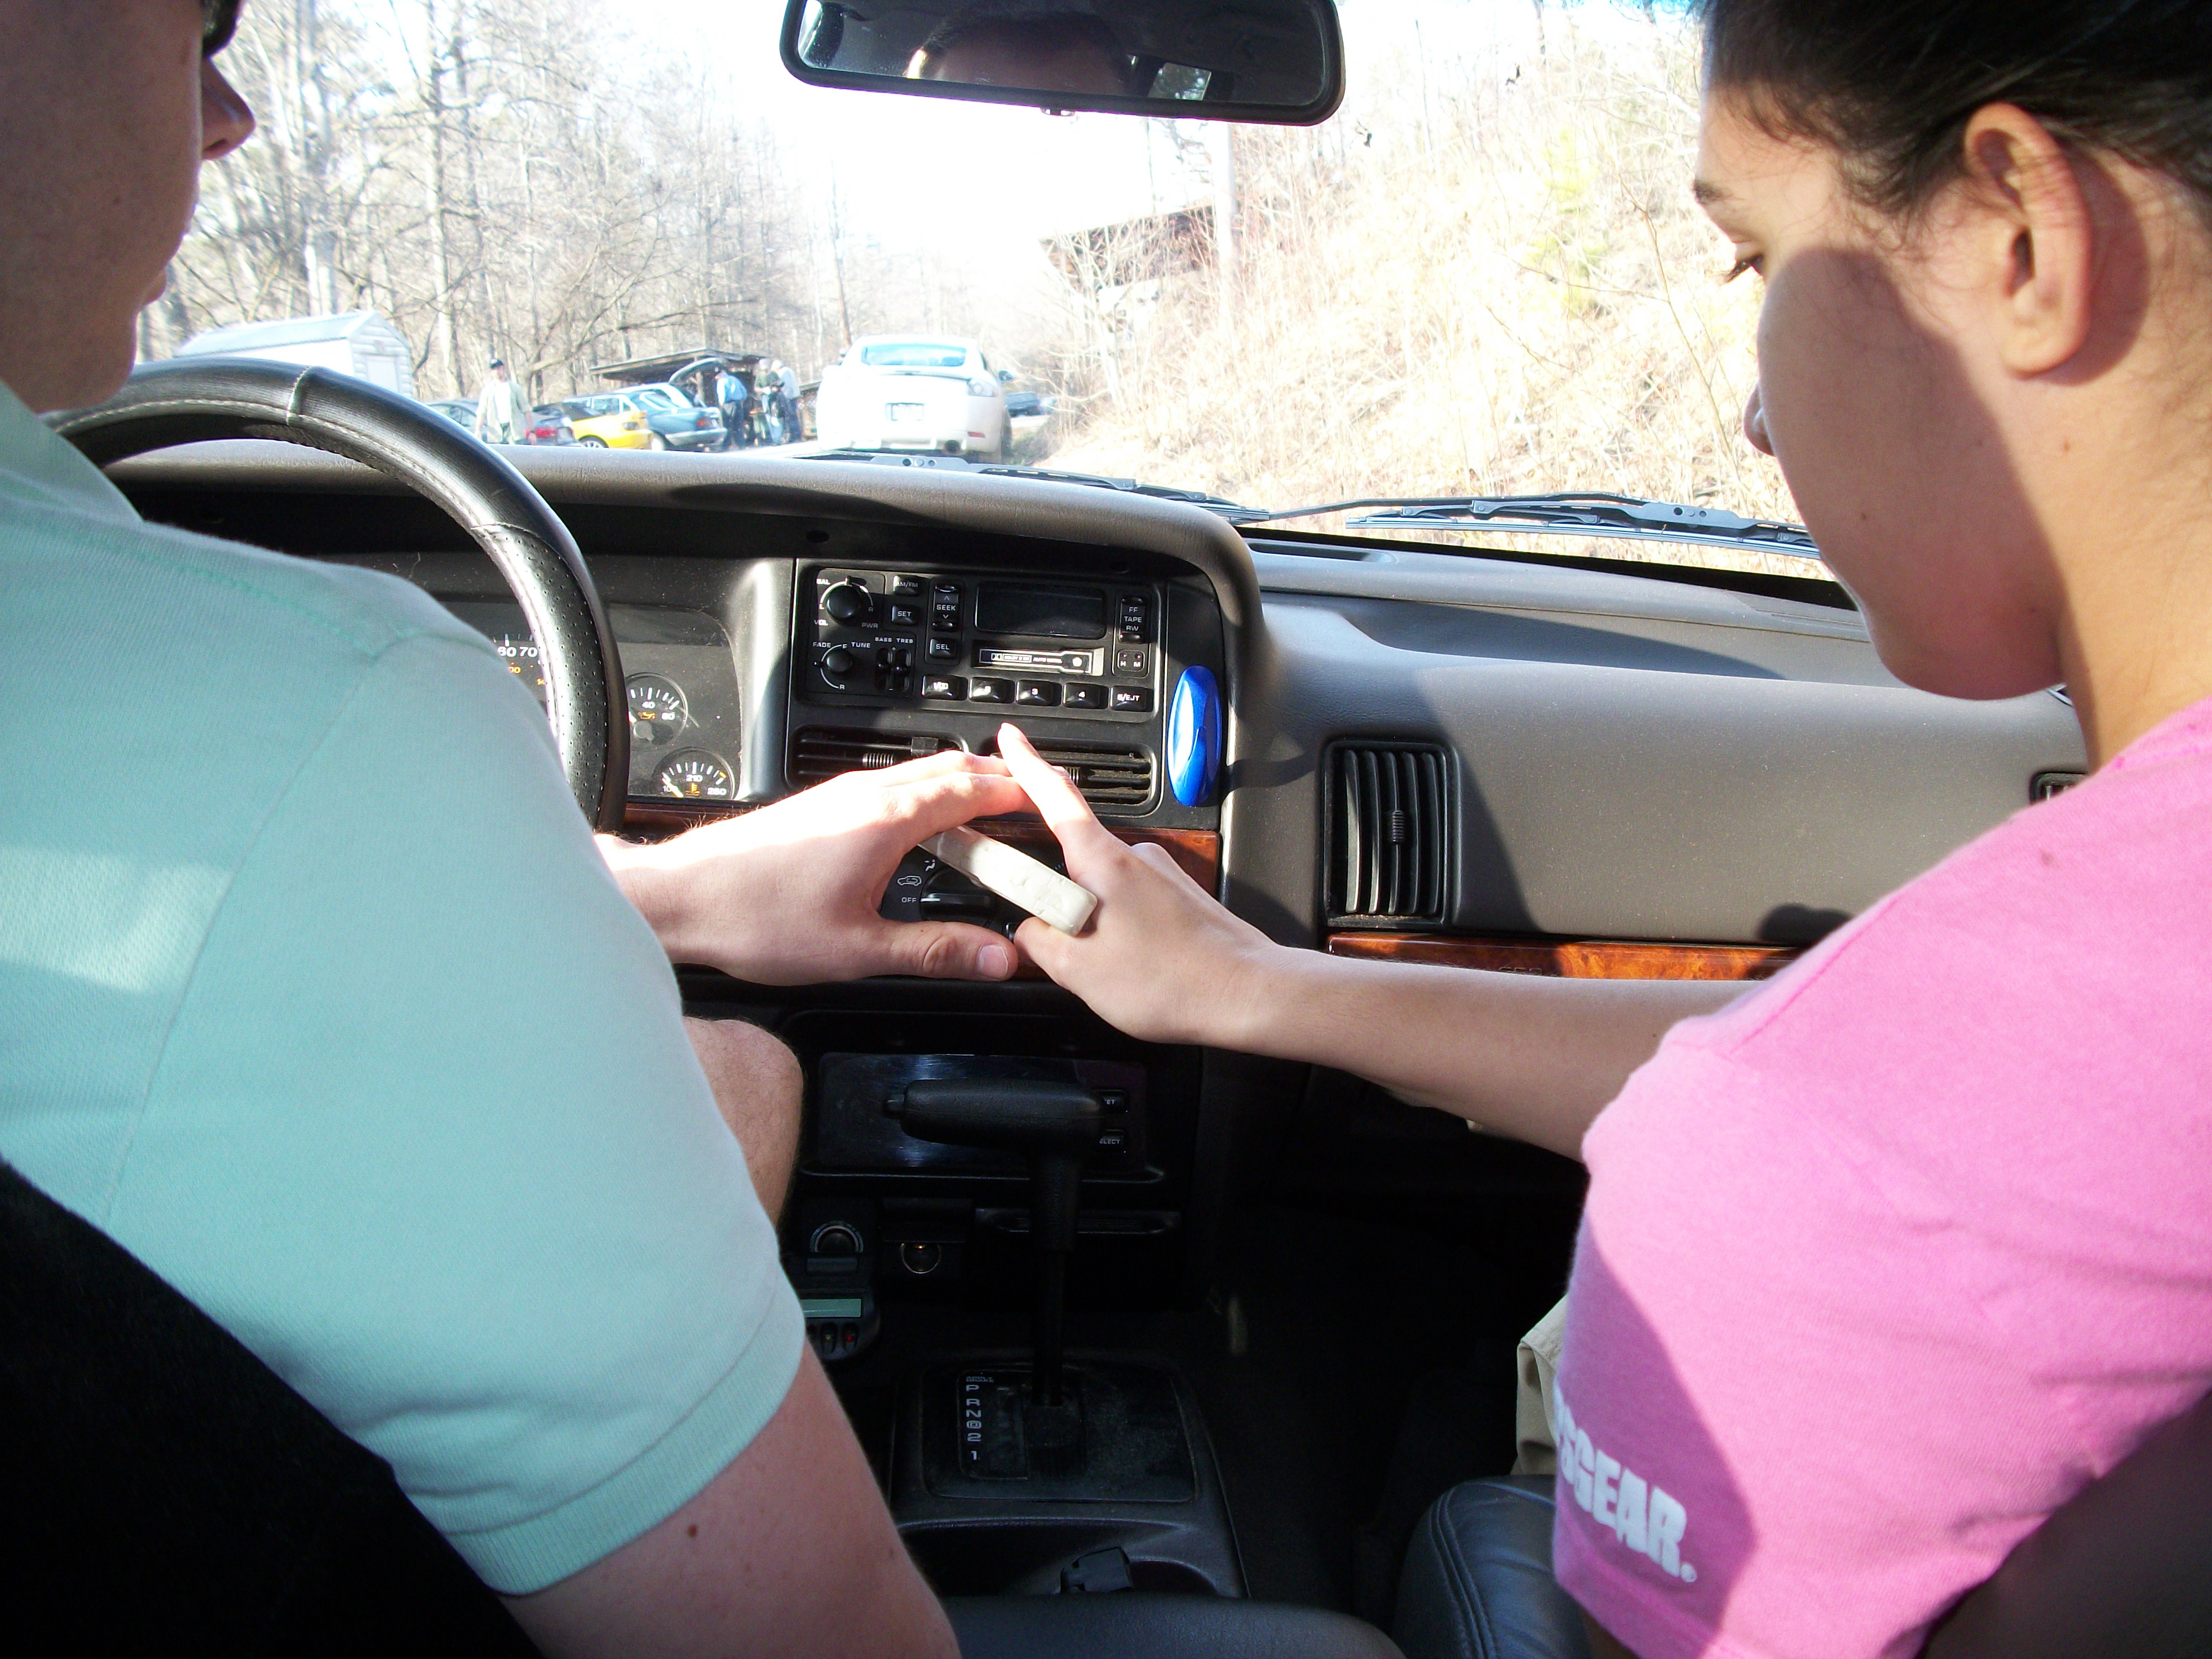
My protocol when carrying a gun for another person and then passing it off to them is as follows:
- Draw weapon with right hand (I’m right handed).
- Place weapon into palm of left hand with fingers of left hand around fingers of right hand, fingers running perpendicular to each other.
- Release weapon with right hand into left hand. Barrel/slide is now in palm of left hand with fingers wrapped around trigger guard from top to bottom. This protects the trigger guard from having the other person’s finger getting into it, assuming they are right handed.
- Pass it toward the person with the muzzle pointed forward, i.e., away from both of us.
- The other person takes hold of the butt of the weapon with trigger finger on top of my fingers, approximating the register position.

Handing off the gun.
6. Time permitting, I will ask “Got it?”
7. If she feels she has a good grip, she will respond “Got it.”
8. I then release my hold on the weapon and then pull my hand straight up from it so I do not sweep my hand over the muzzle.
Releasing the gun
This is also how I hand guns to other people in general and how I teach gun passing in my classes. The muzzle may be oriented in a different direction for safety.
I believe Scott Reitz teaches something similar to this with regard to gun passing. That may have been the origin of the idea, I don’t recall.
Some folks objected to the idea of carrying a gun for someone else who “isn’t serious enough to carry on their own.” The decision is based on a personal assessment of METT-TC (Mission, Enemy, Terrain, Troops, Time, Civil Considerations). In this case, I was satisfied that her attitude toward the enemy and proficiency with a handgun justified the tradeoffs involved. Would I rather she carried her own gun? Certainly. Would I prefer she was unarmed in a precarious situation? Certainly not.
Friday Fundamentals – Biases and Changes
My colleague Grant Cunningham posed two interesting questions on his blog, which led to a lengthy Facebook discussion.
Question #1: “what are your biases or preconceptions?”
Question #2: “what have you changed your mind about in the last year?”
I gave a brief answer to #2 but I think they both deserve some elaboration.
Question #1: “what are your biases or preconceptions?”
I am very reluctant to design training for myself or others that is rooted purely in hypothesis or conjecture. I.e., I am very biased toward following the scientific method, as much as possible, when developing training paradigms.
The overall process of the scientific method involves making conjectures (hypotheses), deriving predictions from them as logical consequences, and then carrying out experiments based on those predictions. — https://en.wikipedia.org/wiki/Scientific_method

It’s important to note that testing is an inherent part of the scientific method. Testing implies some form of measurement. As a result, I believe that having performance standards is an important part of training. I think of training as ‘outcomes based’ rather than ‘input based.’
We have at our fingertips, via the Internet, an enormous amount of data available to us. At the top of this blog are links to a number of sources that I regularly read to gather information about armed encounters, shootings, gunfights, and gunbattles. I use each of those terms in a very defined way because I consider many terms used in the training community to be fuzzy and ill-defined. Fuzzy and ill-defined terminology does not fit particularly well in the scientific method.
One of the often parroted phrases I hear about gathering information from the Internet is “The plural of anecdote is not data.” I rebut this with the words of one of my accounting professors, “Accounting information is expensive to gather and is sometimes not worth it.” What he meant was that, at some point, you have to accept whatever information you have been able to collect and work with it to form an opinion.
Something I try to avoid is ‘cherry picking’ data that supports my hypotheses. Cherry picking is not always an intentional process, either; it can require a significant amount of intellectual rigor to avoid. I learned this years ago when I was Research Director of a large commercial real estate brokerage company. The brokers all worked specific geographical areas and the Vice President asked me to analyze the Zip Codes of their contact lists. As it turned out, only about 20 percent of the brokers actually had the majority of their contacts in their assigned areas, even though they thought they did. That was when I became a believer in writing things down and checking them periodically to eliminate unconscious errors. A while later, I created a database of five years of data from the Armed Citizen and found some patterns and trends I hadn’t anticipated.
To sum up my bias, I might say:
I’m not interested in conjecture. Tell me where your hypothesis originated, what data supports it, and how you measure the outcome(s) you expect your students to achieve as a result of this training.
Question #2: “what have you changed your mind about in the last year?”
My short answer to this question on Facebook was “The importance of manipulation skills vis–à–vis decision-making.”
I’ve been thinking about this for many years. In 2011, my presentation at the Rangemaster Tactical Conference was entitled The Myth of the Lone Gunman: Working with Family, Friends, and Significant Others.
At the Conference in 2014, my colleague Craig Douglas made the suggestion that I do a presentation about ‘Bad Shootings’ for the 2015 Conference. The results of my research changed me forever.
As many people know, I was part of the Rogers Shooting School for ten years, culminating with being Chief Instructor for five years. Rogers is the most elite and difficult shooting school in the world. Many police and military special units go there to train every year and get to eat a piece of Humble Pie every day of the five day Course. “We’re the best shooters in our Department, by far. Then we come here and find out we suck!” The Handgun Testing Program has no peer for difficulty in the entire training community. It is training on a level that only a select few shooters will ever get to experience. I am enormously proud of my association with the School and maintain a relationship to Bill and Ronnie to this day.
That being said, once I started doing my research on ‘Bad Shootings,’ which eventually morphed into ‘Negative Outcomes,’ I saw a vastly different set of priorities were important. Although I still believe performance standards are important, the level of those standards has changed in my mind. The NRA Defensive Pistol standards, probably at the Sharpshooter level, will suffice to solve almost every confrontation I have been able to find between an Armed Private Citizen and a marauding criminal. Truth be told, those standards would work for most police shootings also. The kicker about the NRA standards is twofold; 1) competence must be demonstrated repetitively and 2) the standard is 100 percent hits.
Once a person can shoot a pistol to a reasonable standard, it’s time to move on to thinking about the circumstances of personal protection and becoming proficient at decision making in that context. Decision making can be a very difficult task, especially when we are armed. Lack of proficiency, not just at marksmanship, but at gunhandling under stress, complicates this. Persons who are not Unconsciously Competent can easily become focused on the firearm rather the situation. Focusing on the wrong thing can lead to Bad Decisions, which in turn can result in Negative Outcomes.
These are the Negative Outcome categories I identified in my research. There are probably more.
- Brandishing/showing
- Chasing and shooting
- Downrange failures (shot an innocent while shooting at a threat)
- Intervention
- Lost/stolen guns
- Mistaken identity shootings
- Negligent discharges
- Self-inflicted GSW
- Unintentional shootings
- Police Involvement (arrests for non-shooting related incidents)
- Poor judgement
- Unauthorized access (generally by small children)
- Unjustifiable shootings
- Warning shots
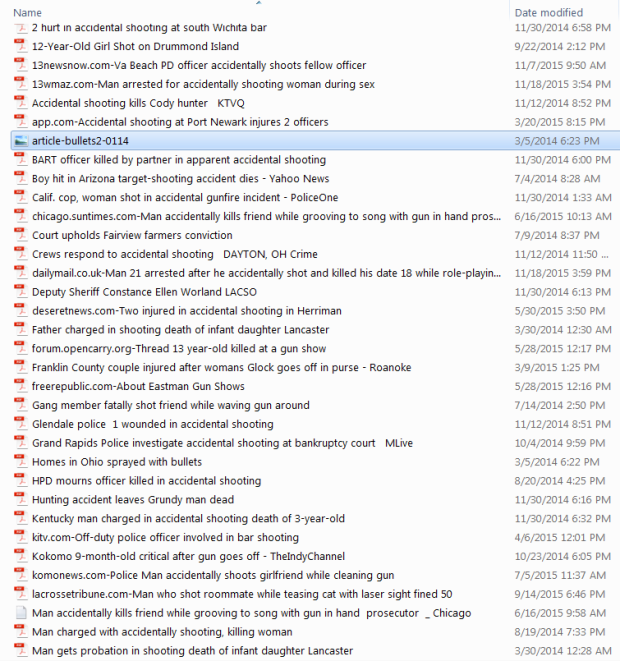
As an example of one category, Unintentional Shootings, here’s a screencap of some of the stories I have collected.
Bad decisions have serious consequences and end up being punished in a variety of ways, some legal and some social. The legal consequences are obvious; the shooter goes to court and sometimes thence to prison. The social consequences of Negative Outcomes are less obvious. If a person accidentally shoots a family member, whether the criminal justice system gets involved or not, I doubt that family relationship will ever be the same. The particular incident I am thinking of occurred when a police officer shot his daughter, thinking she was an intruder.
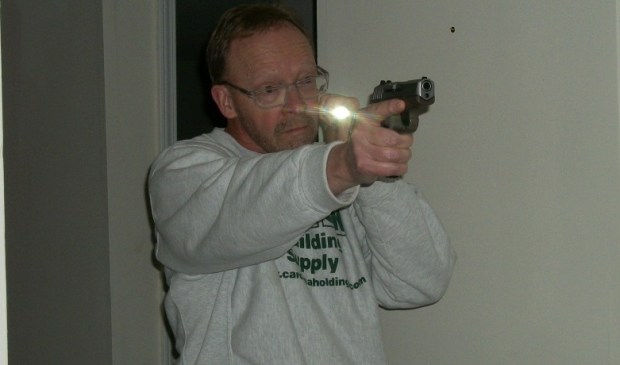
Decision making has many aspects to it that people don’t often consider. Where you point a gun anytime you handle it is a decision that has to be made. Consider that the next time you’re in a gun shop; where are you going to point the gun as you pick it up to ensure that you don’t muzzle anyone? This relates to another reason I am not fond of the overhand method of slide manipulation. During administrative gunhandling, which happens far more than shooting, the overhand method simply does not give the same level of muzzle control that the slingshot method does. I regularly have to correct students about muzzling themselves when using the overhand method. Using the slingshot technique, not at all.
Note that the Decision Making Process starts long before an incident. For instance, having a flashlight and then practicing with it is a decision. Not having one and/or not practicing with it is a Bad Decision. There are many other possibilities too. Failing to devise emergency plans and then discuss them with your family is a Bad Decision.
Look at the list of Negative Outcomes. The category ‘Downrange Failures’ is the only one that is marksmanship driven. All the rest relate to Decision Making and gunhandling. That’s why I changed my mind.
Friday Fundamentals – Getting our priorities straight
The attacks in Paris by Radical Islamists have captured the attention of the world and obviously people in the United States. Over 100 people were killed and several hundred more were wounded. Along with many people, I mourn for the casualties of these horrific and barbaric events.
In the aftermath, numerous articles are being written about surviving active shooter events, etc. In addition, some folks are saying they’re going to make some massive changes in the way they socialize. It’s always good to examine our vulnerabilities. However, let’s look at things in perspective.
In 2014, the estimated number of murders in the [United States] was 14,249.
In 2014, there were an estimated 741,291 aggravated assaults in the [United States].
There were an estimated 84,041 rapes (legacy definition) reported to law enforcement in 2014.
The FBI definition of Aggravated assault is:
An unlawful attack by one person upon another for the purpose of inflicting severe or aggravated bodily injury. This type of assault usually is accompanied by the use of a weapon or by means likely to produce death or great bodily harm. Simple assaults are excluded.
As my colleague Tom Givens has mentioned, one reason the murder rate has declined in the past few years is because of the advancement of emergency medicine. People who would have been murder statistics a few years ago are often aggravated assault statistics now. That doesn’t mean their bodies and lives haven’t been changed forever because of the assault.
While it’s popular to believe that most murders are committed by gangbangers killing each other and we should just say ‘good riddance,’ that’s not necessarily the case. Where the data is available, the Bureau statics indicate that strangers or unknown persons accounted for 57 percent of murders.
When considering clearances of violent crimes, 64.5 percent of murder offenses, 39.3 percent of rape offenses (legacy definition), 38.5 percent of rape offenses (revised definition), 29.6 percent of robbery offenses, and 56.3 percent of aggravated assault offenses were cleared.
‘Cleared’ means someone was arrested for the crime, not necessarily even convicted. Fully one-third of murders in this country don’t even result in an arrest. Nearly half of aggravated assaults don’t even result in an arrest. Almost two-thirds of the reported rapes don’t result in an arrest. If you become the victim of a violent crime, there’s a good chance the only ones affected will be you and your loved ones.
Relatively speaking, our chances of being criminally victimized are massively higher than becoming a casualty of a terroristic attack. Over 800,000 people in this country had their lives changed forever last year by ‘ordinary’ crime. That’s what we need to maintain our focus on.
For instance:
- Are all your doors and windows locked at night and do you keep your security system on all the time?
- Do you always make people aware you’re in the house when they knock?
- Have you ever opened your door to someone without checking the peephole to see who it is?
- Do you walk or run with your earphones in while listening to music?
- Is there a safe or lockbox in your car to put your pistol in when you can’t take it in with you to the courthouse?
- Do you make a short security halt to observe the parking lot when you come out of a store?
- How often do you text or check Facebook on your phone while you’re in a transitional environment like a parking lot?
- Do you ever park your car in the closest spot to the door of a store without regard to who’s around or what kind of vehicle you’re parking next to?
- You know all the little security violations that you make. Eliminating them is probably more useful than starting to carry an another magazine of ammo.
Another thing to consider is our usage of automobiles and just how much danger we place ourselves in when we drive. Being in a motor vehicle may well be the second most statistically significant voluntary danger we face, exceeded only by going to the hospital.
According to the National Highway Transportation Safety Administration, US car crashes killed 22,383 vehicle occupants in 2013 and injured 2,099,000.
Tactical firearms training is a lot of fun. Tactical medicine classes are very informative and might be more useful than a firearms course. But when was the last time you took a Defensive Driving Course? Some insurance companies offer online versions for free. Most insurance companies lower your premium for taking the DDC. In my state of Georgia, the class is 6 hours and costs less than $40 if you don’t have to take it because of getting a ticket. You put your life in danger every time you get in your vehicle. Don’t you owe it to yourself and your family to become a safer driver? The Situational Awareness tuneup will carry over into other areas of your life, as well.
It’s easy to get caught up in the latest horror of the week that the Lame Stream Media shoves down our throats and we then propagate among ourselves. Let’s use it as a reminder to examine all the safety risks we face. The latest event is probably way down the priority list if we dispassionately look at the many dangers we face every day.
Snub Revolver DVD Special
Sometimes, you’ll be surprised what you find when you clean.
–my Mother
And she was right. Another box of Secrets of the Snubby turned up. I’m running a package deal on Secrets and Fundamentals as a combo. Only $24.95 for both when purchased as a package.
I like snubs and I like to push the performance envelope with them. Once you know what you’re doing, snubs are a lot more than an “arm’s length gun.”
Friday Fundamentals – Measuring time in your firearms practice
Fast is fine, but accuracy is everything. In a gun fight… You need to take your time in a hurry.
–Wyatt Earp
One of the memes in firearms training is “I’ve never seen a timer in a gunfight.” This is hugely misleading in the way it’s often understood. The timer that is present is your life-clock. Don’t think it isn’t running every nanosecond of a deadly force encounter. While we need to be deliberate and make our hits, as Earp stated, we don’t have all the time in the world to do so, as he also stated. So we need to establish some kind of time standards in our practice, at least for some of our drills. The question is how do we do so, both in principle and in practice?
There are two principal ways of measuring time. One is measuring it directly. For instance, a shooter might be able to draw and fire a pistol in 1.4 seconds. To achieve a meaningful level of accuracy in that measurement, we would use a ‘shot timer.’ Shot timers give an audible or visual signal to the shooter and then record the time taken for the task via a microphone in the timer that hears the shots. Shot timers range from fairly simple push a button types costing around $125 to more complex devices with numerous features than run about $200. They all work fairly well. The choice largely depends on the features you want. One downside is that shot timers cost more money than many people want to spend.

On outdoor ranges, shot timers work really well. On an indoor range, not so much. Measuring time is much more difficult in the indoor environment. Multiple shooters adjacent to each other interfere with using a standard shot timer. If your timer is picking up the sound of someone else’s shots, it’s not doing you any good.
This issue brings us to the second way of measuring time, par time. Par time means that the shooter has a fixed amount of time to accomplish the task. Drawing, reloading, and presenting from ready are all tasks that can be accomplished in par time. For instance, we might say that a police officer is allowed 2.0 seconds to draw from a security holster. Par time lends itself much better to mass training, such as in the police and military than individual measurement, which would be prohibitive for training time-wise.
The times in the NRA Marksmanship Qualification Program and The Tactical Professor’s Pistol Practice Program are par times. So are most police qualification courses. Some ‘proficiency demonstrations’ that private citizens are required to do to obtain a Concealed Handgun License are timed. Those are par times, as well.
Par time can also be an effective way of practicing on an indoor range because we don’t have to be concerned with the effects of other shooters’ gunfire on a shot timer. Most shot timers will also do par time by sounding a second beep at the end of the par time. Unfortunately, the second beep is easily drowned out by nearby gunfire.
The simplest solution is to have a partner time you using a watch or stopwatch. Your partner can tap you on the back once for go and again for stop. It’s not terribly accurate but better than nothing.
If you go by yourself, an interval, or countdown, timer can provide a workable solution, especially if it has a visual signal or vibrates. This is a good way to get around the noise issue of indoor ranges. The vibration is becomes your start/stop signal
The first solution I used is a vibrating wristwatch. It has a countdown timer function.
 Another is the Gymboss that can be clipped to the pants or belt.
 The CED Universal Countdown Timer vibrates and also has a visual signal the form of a blinking light. This is the one I find myself using most.
 Time is a critical component of defensive training that many people don’t work on for a variety of reasons. Adding in time pressure to your shooting practice is a worthwhile way to increase your proficiency. If you are going to get a Concealed Carry License in a state that times the qualification course, it’s a good idea to practice ahead of time to get a feel for the cadence you’ll have to shoot at.

Friday Fundamentals – Performance Standards
Without testing, there has been no training
Shooting a pistol is an athletic activity. Like any athletic endeavor, we need to have some performance measurement standards. Measurement is the operative word here. We need to measure our downrange performance, i.e., how well we can hit the target, if we want to become better at shooting. There are numerous variables that can be called into play for measurement.
As an example of athletic measurement, the current US Army standard for my age cohort is a minimum of 27 sit-ups in one minute. More sit-ups means more points scored. The Army Physical Fitness Test has to be taken twice a year.
In weight training, we might simply measure how many repetitions of lifting a given amount of weight we can do until we can’t lift anymore. Over time, our objective is to be able to lift more weight and/or perform more repetitions.
Police officers have to undergo periodic testing of their shooting ability. The period might be anywhere from once a year (mandated by every state I am aware of) to four times a year (LAPD and FBI).
What might be a set of reasonable standards for the average gun owner? I’ll offer the following as a progression that a gunowner could use to see where their skills stand on a periodic basis. It’s less than 100 rounds, so there is some room for remediation, if necessary. Because firearms skills are perishable, I’m more in favor of the LAPD/FBI approach of doing an evaluation four times a year rather than just once.
1) LAPD Retired Officer Course
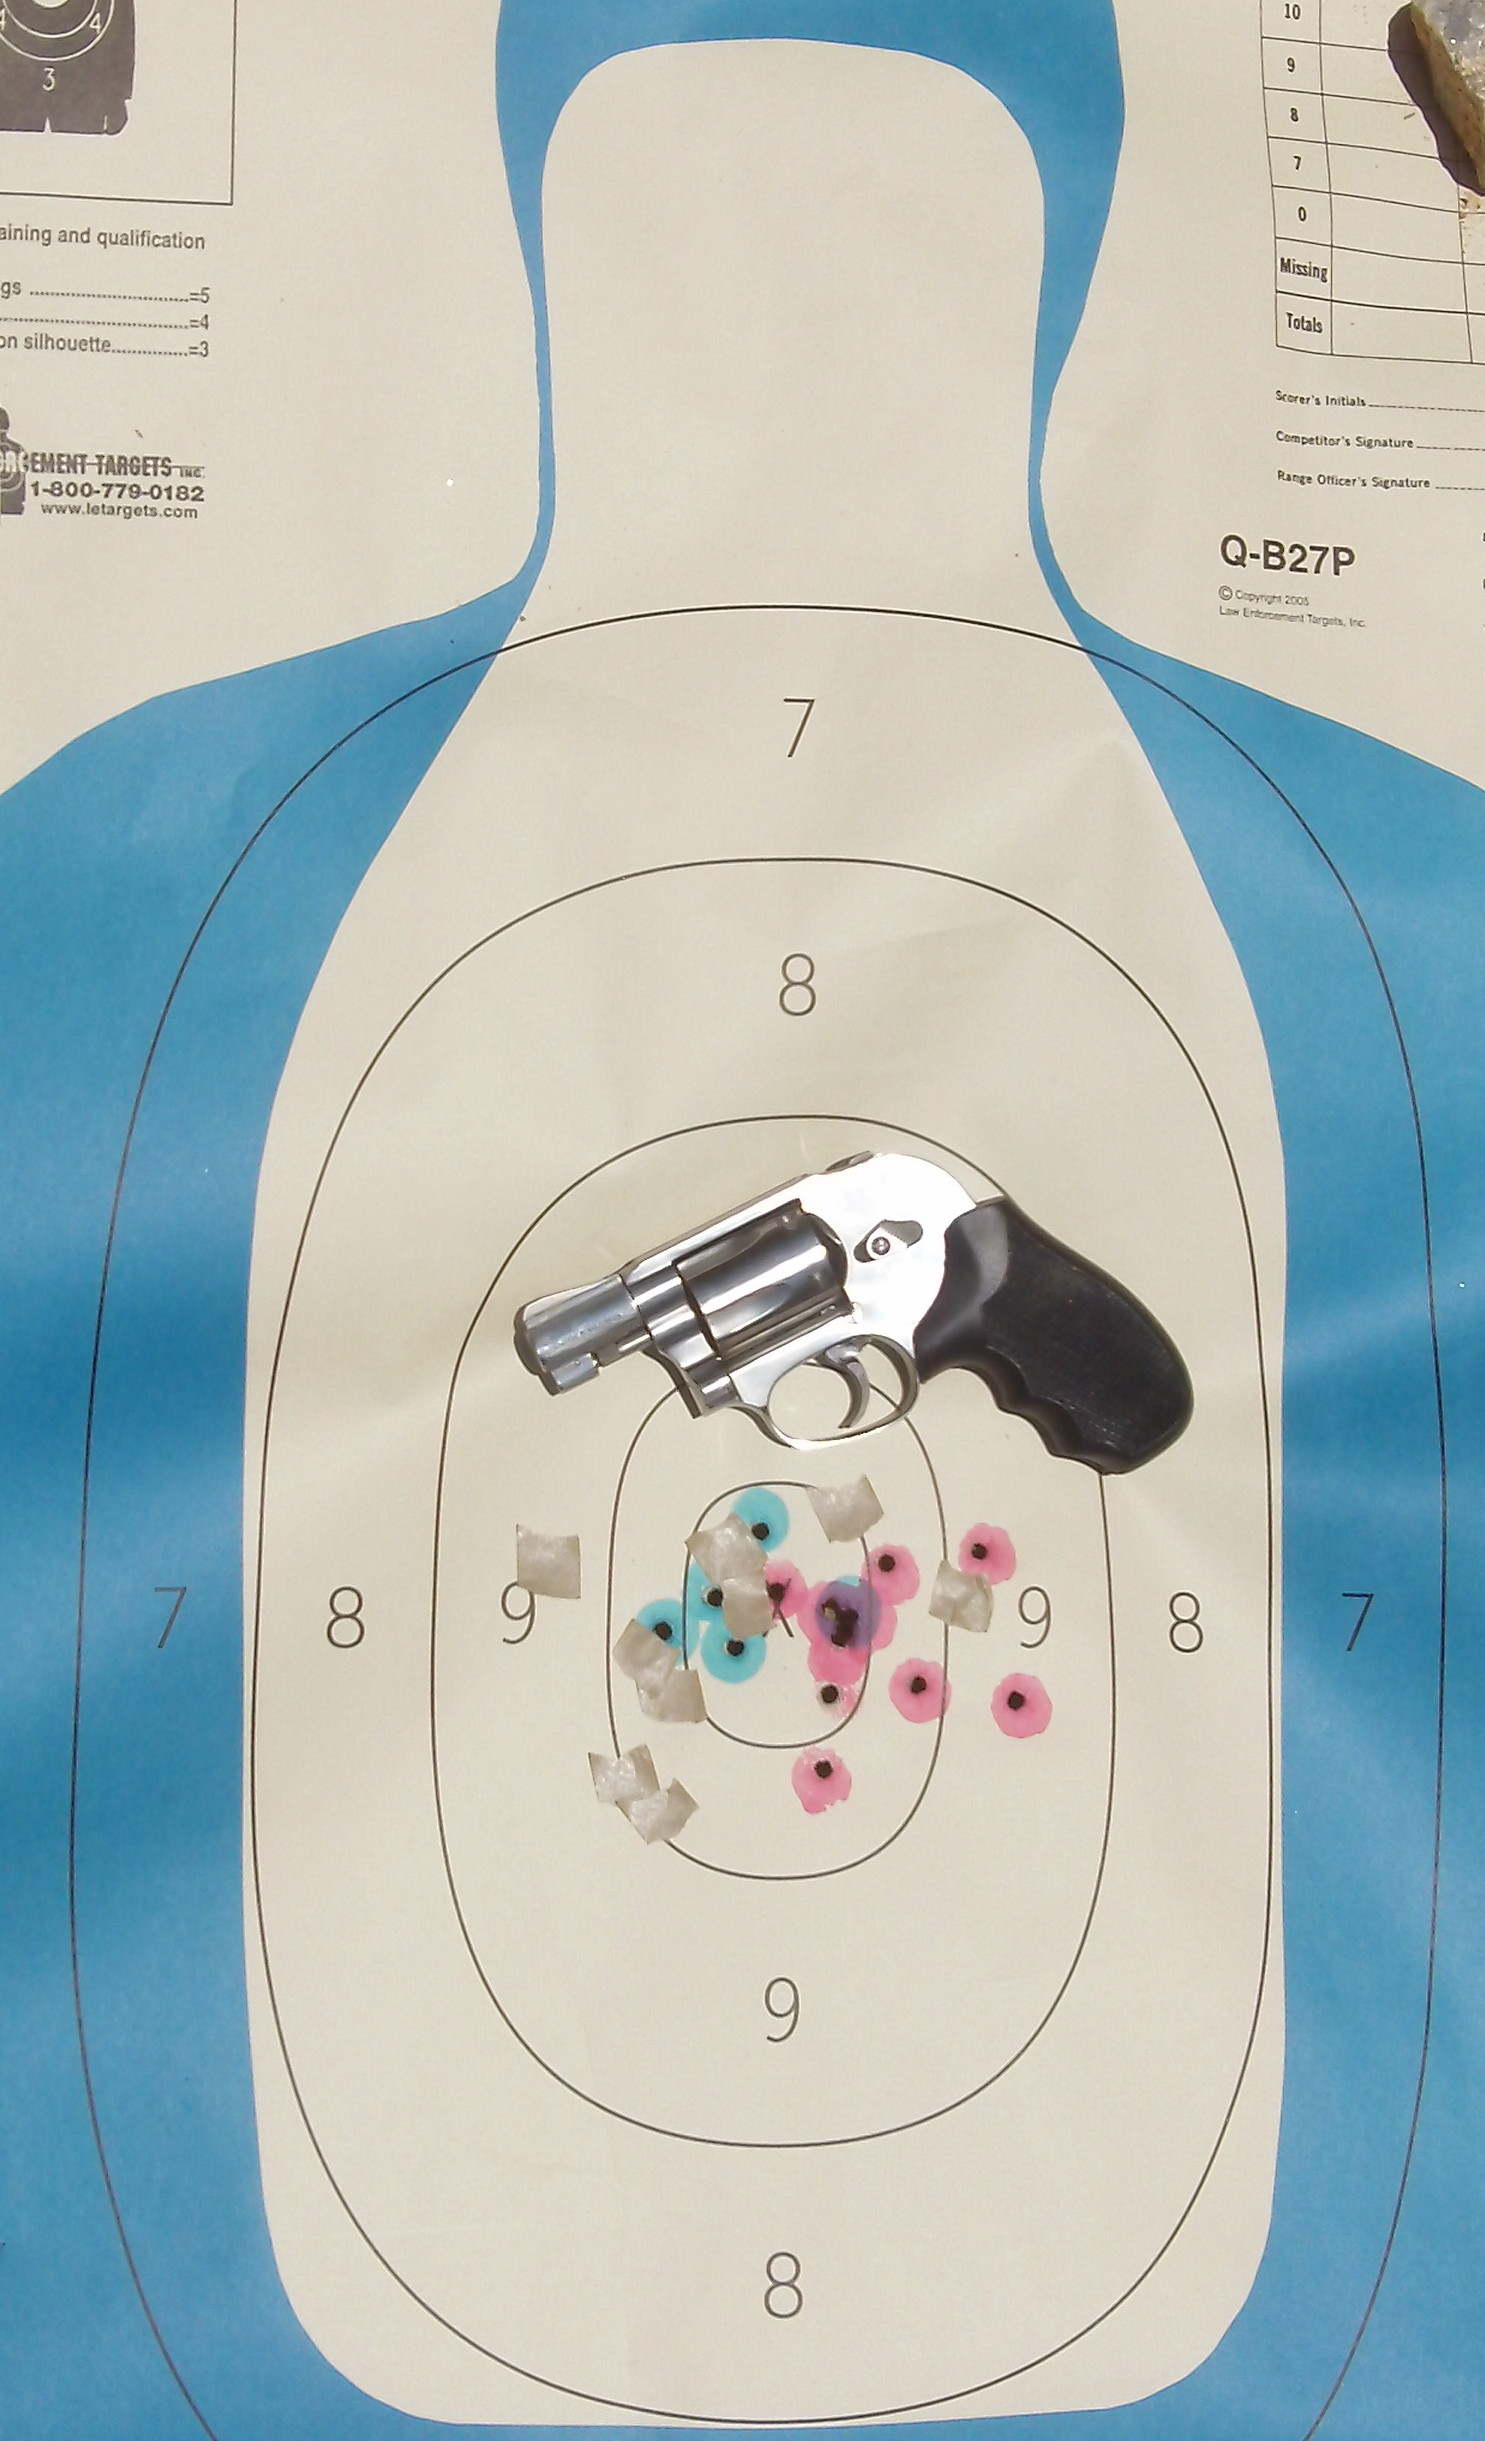
Shoot 10 shots at a silhouette at 7 yards with no time limit. The LAPD standard is simply that 7 of the ten have to hit. Our standard should be to have, at a minimum, all 10 rounds hit within the 7 ring of a B-27 or an equivalent.
 The point of this is to learn how fast we can shoot and still make our hits. Even the LAPD SWAT has learned and trained the cadence they can make consistent hits on a target. It’s not by shooting as fast as they possibly can, it’s by paying attention to what they’re doing while they’re shooting. I got that from Darryl Bolke.
If you meet the standard, then move on to the next component. If not, work on getting your fundamentals in better shape.
2) NRA Basic Pistol
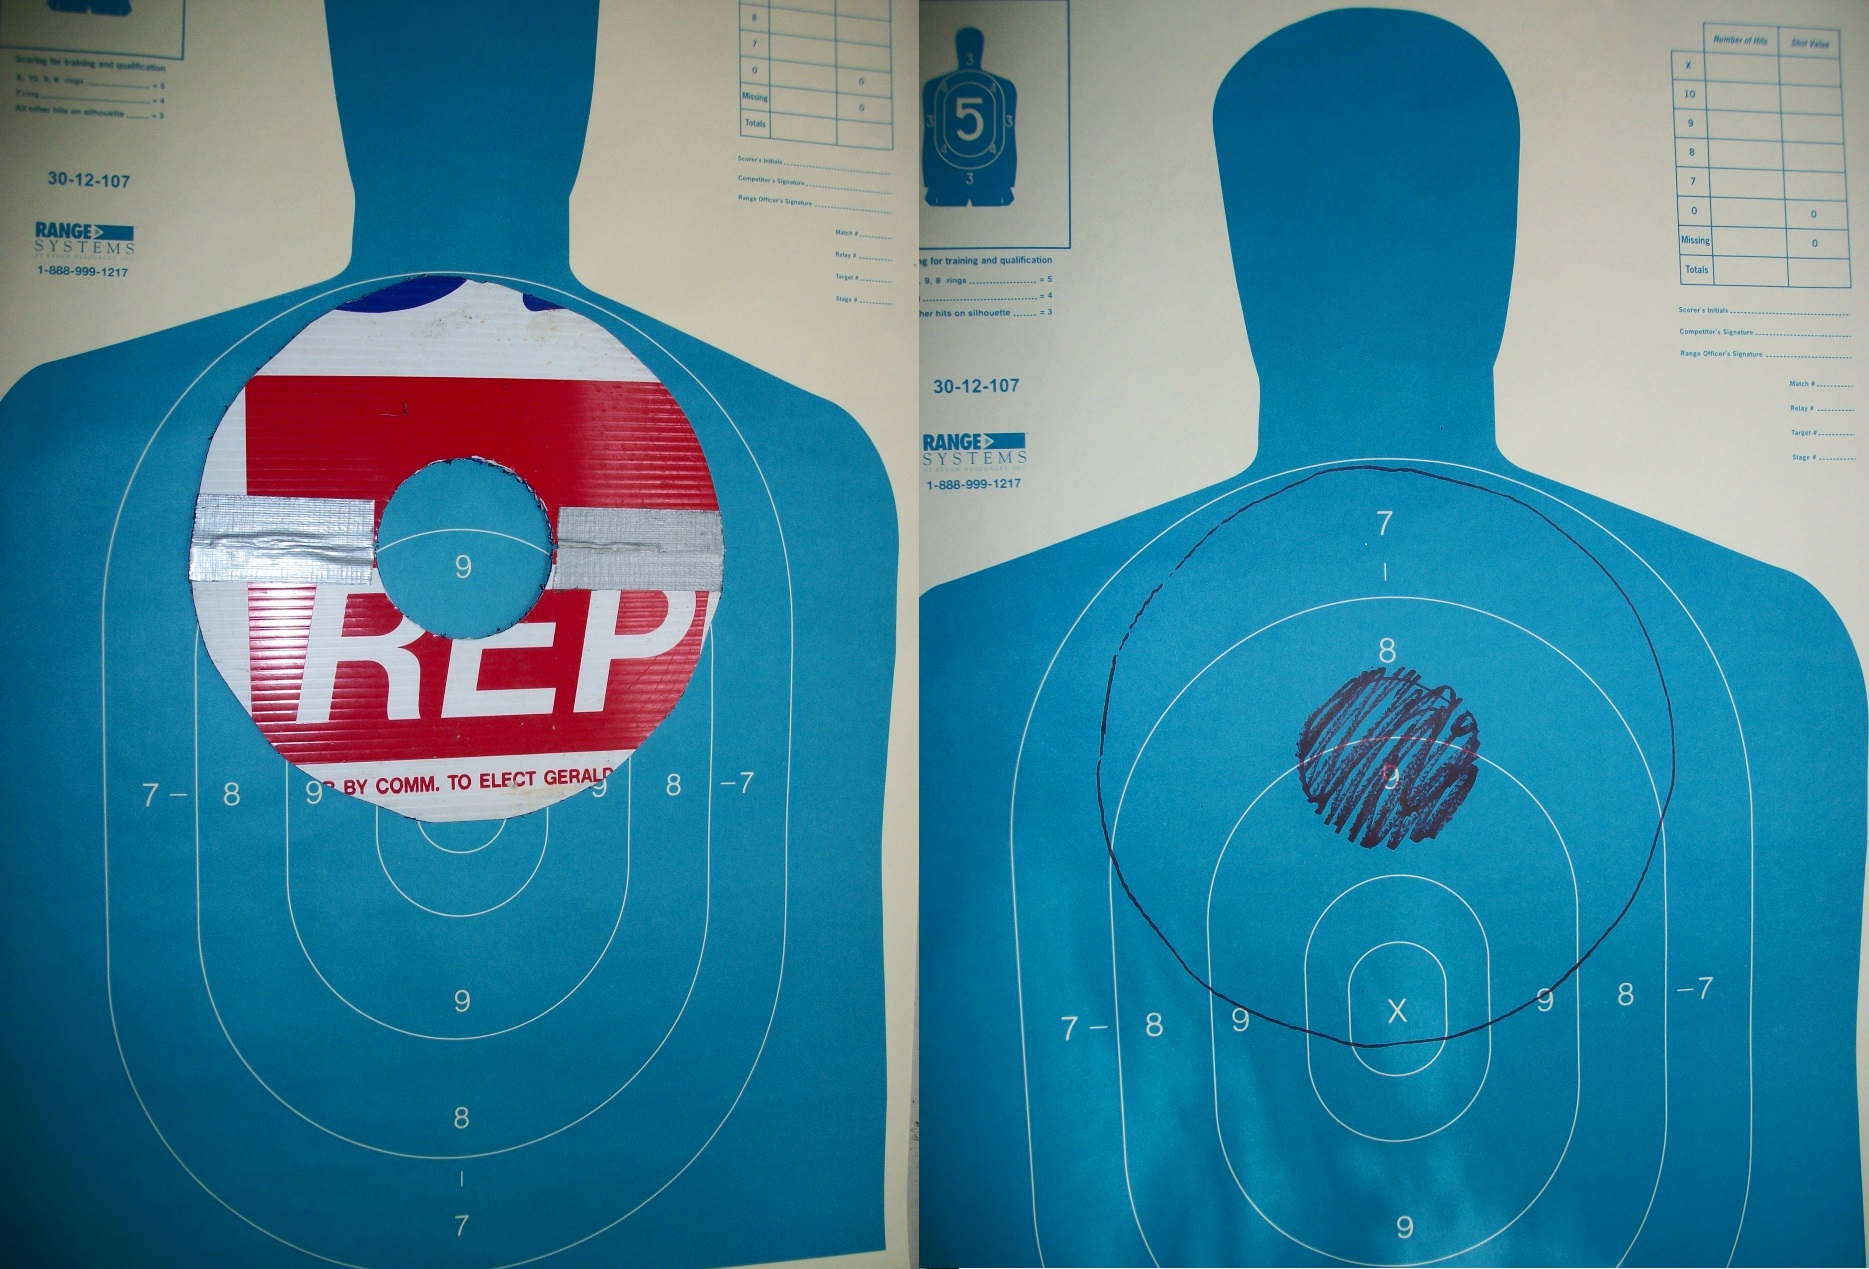
Shoot a five-shot group within a 9-inch diameter circle (paper plate) at 15 feet with no time limit. Repeat twice for a total of three times. All the shots have to hit the plate. My colleague Chuck Haggard commented to me:
I wonder how many people never shoot anything but a full value target [i.e., complete silhouette] at 3-5 yards and call it gtg [Good To Go].
I agree with him completely; assuming that we’ll always have a full body presentation to shoot at in a defensive encounter is a mistake. If you can’t hit a paper plate consistently at five yards, you should work on being able to do that. See the sights and press the trigger smoothly. If you can make the standard, then move on to the next.
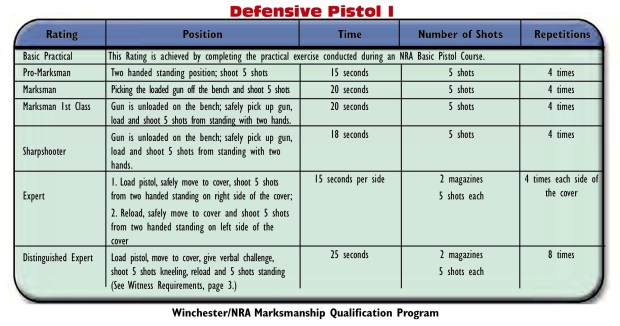
3) NRA Defensive Pistol I – Pro-Marksman
Shoot a five-shot group within a 12-inch diameter circle at 21 feet in fifteen seconds. Repeat until you’ve done it four times. The four times don’t have to be consecutive, however the standard of every shot having to be in the circle is. This drill is a lot more difficult than most people think because of the 100 percent hit requirement. Even though 15 seconds is a very generous time standard, knowing you’re on the clock makes it more difficult. Once you’ve made it four times, move on to the next component.
 4) 5^5
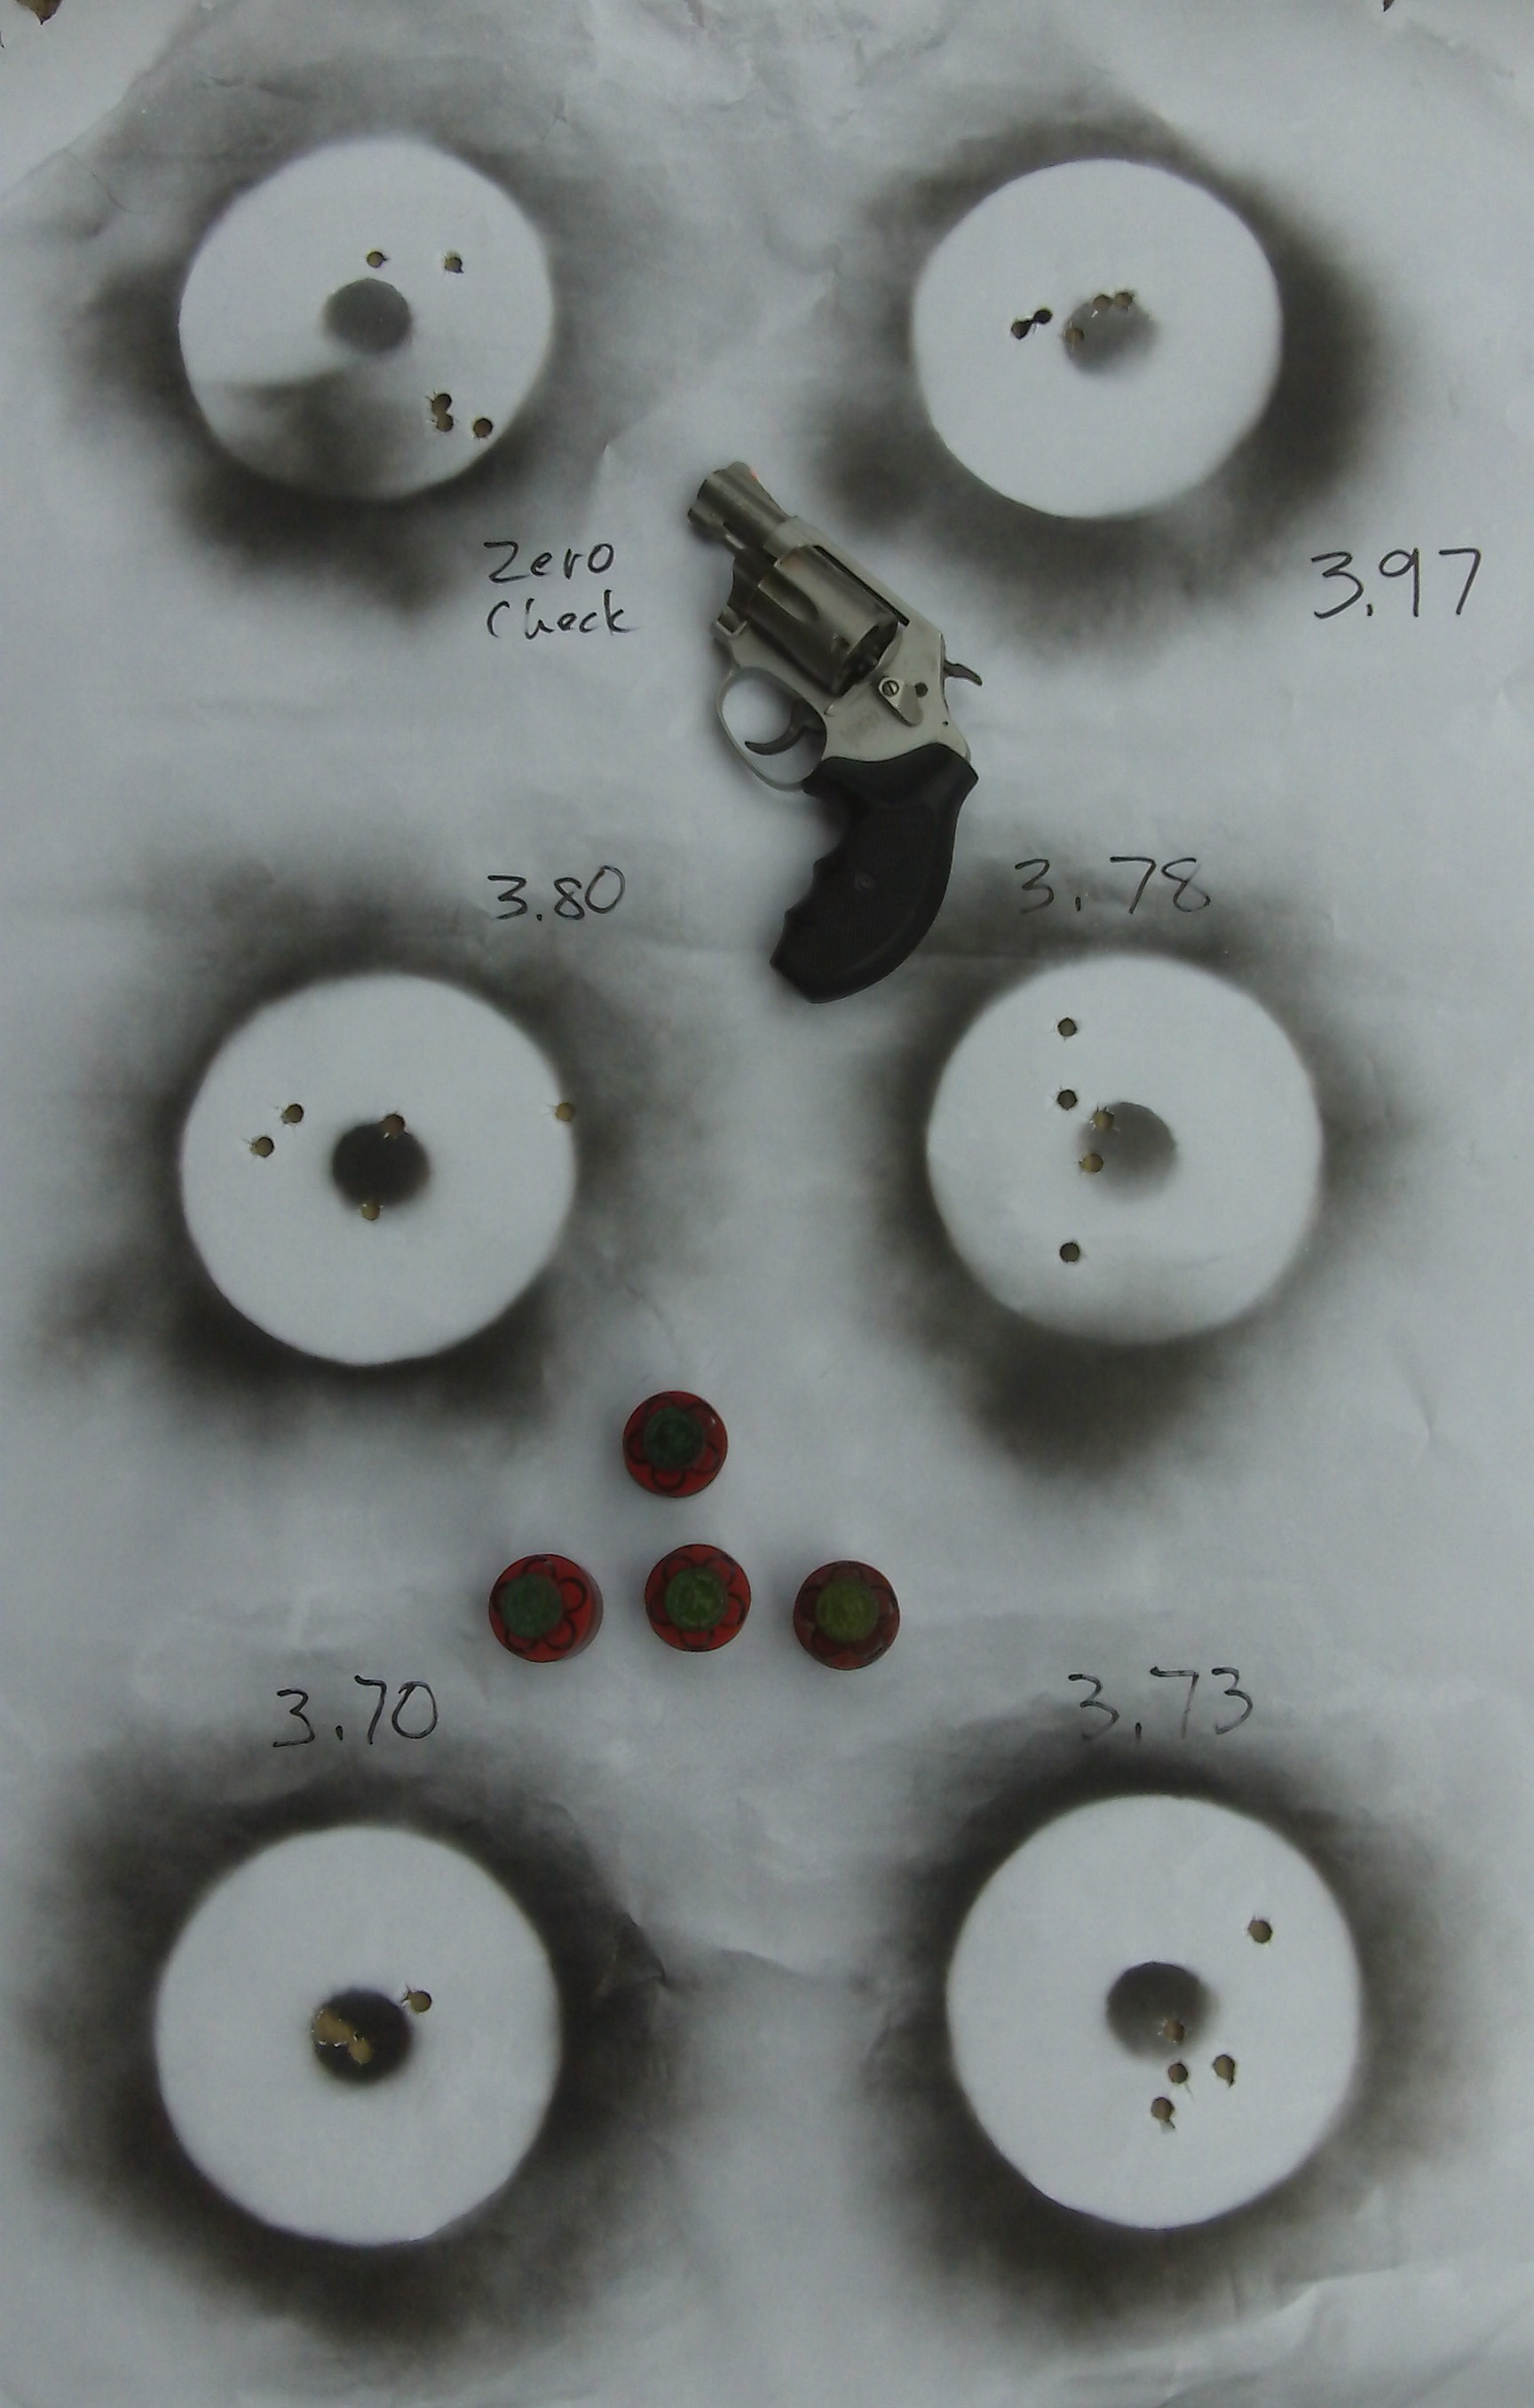
Shoot five shots into a five inch circle at five yards in five seconds. Do it five times in a row. This is a very difficult drill for most people. Only do it once to get an idea of how well you can shoot it. It’s a good practice drill for other times you shoot. After shooting it once, move on to the final component.
 5) NRA Off-Duty Pistol Course – Stage 3
Shot at 15 yards on a B-27 silhouette target. Load with six rounds only; you will need another magazine or speedloader loaded with six rounds also. Start double action if your pistol is so equipped. Fire six shots, reload, and fire another six shots for a total of 12 shots from a standing position, no support from bench or wall allowed. The time limit is 20 seconds, including the reload for the second 6 shot string. Score it based on the number value of the rings. The maximum point value for the string is 120.
Although many people think that a Private Citizen cannot legally justify shooting past seven yards, that is absolutely not true. I have a number of incidents in my database where Private Citizens shot at longer distances and it was completely justified. If a gang banger is shooting at you and your children at 23 yards, you are legally justified in shooting back. That assumes you have the skill and are cognizant of the background.
If you don’t need to do any remedial work during the session, you will fire 82 rounds total. That gives you a little left over to play around with as you please. Using a progression of drills that increase in difficulty gives you the opportunity to evaluate where you need to work on your skills to improve. Keep a record of how you did on each drill. Having a record is key to knowing what you need to work on in your practice sessions.
If it all seems easy, you can do the drills one handed; either dominant hand only or support hand only.
Friday Fundamentals (Segment 3) Properly gripping an autoloading pistol
As my colleague Wayne Dobbs of Hardwired Tactical Shooting says, there are three fundamentals of handgun shooting that can make you or break you in a defensive situation; grip, sights, and trigger [manipulation]. I would also add follow through, as a student who came back today from the elite Rogers Shooting School called to mention to me.
For this segment, let’s look at the autoloading pistol grip discussion contained in Advanced Pistol Practice.
 The proper grip for any handgun should accomplish several objectives:
- Maximize our hand friction on the handgun. The way we prevent the handgun from moving around in our hand(s) is simply via friction. Therefore, the more hand surface we have in contact with the gun, the more friction we can achieve.
- Minimize the gun’s motion during recoil by stabilizing the supporting joints, principally the wrists, when the gun fires.
- Reduce the distance between the line of the handgun’s bore and our hands to the smallest amount possible. This diminishes the rotational torque generated by the handgun upon firing.
After establishing the appropriate grip, a series of index points can be used to feel when the grip has been properly achieved. Especially in defensive encounters, there is no time for visually checking whether the proper grip is in place. Having a set of index points allows a shooter to establish a proper firing grip in the holster and during the drawstroke to know that the grip is as it should be.
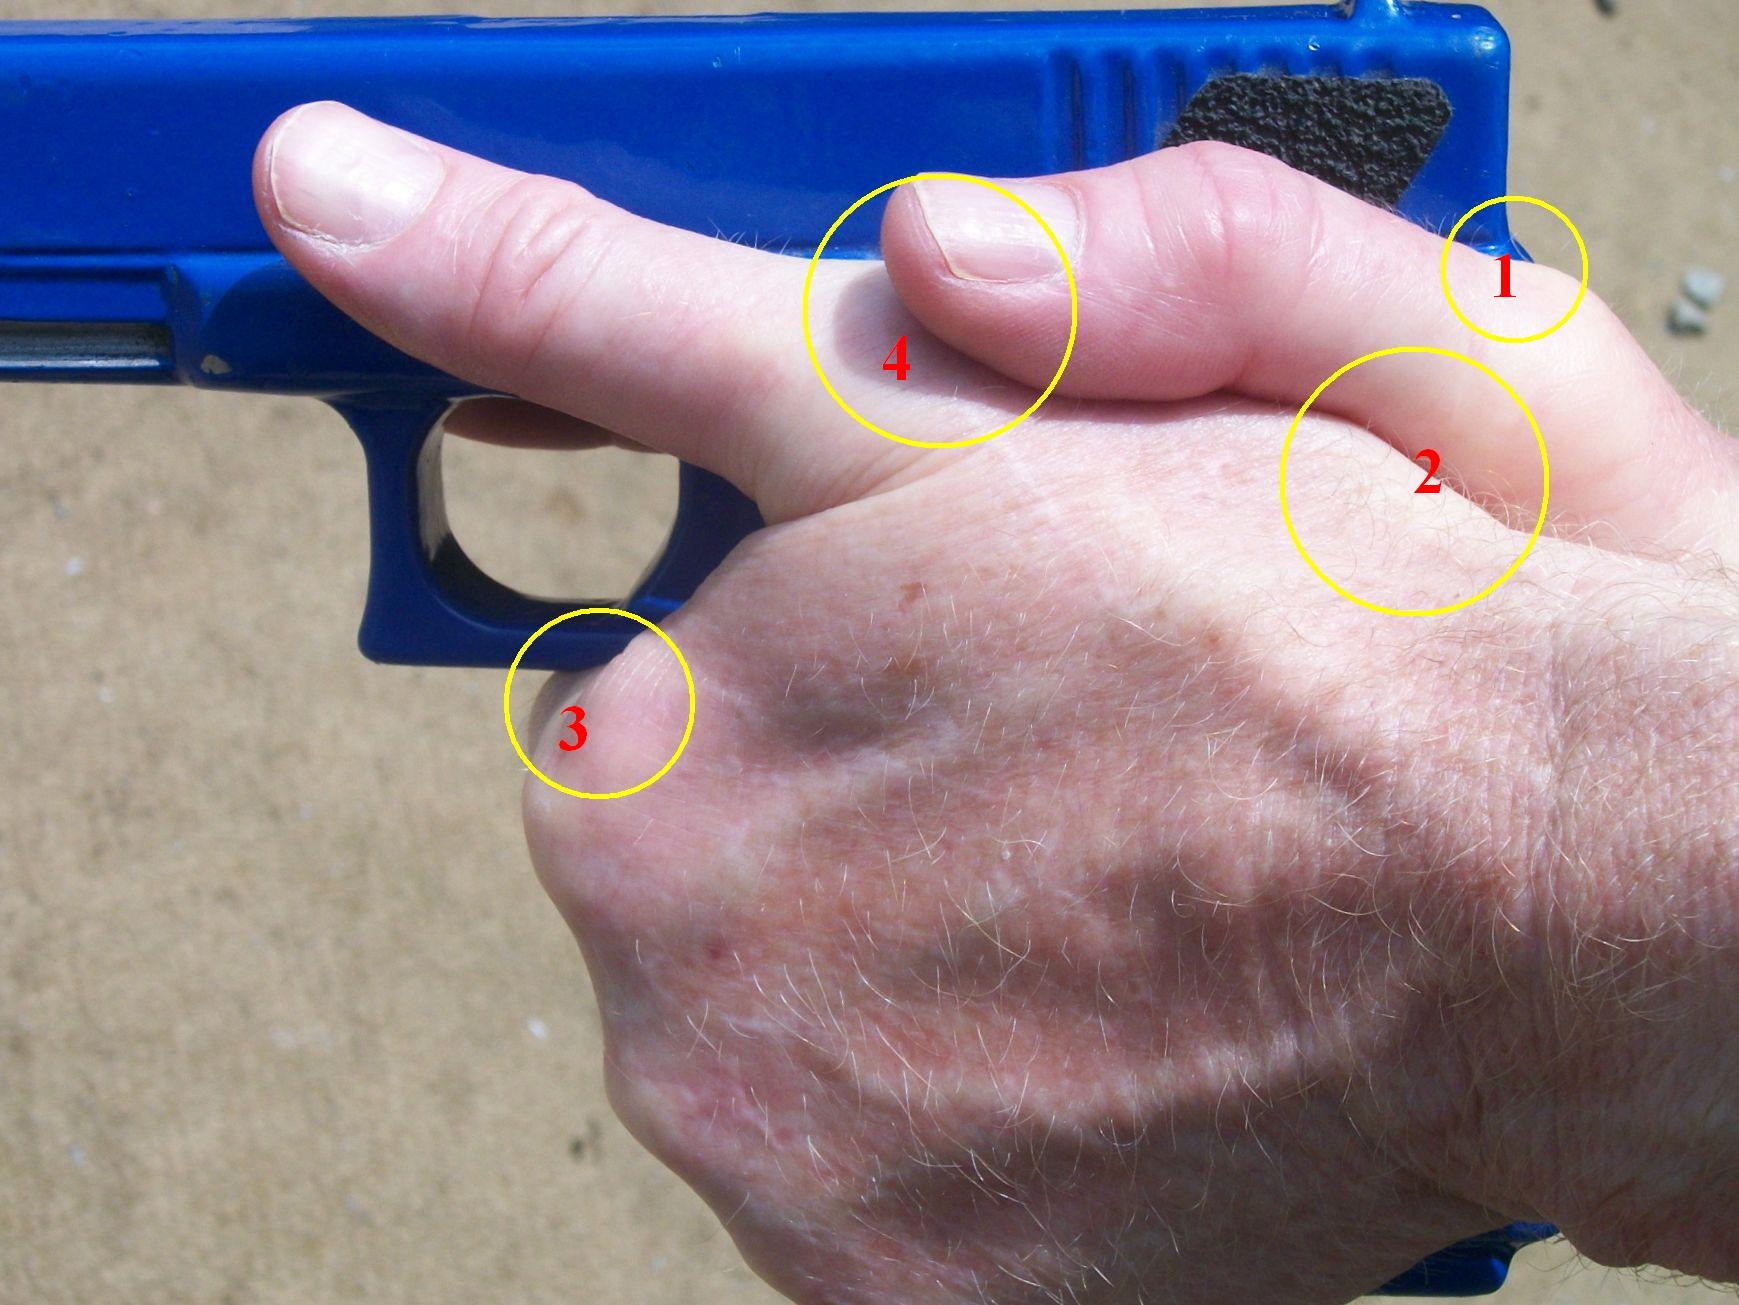
With an autoloading pistol, this grip is commonly referred to as the ‘thumbs forward grip.’ Being aware of four specific index points will allow a shooter to know that a proper grip has been achieved without having to visually verify it. There are nuances to this grip that sometimes escape even experienced shooters, however. The first three index points are essentially the same for all shooters. The fourth index point may vary among shooters, dependent on individual physiology.
There is still debate as to how hard the fingers of the support hand should grip the firing hand. In any case, they should certainly grip firmly enough to not break free of the firing hand during recoil.
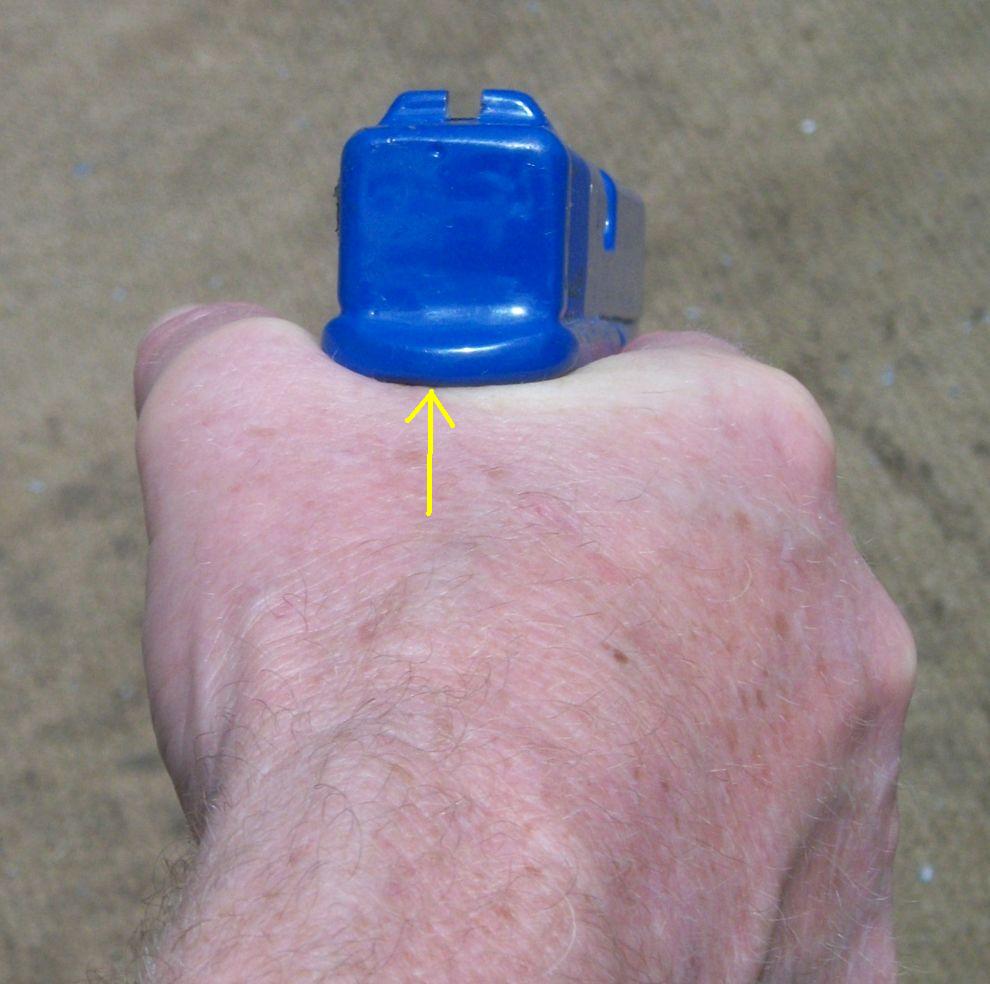
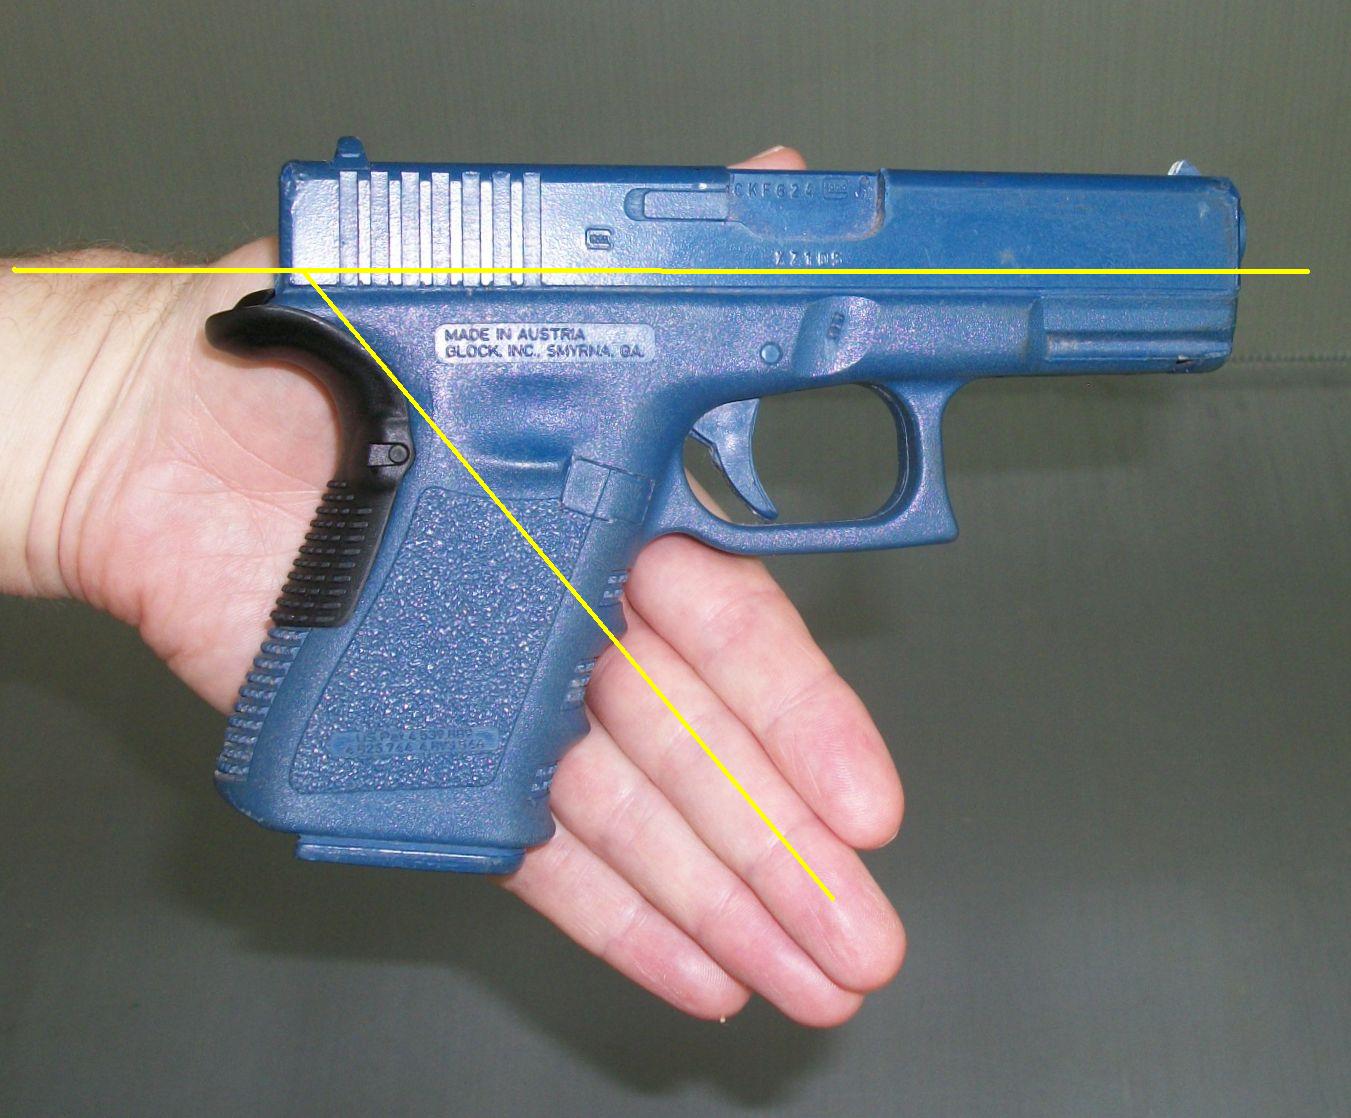
Web of the firing hand
The firing hand should be as high as possible on the back strap of the pistol. Gripping the pistol low increases the rotational torque of the pistol in the hand. So the first index point is the relationship between the tang of the pistol and the web of the hand. For most people, there should be no space between the tang and the web. The shape of a few people’s hands will leave a small space even when the gun is gripped as high as possible but this space should be minimal. Those with large hands may experience contact by the slide on the firing hand when it is held this high. The use of a beavertail or Grip Force Adapter on the Glock pistol can reduce this contact.
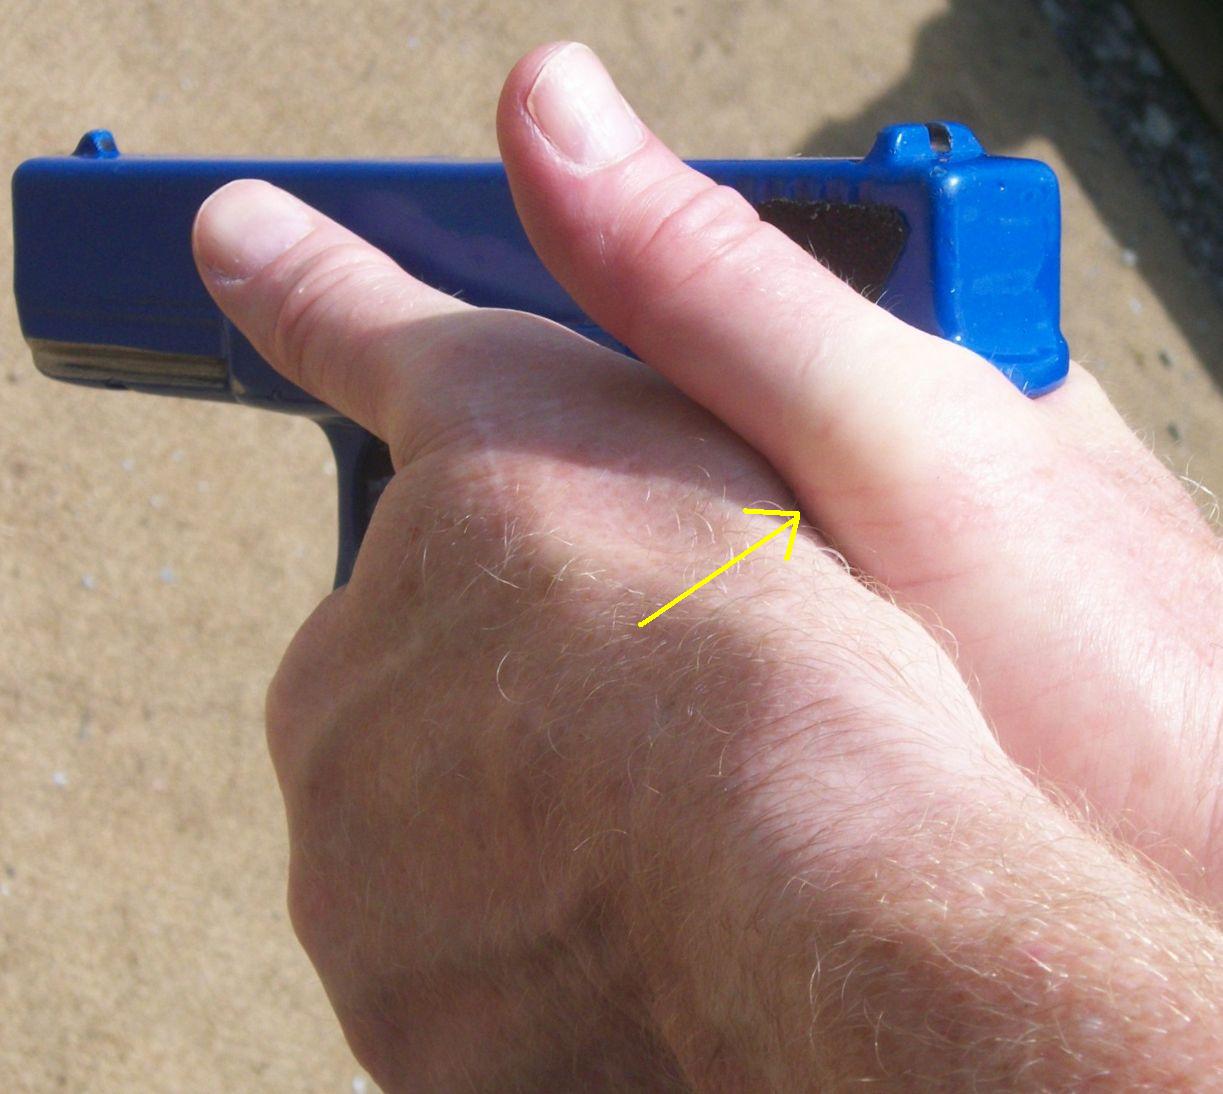
 Bases of the thumbs mate
As much of the support hand as possible should make contact with the pistol to maximize the friction the support hand can generate on the pistol. To achieve maximum contact, the bases of both thumbs should make contact firmly. This is the second index point. It is common to see space in shooters’ grips between the bases of the thumbs. This is a clear indicator that the support hand is not making maximum contact with the pistol.
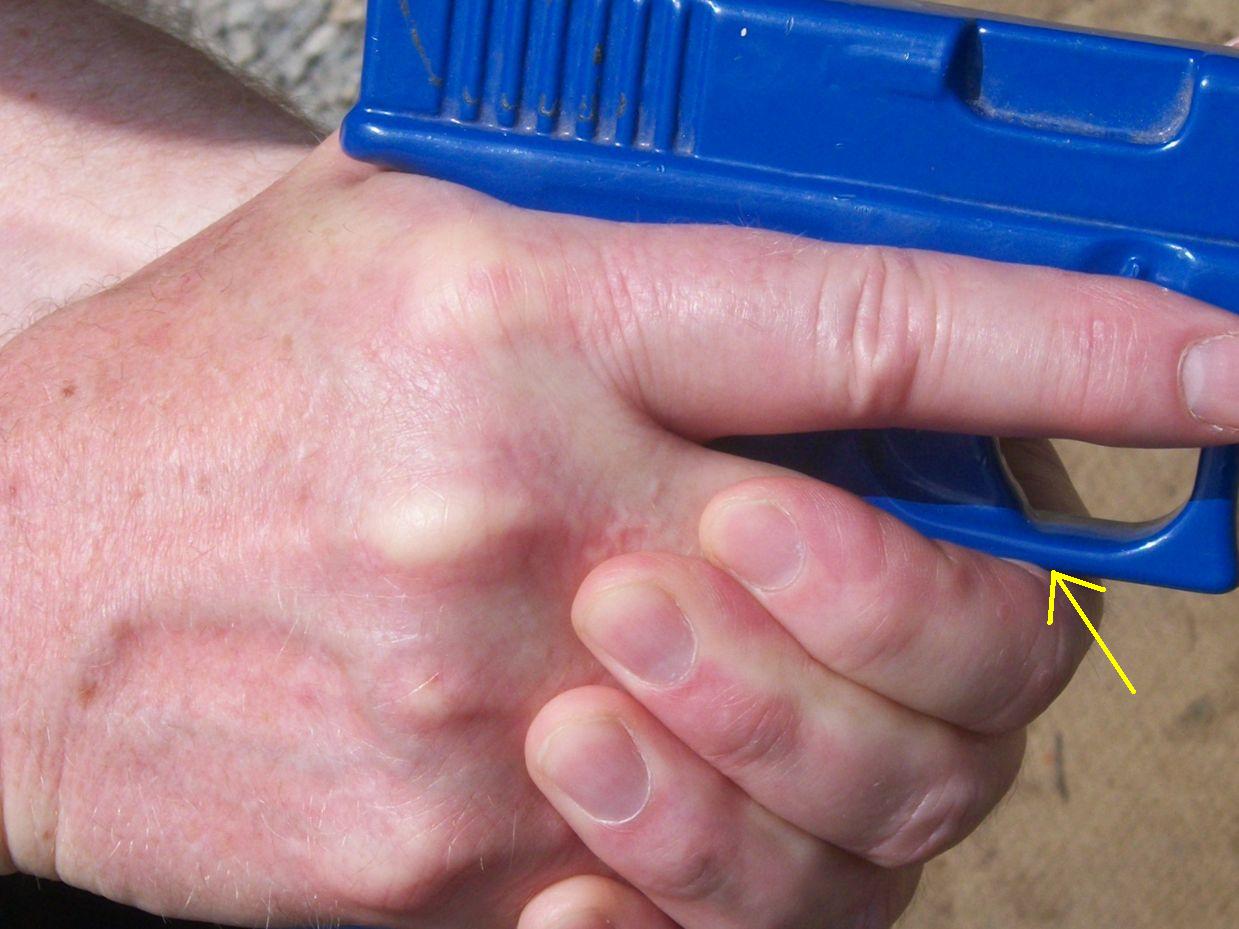
 Support trigger finger touches trigger guard
The support hand should be as high as possible on the pistol to reduce rotational torque. Lightly touching the underside of the trigger guard with the side of the support hand trigger finger is the third index point of a proper grip. When the support hand trigger finger touches the trigger guard, the support hand is properly high on the gun. The ‘cup and saucer’ hold used by most TV and movie actors is an excellent demonstration of how NOT to form the grip of the support hand. Because blanks generate no recoil, controlling the handgun is not of importance to them. The ‘cup and saucer’ method does keep the actor’s arms down and allows a better view of the face, which is why it is used so often in that format.
 Wrist is extended downward
Stabilizing the support wrist is a key component of a proper grip to achieve recoil control. This is the element that many people do incorrectly when forming the grip. The wrist is most stable when it is extended downward.
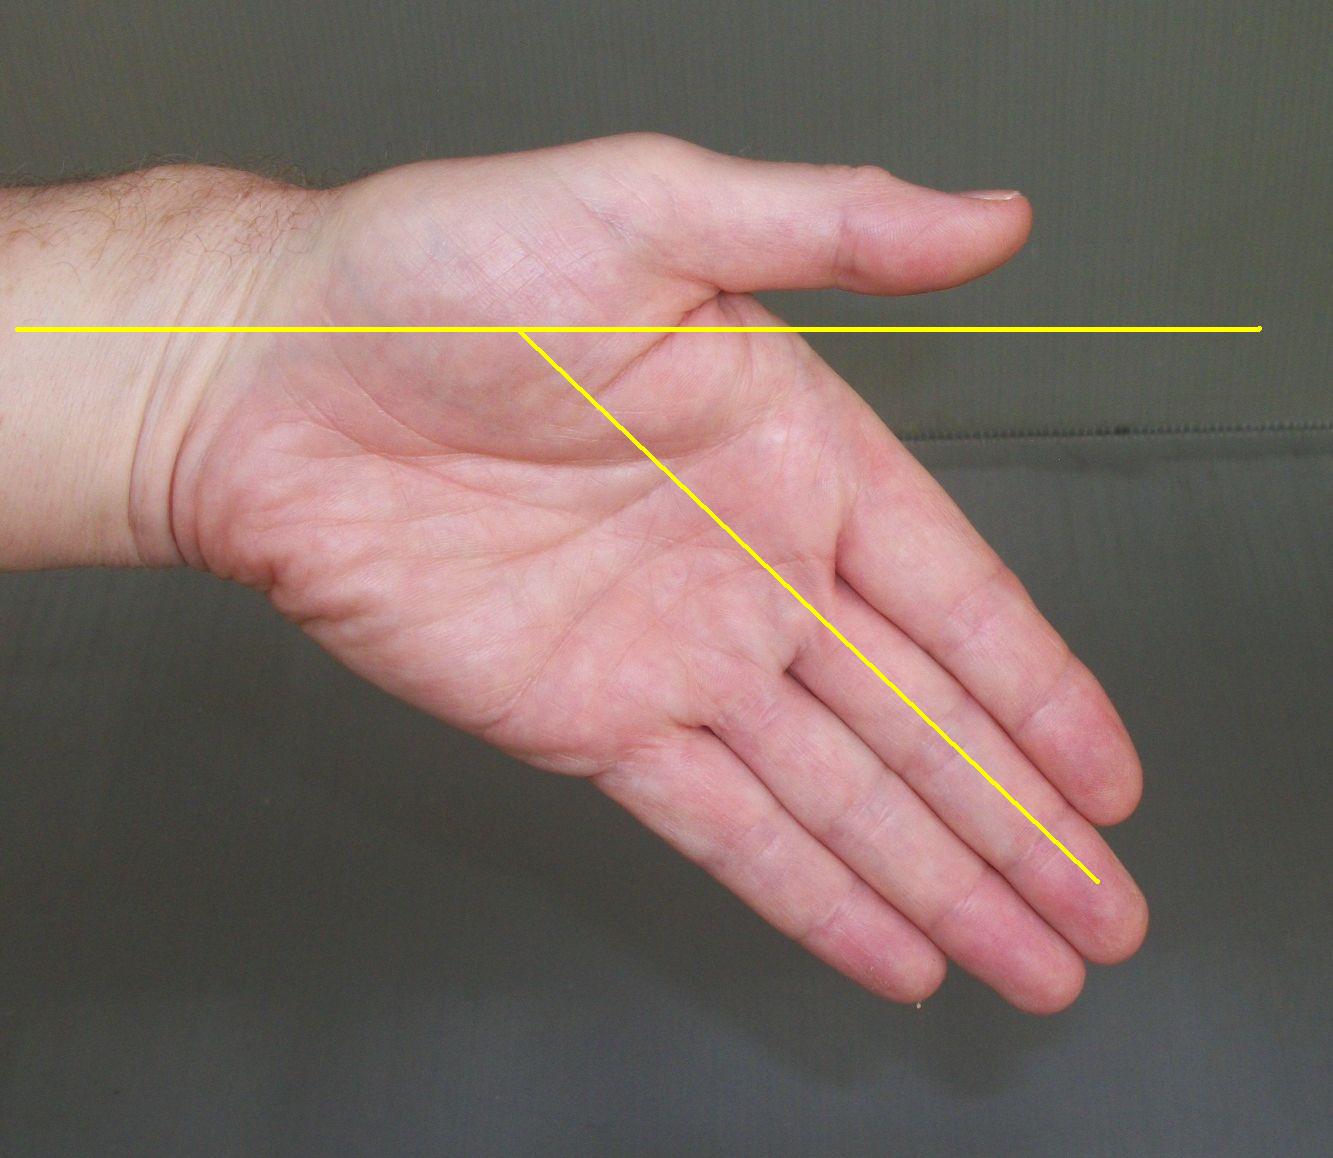 Angled downward in relation to bore
So when the support hand is applied to the pistol to form the grip, it should be angled downward in relation to the line of the pistol’s bore.
 Wrist should not be straight
The downward extension is initially slightly uncomfortable and feels somewhat unnatural. As a result, shooters tend to unconsciously keep the wrist of the support hand straight instead of extending it downward.
 Wrist incorrect
So, it is common to see the wrist held almost straight when the support hand is applied to form the grip. This is incorrect and does not provide much stability to the pistol when it fires.
 Firing thumb on support thumb
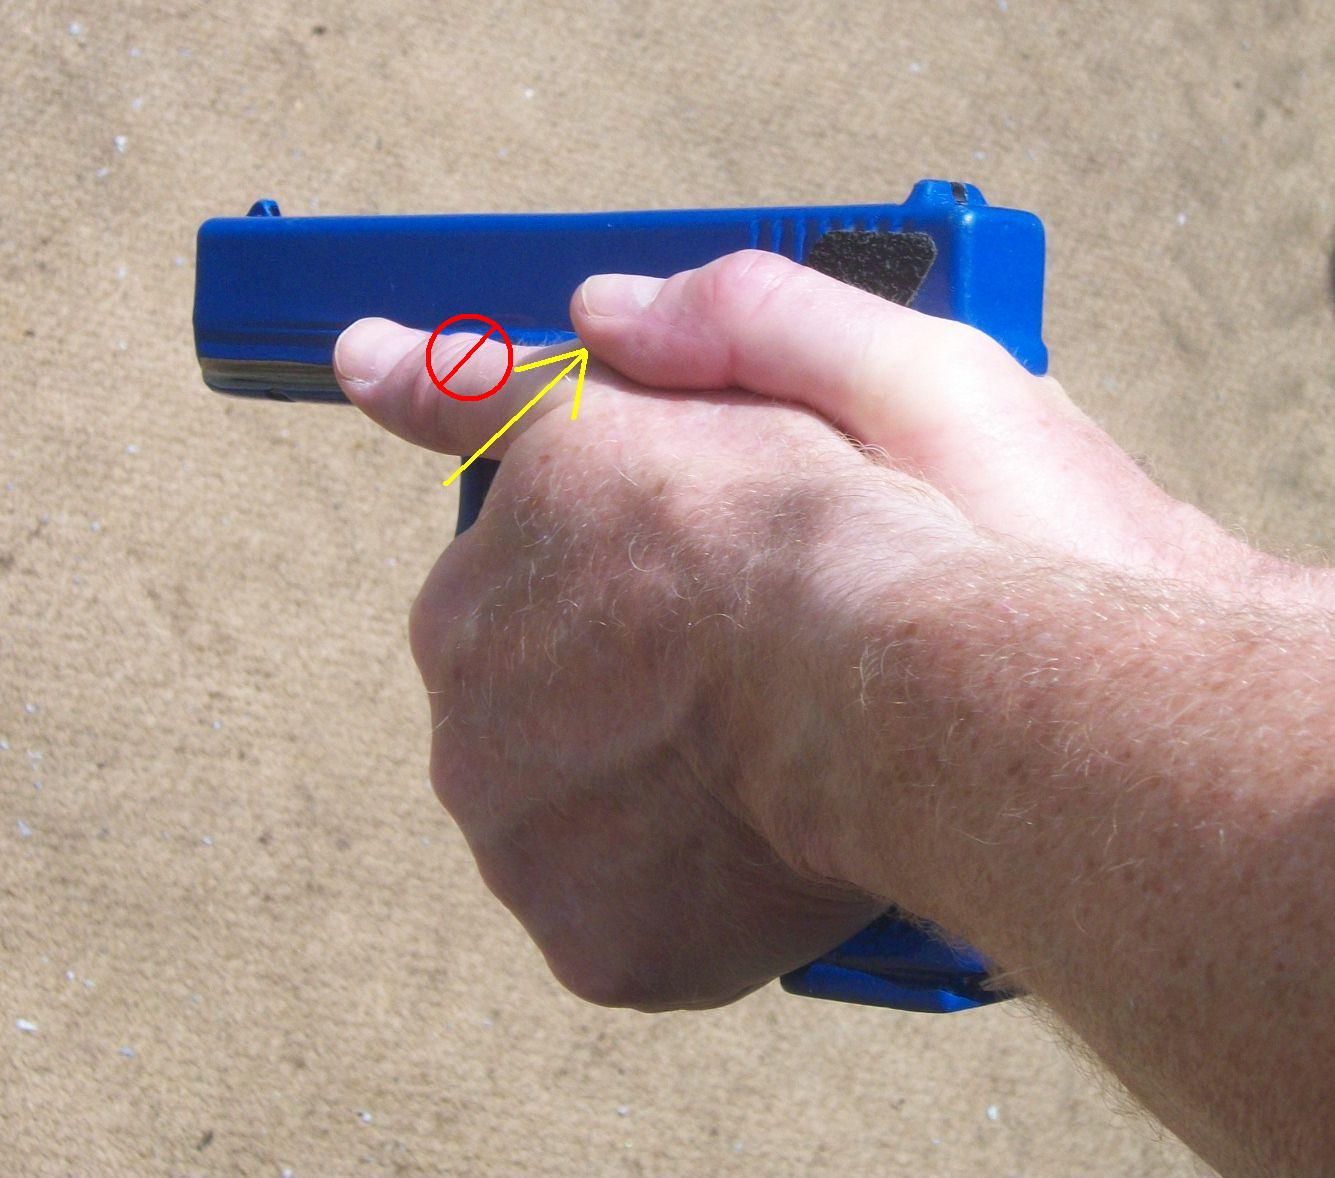
Consequently, the fourth index point is the contact point of the firing thumb on the support thumb. By knowing location of this point when the support wrist is properly extended downward, a shooter can immediately tell whether or not the best grip has been achieved. For most shooters, the tip of the firing hand thumb should be aligned in the area of the base knuckle of the support hand, rather than on top of the knuckle, as is commonly seen. The support hand thumb can either float free or lightly touch the frame of the pistol. It should NOT apply any significant sideways pressure to the pistol frame, as this can create a shift in the pistol’s point of impact.
 Two components of fourth index point
The fourth index point has two components. First, it verifies that the support wrist is extended downward. Second, it is located such that the firing hand thumb clears the slide stop to the maximum extent possible.
 If the firing hand thumb is placed directly alongside the slide of the pistol, it’s easy for that thumb to prevent the slide stop from functioning. This will prevent the slide from locking back after the last shot fires. The subsequent click upon a firing attempt when the slide does not lock back can be either annoying or fatal, depending on circumstance.
For most shooters, the firing thumb should be placed directly in line with the support thumb, as opposed to beside it near the slide. Learning to place the firing thumb in line with the support thumb will minimize the possibility of interfering with the slide stop.
In summary, the four index points of the proper grip on an autoloading pistol are:
- Web of firing hand meets tang of pistol.
- Bases of both thumbs mate closely.
- Support hand trigger finger makes contact with trigger guard.
- Contact point of the firing thumb on the support thumb.
 Developing a proper grip takes some effort and analysis but yields big dividends in terms of your shooting ability. Note that the issue of sights is important enough for me to cut a rear sight notch in my blue guns. I cannot abide a gun without functional sights, even when it is an inert gun. The sights discussion is for another time, however.
Friday Fundamentals (Segment 2)
We’re continuing on with the series of ‘Friday Fundamentals’. I’ve written about Sight misalignment, speed, and accuracy before. It’s a key fundamental to increasing your speed while still maintaining an acceptable degree of accuracy. This drill is part of the second session of my Pistol Practice Program.
Required equipment:
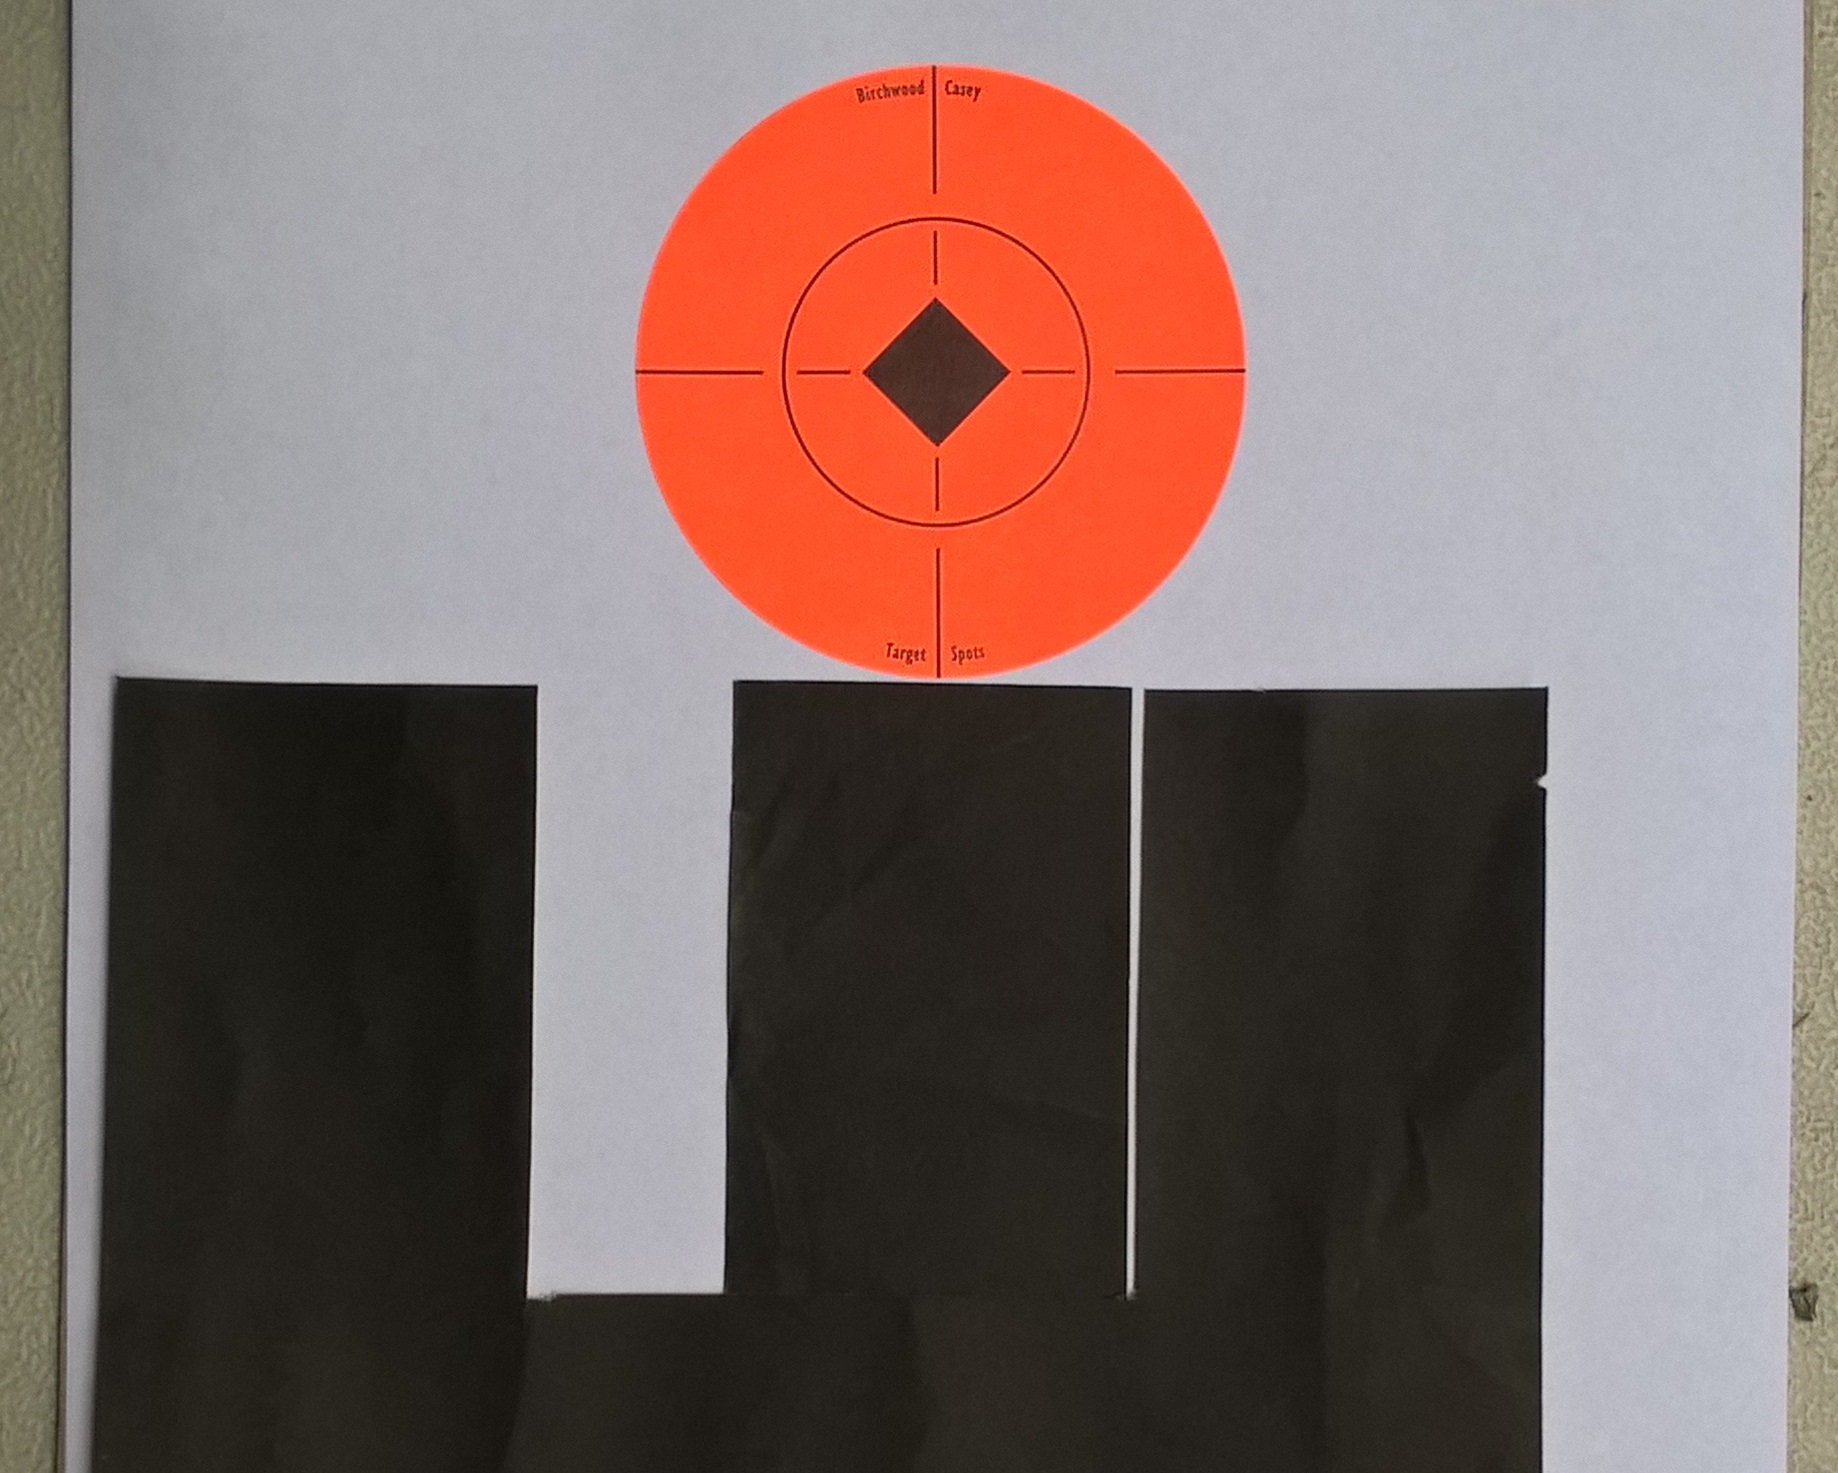
- Any silhouette target; B-27, B-21, Q, IDPA, IPSC, etc. Put a 2-3 inch aiming point on the silhouette in about the center of the target.
- Masking tape (preferred) or magic marker to mark the target.
- Pistol, 24 rounds of ammunition
- Eye and ear protection
Overview
This drill consists of three (3) Sequences of 8 shots each. You are going to deliberately misalign your sights so you can see the effect of this at increasing distances. The drill is to fire the pistol with the front sight on a spot on the target but with the rear notch deliberately misaligned. The Sequences are untimed.
Setup:
Place target at five (5) yards
Procedure:
Sequence 1 (8 rounds at 5 yards)
1) Start with handgun held in both hands. If possible, sit and rest your arms on the bench. You want to be as steady as you can for these three sequences. Do not let the pistol touch the bench; this can change where the bullets hit. Shift your support hand slightly under the pistol, if needed.
 2) Put the front sight just below the aiming spot on the target with the front sight half way above the top of the rear notch. Carefully fire two shots. Your sight picture should look something like this.

3) Put the front sight just below the aiming spot on the target with the front sight lowered so that its top edge is half way down in the rear notch. Carefully fire two shots. Your sight picture should look something like this.

4) Put the front sight just below the aiming spot on the target with the front sight over to the right so that its right edge is touching the right side of the rear notch. Carefully fire two shots. The sight picture should look something like this.
 5) Put the front sight just below the aiming spot on the target with the front sight pushed to the left so that its left edge is touching the left side of the rear notch. Carefully fire two shots. Your sight picture should look something like this.
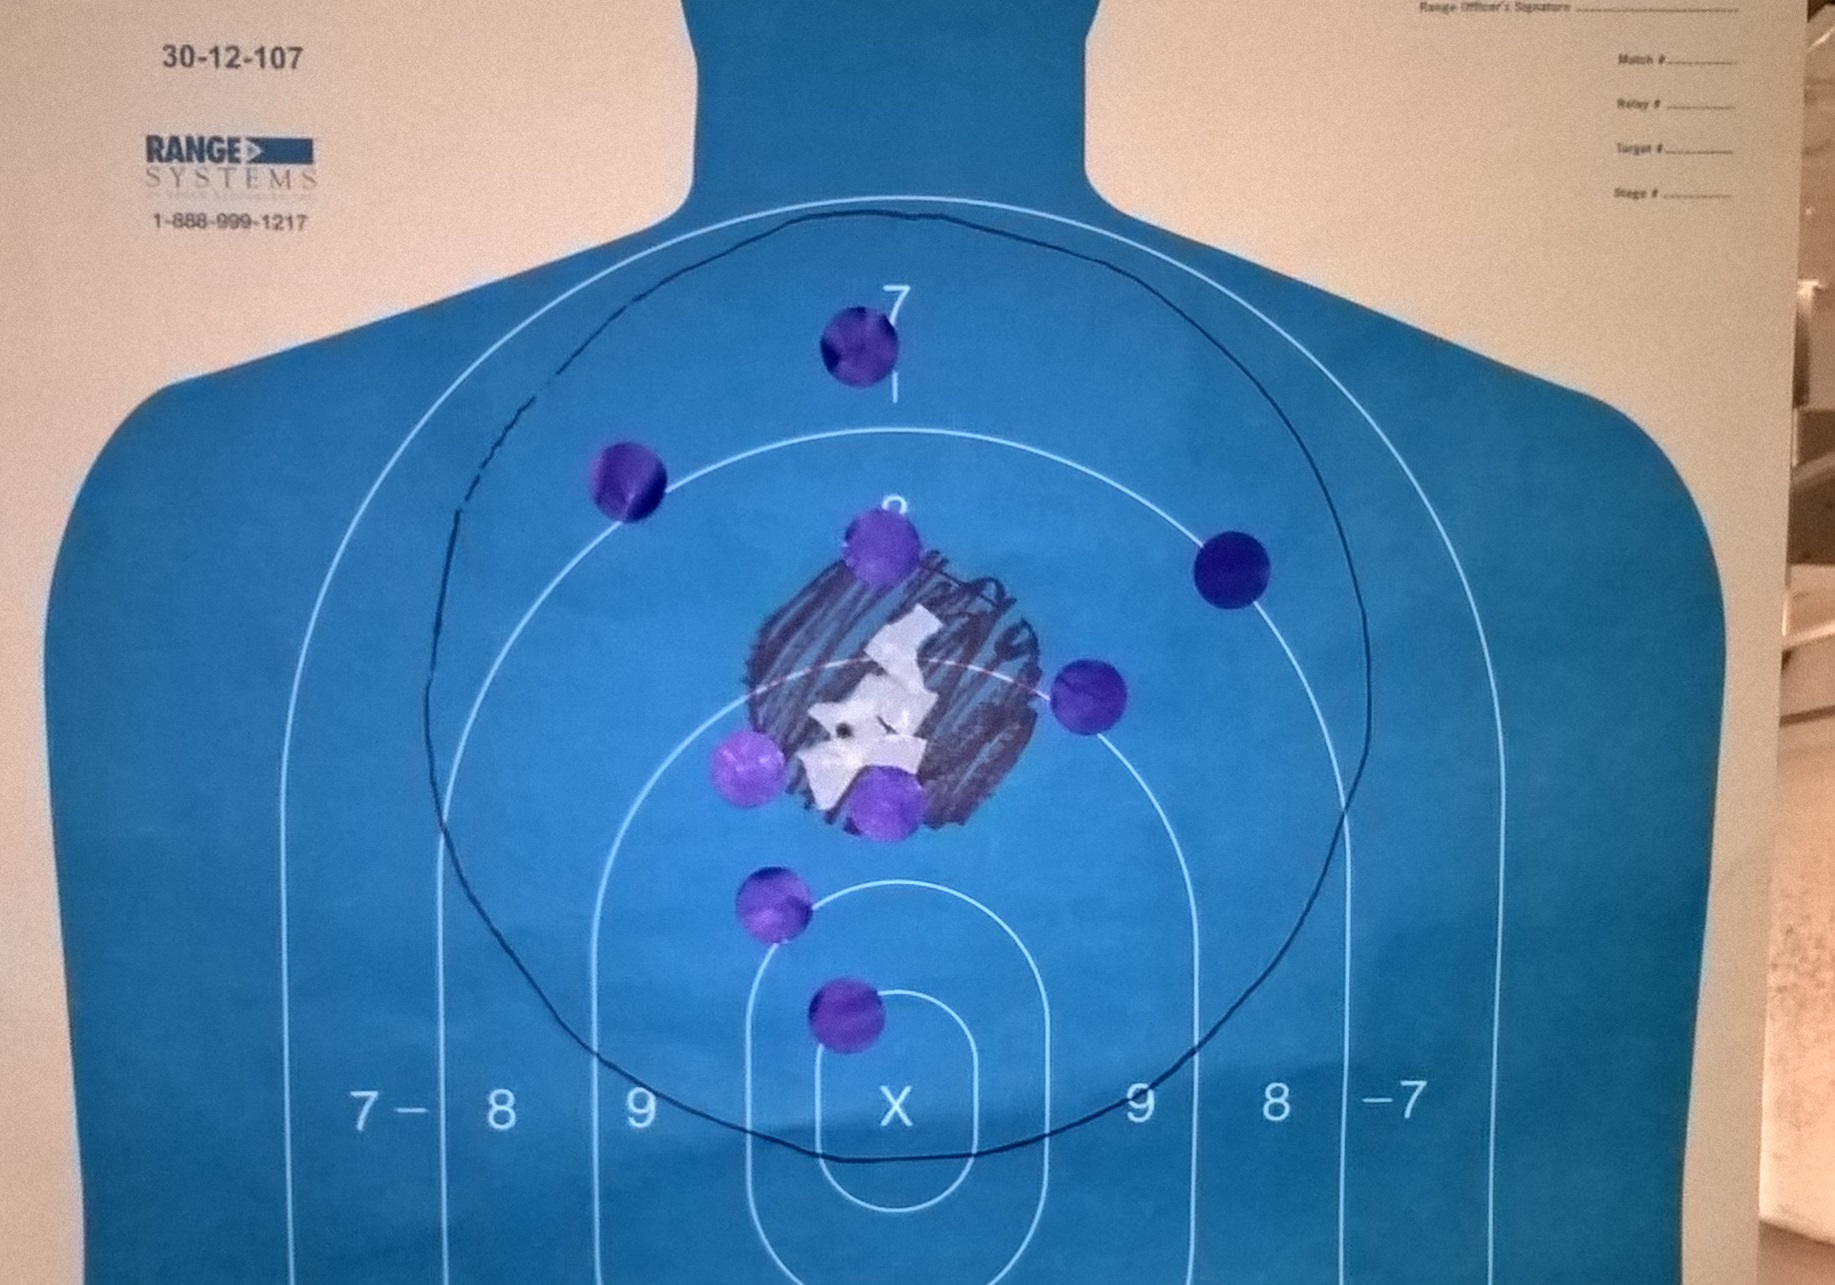
 Bring the target back and mark your shots with masking tape, pasters, or a marker. You will end up with eight shots on the target that will be dispersed up, down, left, and right. The target should look something like this:
 Sequence 2 (8 rounds at 10 yards)
1) Send the target out to 10 yards.
2) Repeat Sequence 1 but with the target at 10 yards.
3) Bring the target back and mark it.
Sequence 3 (8 rounds at 15 yards)
1) Send the target out to 15 yards.
2) Repeat Sequence 1 with the target at 15 yards.
3) Bring the target back and mark it.
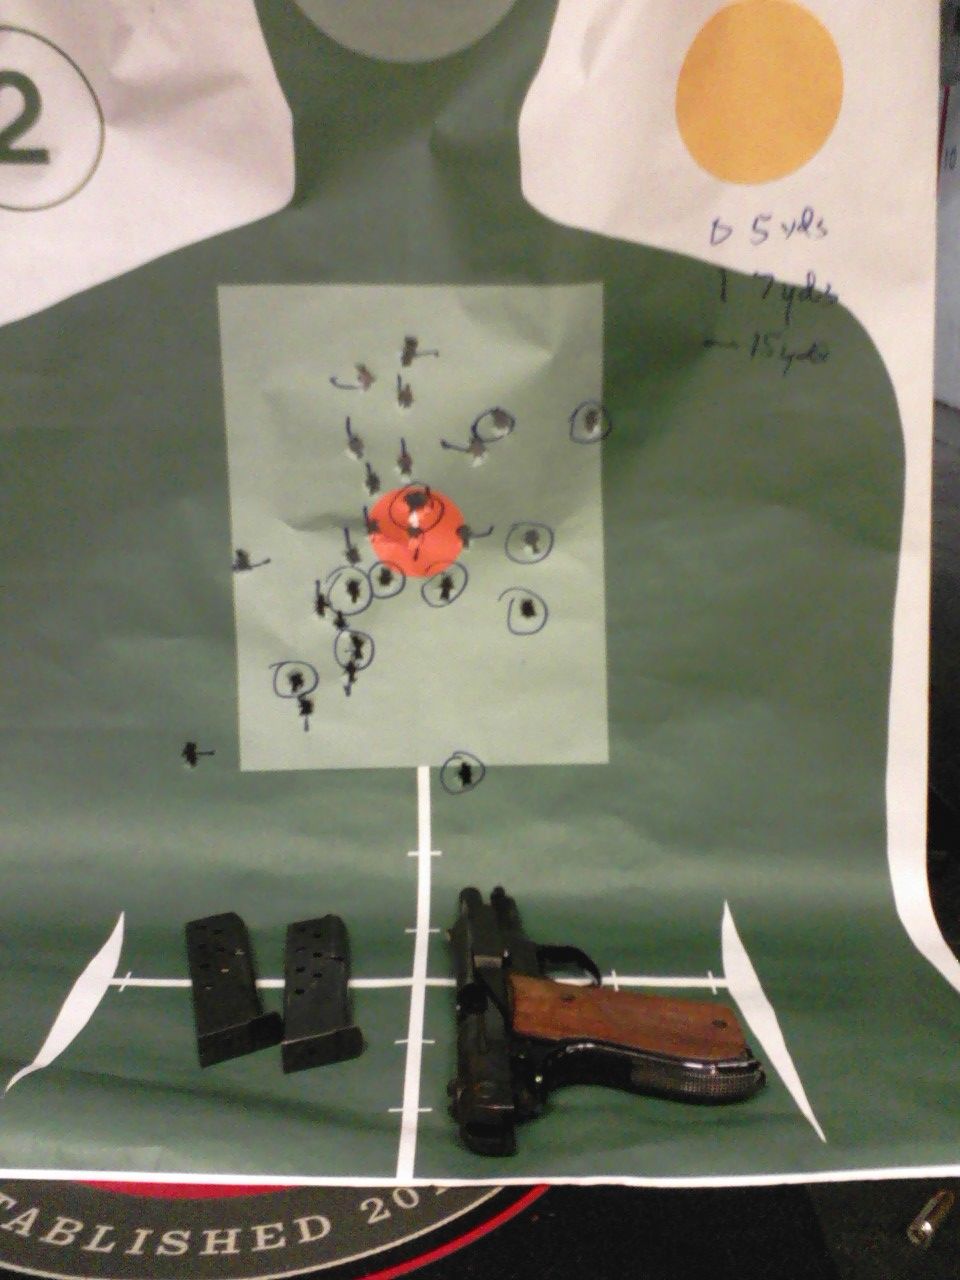
Depending on your eyes and the nature of your sights, you may find that even at 15 yards your group stays on the target, despite the slightly misaligned sights.
Objective:
The purpose of this exercise is to demonstrate that the sights do not have to be perfectly aligned to get an acceptable hit on a silhouette size target. Many people waste time trying to get a perfect sight picture when it isn’t necessary. This principle of acceptable misalignment is the basis for what is called the “flash sight picture.” What we are trying to do is to get the front sight close to our aiming point and then refine the sight picture only to the extent we need to in order to get an acceptable hit. As your skill improves, your groups will get smaller and smaller but the principle remains the same.
How much work and practice?
Linda Ronstadt made the following comments [3:22] in an interview about how hard she worked at the process of learning to sing as well as she did.
In order to get good, you really have to spend 6 or 8 hours a day doing it.
You have to spend hours and hours and hours, day after day, year after year.
It took me about 10 years to learn how to sing, even after I was a professional.
It took me 10 years until I really had some control of my instrument and I could deliberately do what I wanted to do.
Sometimes, as I continue on with 1000 Days of Dryfire, going to the range weekly to livefire, or taking training from someone else several times a year, I wonder whether I work at it too much. Then Linda comes along and basically tells me that actually I’m only spending a minimal amount of time and effort at it compared to how hard people who are really good at their craft work. Thanks for that bit of motivation, Linda.
Friday Fundamentals 01 – Establishing Your Baseline
My friend Mark Luell, the author of Growing Up Guns suggested I provide a ‘Friday Fundamentals’ post weekly. We got the idea from my colleague Cecil Burch who wrote a blog post about Fundamentals. It’s a great idea to stay in touch with the basics.
The first installment is Session 01 of my Pistol Practice Program – Establishing Your Baseline. As in any journey, you have to know where you’re starting from before you can get to where you want to go.
The objective of this drill is to determine what distance you can make 100 percent hits on the vital area of a silhouette target. My feeling is that we need to work on achieving 100 percent accuracy because errant rounds in our homes or neighborhoods could be a major problem. Since I also think the first shot is the most important, I structured the session with a lot of first shots but also included multi-shot strings. A lot of people ‘walk their rounds’ into the target even with handguns. This is a huge problem and liability.
 We don’t count hits on the head in this drill because they are actually misses if you are aiming at the body. The head is more than a foot away from the center of the body, if you hit the head when you’re aiming at the body, it’s just a lucky shot and doesn’t count in terms of performance measurement.
Required equipment:
Any silhouette target; B-27, B-21, Q, IDPA, IPSC, etc.
Masking tape (preferred) or magic marker to mark the target.
Pistol, 50 rounds of ammunition
Eye and ear protection
Overview
This drill consists of five (5) Sequences of 10 shots each. The Sequences are untimed.
Setup:
Place target at three (3) yards
Start loaded with five (5) rounds only.
Procedure:
The starting position is Low Ready. This means the pistol is aimed at the floor below the target. For double action pistols, you will decock after each Step.
Sequence 1 (10 rounds)
1) Start with handgun held in both hands, aimed at the floor below the target. Spare magazine loaded with 5 rounds or speedloader with 5 rounds or 5 loose rounds on the bench.
2) Bring the pistol up on target and fire 1 shot at the center of target. Followthrough for one second, then return to low ready. Decock, if appropriate.
3) Bring the pistol up on target and fire 2 shots at the center of target. Followthrough for one second, then return to low ready. Decock.
4) Bring the pistol up on target and fire 3 shots at the center of target. After two shots, the pistol will be out of ammunition. Reload it and fire the third shot. Followthrough for one second, then return to low ready. Decock.
5) Bring the pistol up on target and fire 4 shots at the center of target. After the shots, the pistol will be out of ammunition. Hopefully, the slide has locked back if it’s an autoloader.
6) Place your pistol down on the bench.
7) Bring your target back and mark all the hits, preferably with tape but a marker will do.
8) Write on the target how many hits you made in the body scoring area. I prefer to not count the outer scoring area as I mentioned in Why I hate the -3 zone. Use this format, (3) X/10, X being the number of hits. For this drill, do not count any hits in the head, they are actually misses.
Sequence 2 (10 rounds)
1) Send the target out to 5 yards.
2) Repeat Sequence 1 but with the target at 5 yards instead of 3 yards.
3) When you write on the target how many hits you made in the scoring area, it will be (5) X/10. The number in parenthesis is the distance in yards.
Sequence 3 (10 rounds)
1) Send the target out to 7 yards.
2) Repeat Sequence 1 with the target at 7 yards.
3) Write on the target how many hits you made at 7 yards. (7) X/10
Sequence 4 (10 rounds)
1) Send the target out to 10 yards.
2) Repeat Sequence 1 with the target at 10 yards.
3) Write on the target how many hits you made at 10 yards. (10) X/10
Sequence 5 (10 rounds)
4) Send the target out to 15 yards.
5) Repeat Sequence 1 with the target at 15 yards.
6) Write on the target how many hits you made at 15 yards. (15) X/10
When you finish the drill, record your score for each yardage. Make this a part of your practice record. Shooting this exercise will give you a good idea of what your current proficiency level is. That’s an important starting point.

You must be logged in to post a comment.