Friday Fundamentals (Segment 3) Properly gripping an autoloading pistol
As my colleague Wayne Dobbs of Hardwired Tactical Shooting says, there are three fundamentals of handgun shooting that can make you or break you in a defensive situation; grip, sights, and trigger [manipulation]. I would also add follow through, as a student who came back today from the elite Rogers Shooting School called to mention to me.
For this segment, let’s look at the autoloading pistol grip discussion contained in Advanced Pistol Practice.
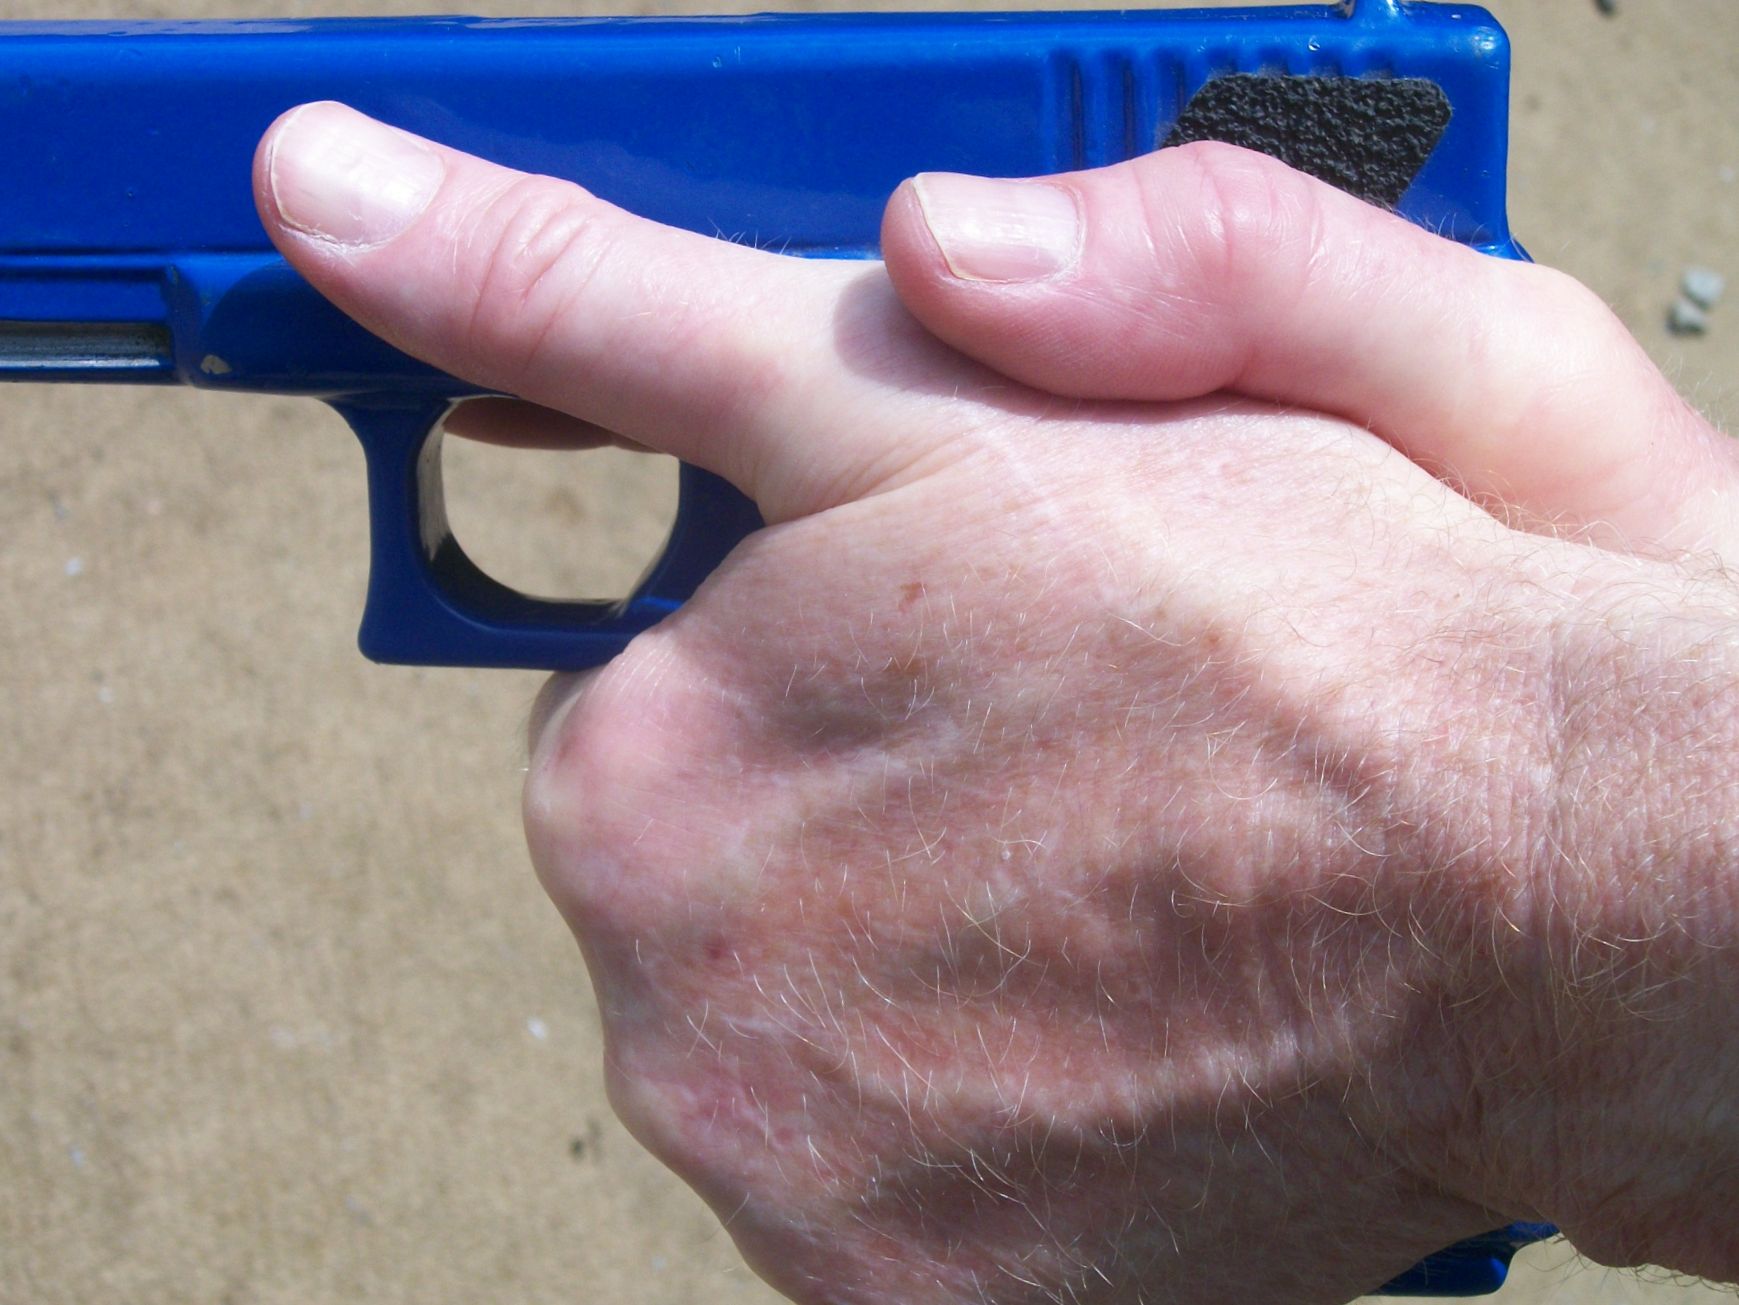 The proper grip for any handgun should accomplish several objectives:
- Maximize our hand friction on the handgun. The way we prevent the handgun from moving around in our hand(s) is simply via friction. Therefore, the more hand surface we have in contact with the gun, the more friction we can achieve.
- Minimize the gun’s motion during recoil by stabilizing the supporting joints, principally the wrists, when the gun fires.
- Reduce the distance between the line of the handgun’s bore and our hands to the smallest amount possible. This diminishes the rotational torque generated by the handgun upon firing.
After establishing the appropriate grip, a series of index points can be used to feel when the grip has been properly achieved. Especially in defensive encounters, there is no time for visually checking whether the proper grip is in place. Having a set of index points allows a shooter to establish a proper firing grip in the holster and during the drawstroke to know that the grip is as it should be.
With an autoloading pistol, this grip is commonly referred to as the ‘thumbs forward grip.’ Being aware of four specific index points will allow a shooter to know that a proper grip has been achieved without having to visually verify it. There are nuances to this grip that sometimes escape even experienced shooters, however. The first three index points are essentially the same for all shooters. The fourth index point may vary among shooters, dependent on individual physiology.
There is still debate as to how hard the fingers of the support hand should grip the firing hand. In any case, they should certainly grip firmly enough to not break free of the firing hand during recoil.
Web of the firing hand
The firing hand should be as high as possible on the back strap of the pistol. Gripping the pistol low increases the rotational torque of the pistol in the hand. So the first index point is the relationship between the tang of the pistol and the web of the hand. For most people, there should be no space between the tang and the web. The shape of a few people’s hands will leave a small space even when the gun is gripped as high as possible but this space should be minimal. Those with large hands may experience contact by the slide on the firing hand when it is held this high. The use of a beavertail or Grip Force Adapter on the Glock pistol can reduce this contact.
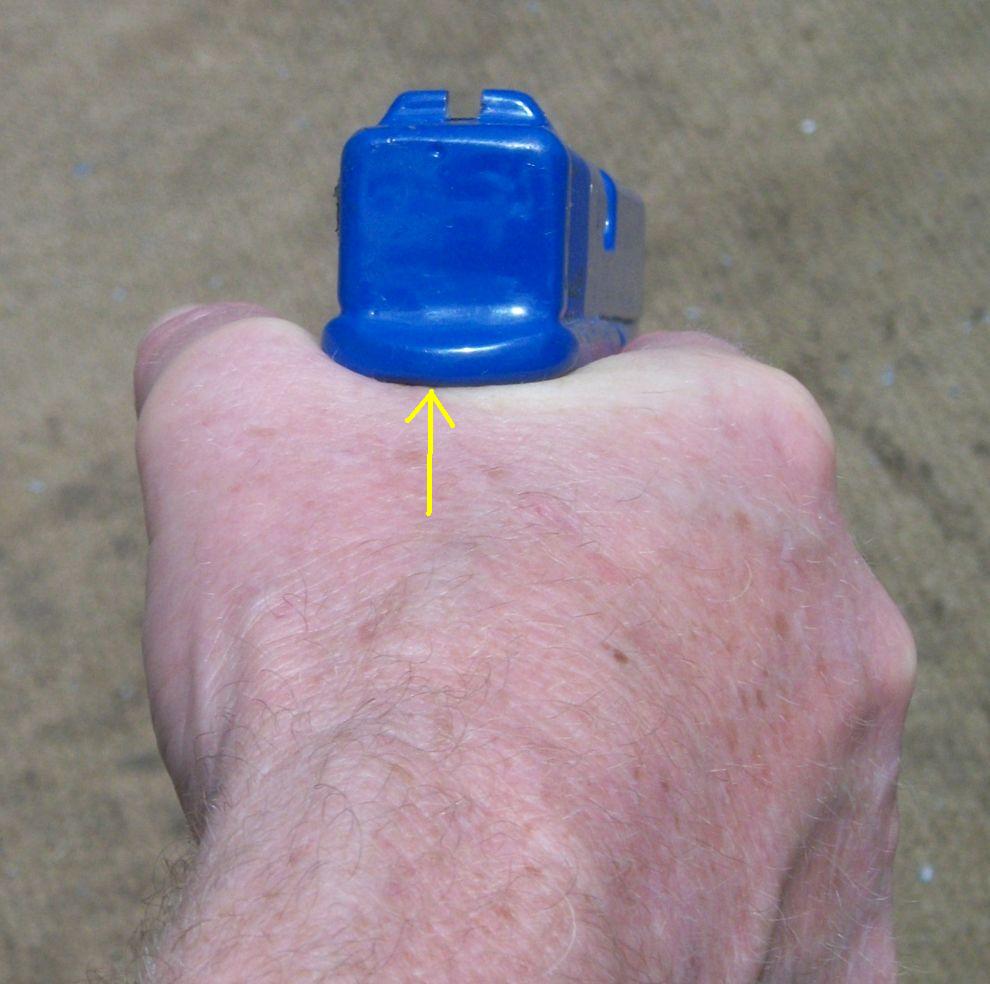 Bases of the thumbs mate
As much of the support hand as possible should make contact with the pistol to maximize the friction the support hand can generate on the pistol. To achieve maximum contact, the bases of both thumbs should make contact firmly. This is the second index point. It is common to see space in shooters’ grips between the bases of the thumbs. This is a clear indicator that the support hand is not making maximum contact with the pistol.
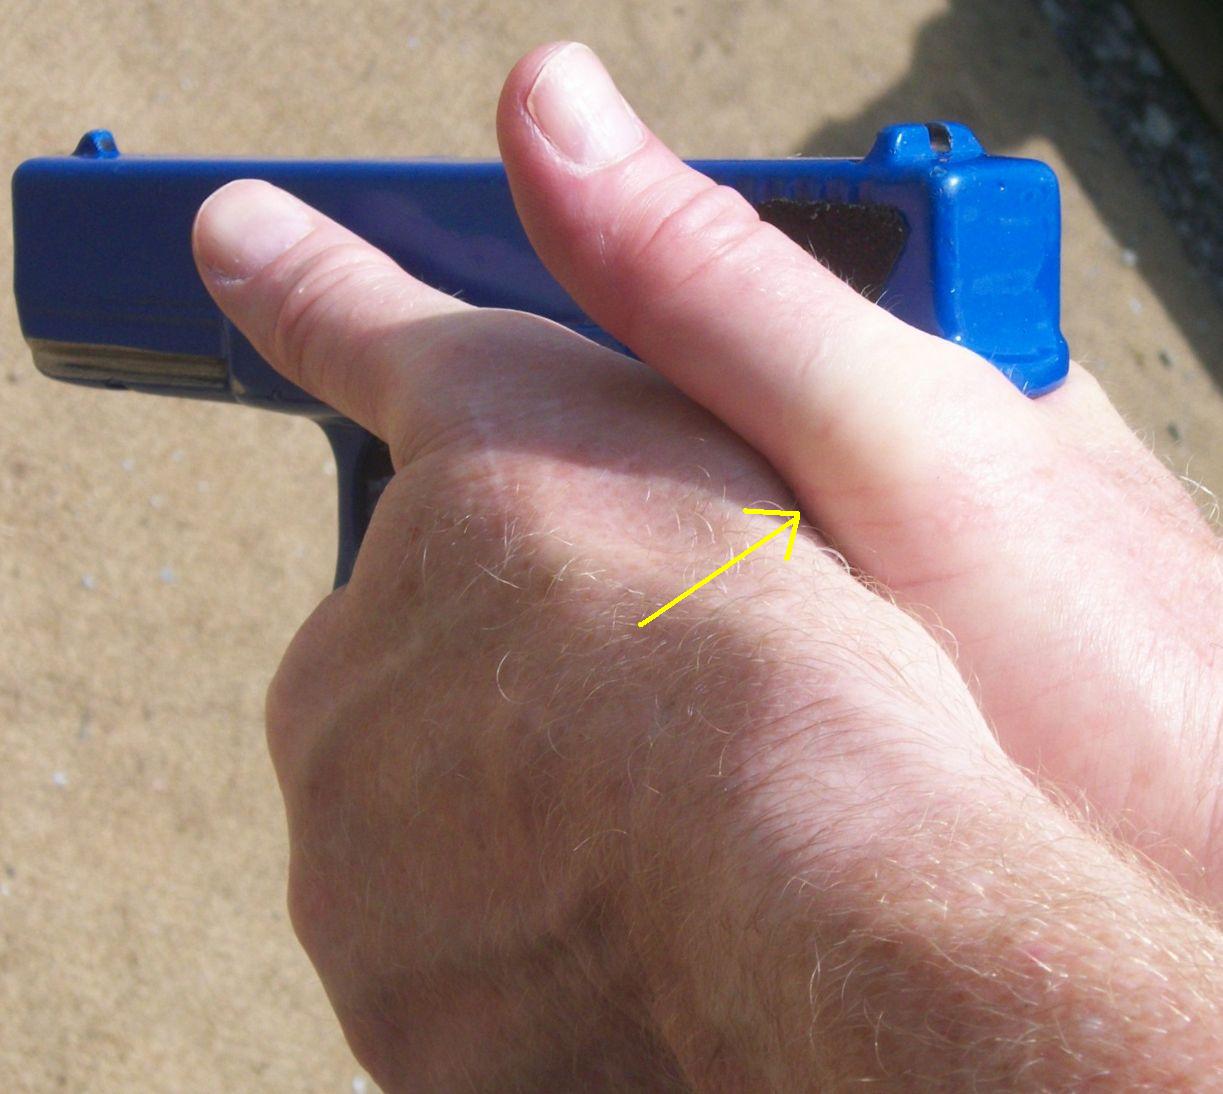 Support trigger finger touches trigger guard
The support hand should be as high as possible on the pistol to reduce rotational torque. Lightly touching the underside of the trigger guard with the side of the support hand trigger finger is the third index point of a proper grip. When the support hand trigger finger touches the trigger guard, the support hand is properly high on the gun. The ‘cup and saucer’ hold used by most TV and movie actors is an excellent demonstration of how NOT to form the grip of the support hand. Because blanks generate no recoil, controlling the handgun is not of importance to them. The ‘cup and saucer’ method does keep the actor’s arms down and allows a better view of the face, which is why it is used so often in that format.
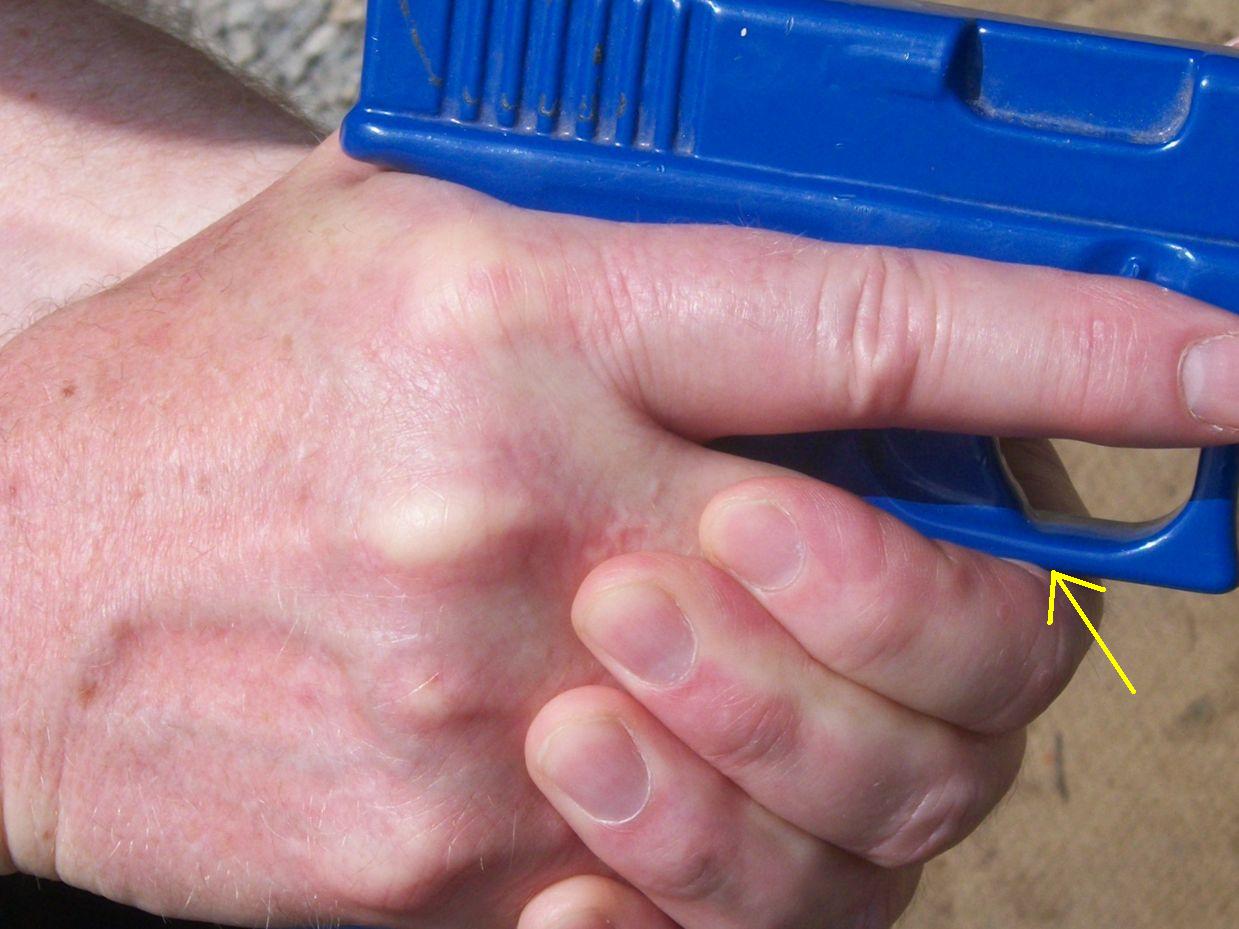 Wrist is extended downward
Stabilizing the support wrist is a key component of a proper grip to achieve recoil control. This is the element that many people do incorrectly when forming the grip. The wrist is most stable when it is extended downward.
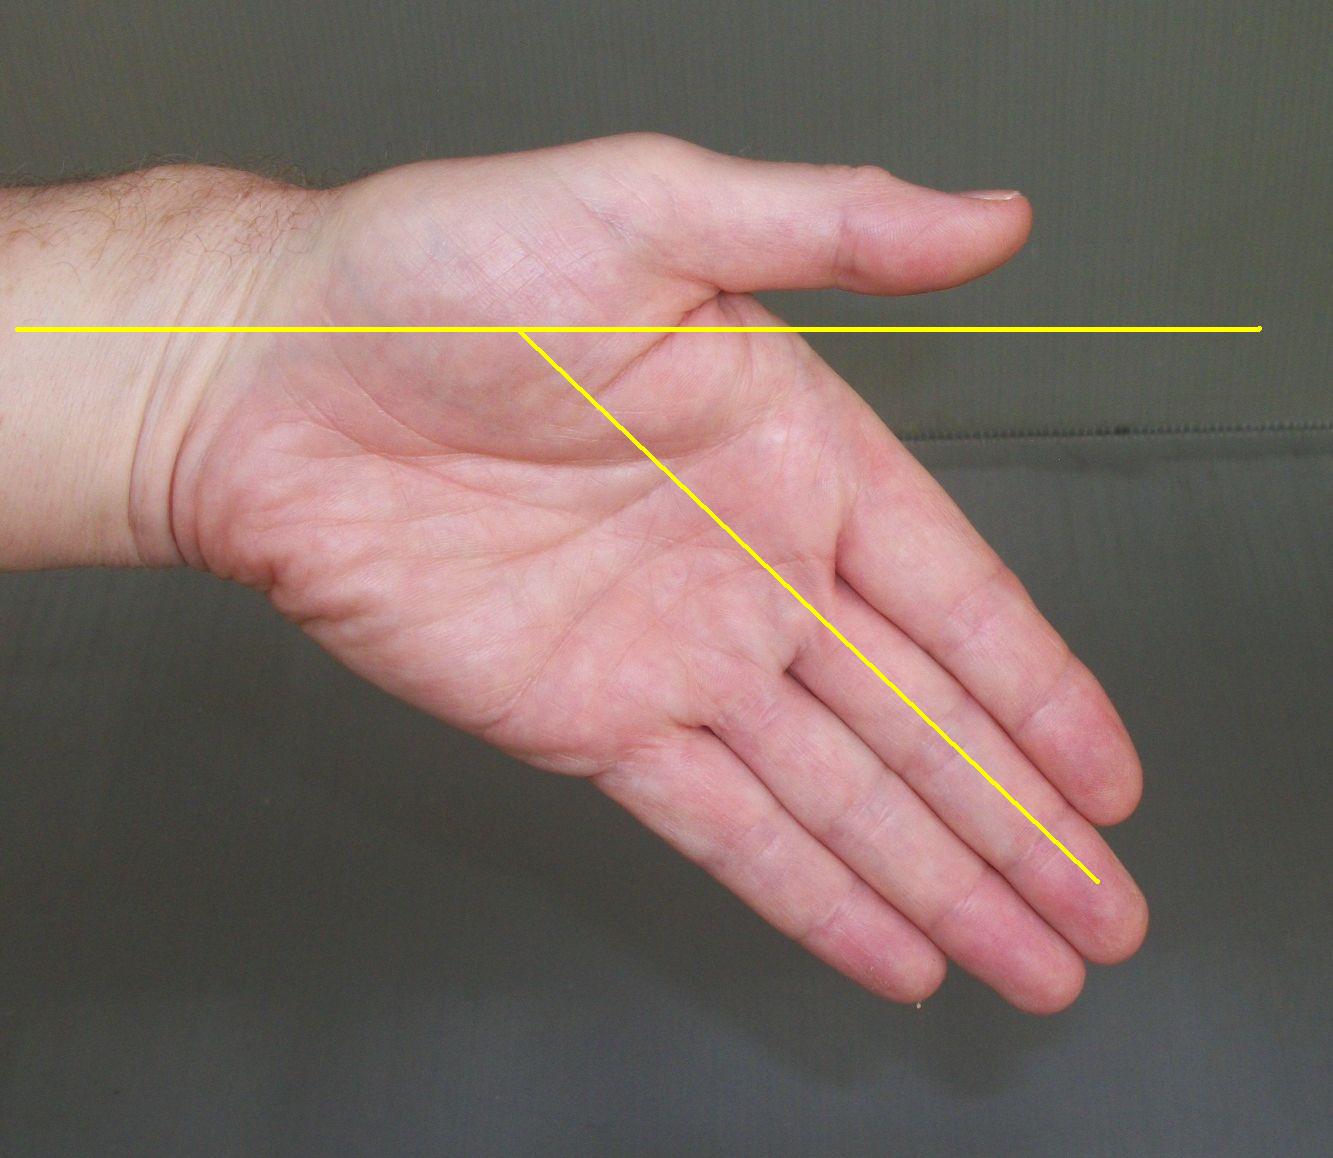 Angled downward in relation to bore
So when the support hand is applied to the pistol to form the grip, it should be angled downward in relation to the line of the pistol’s bore.
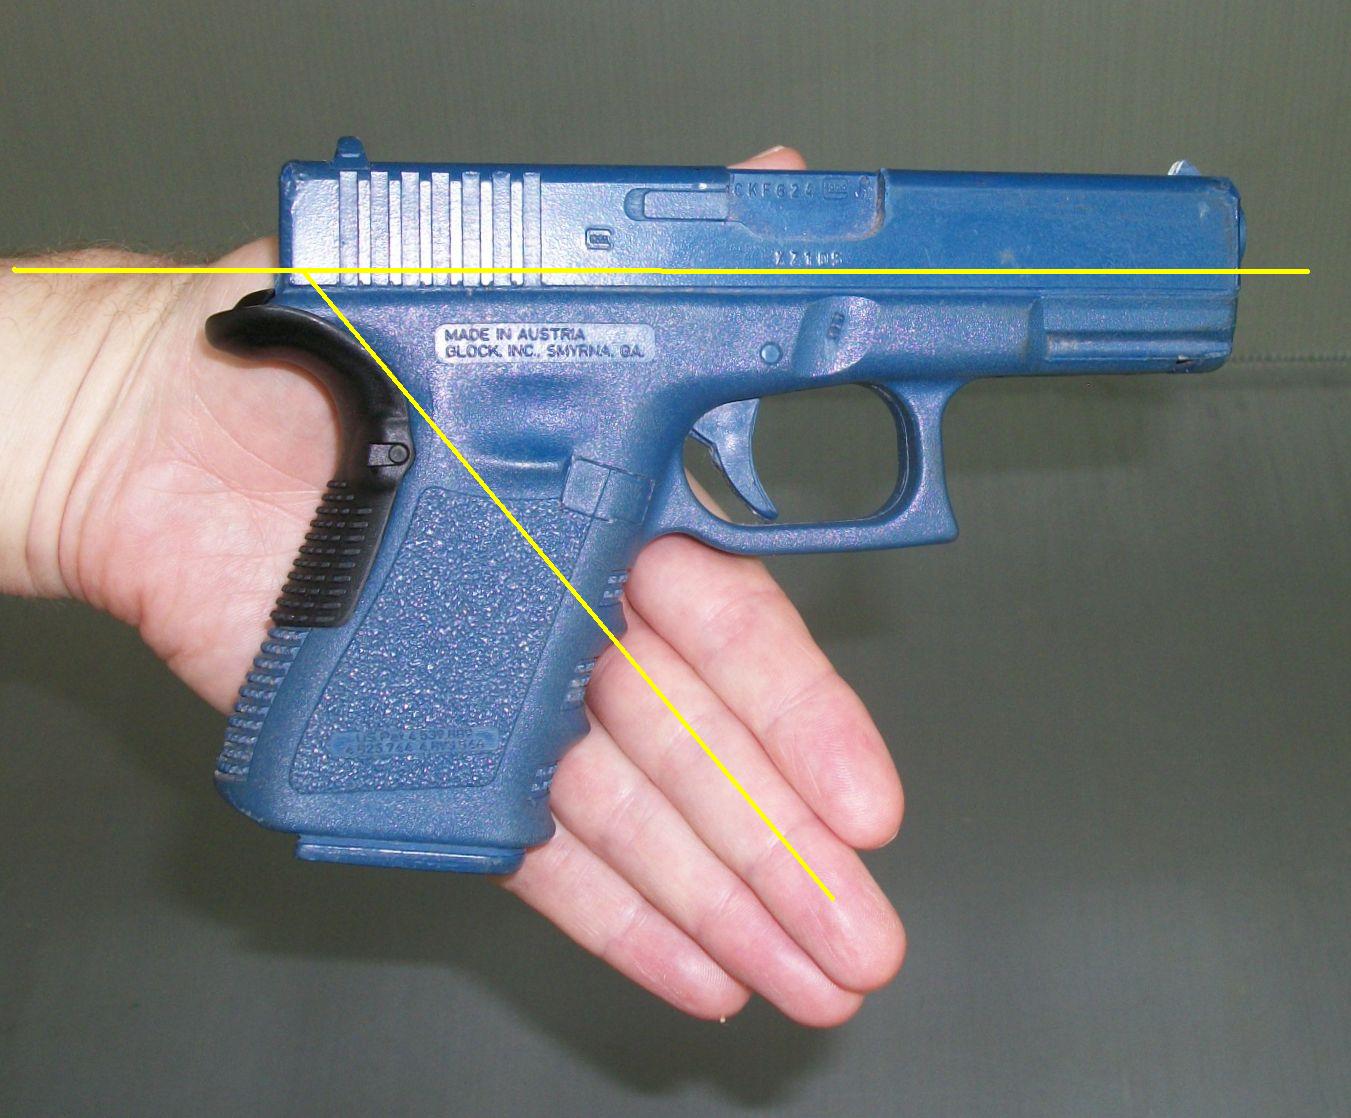 Wrist should not be straight
The downward extension is initially slightly uncomfortable and feels somewhat unnatural. As a result, shooters tend to unconsciously keep the wrist of the support hand straight instead of extending it downward.
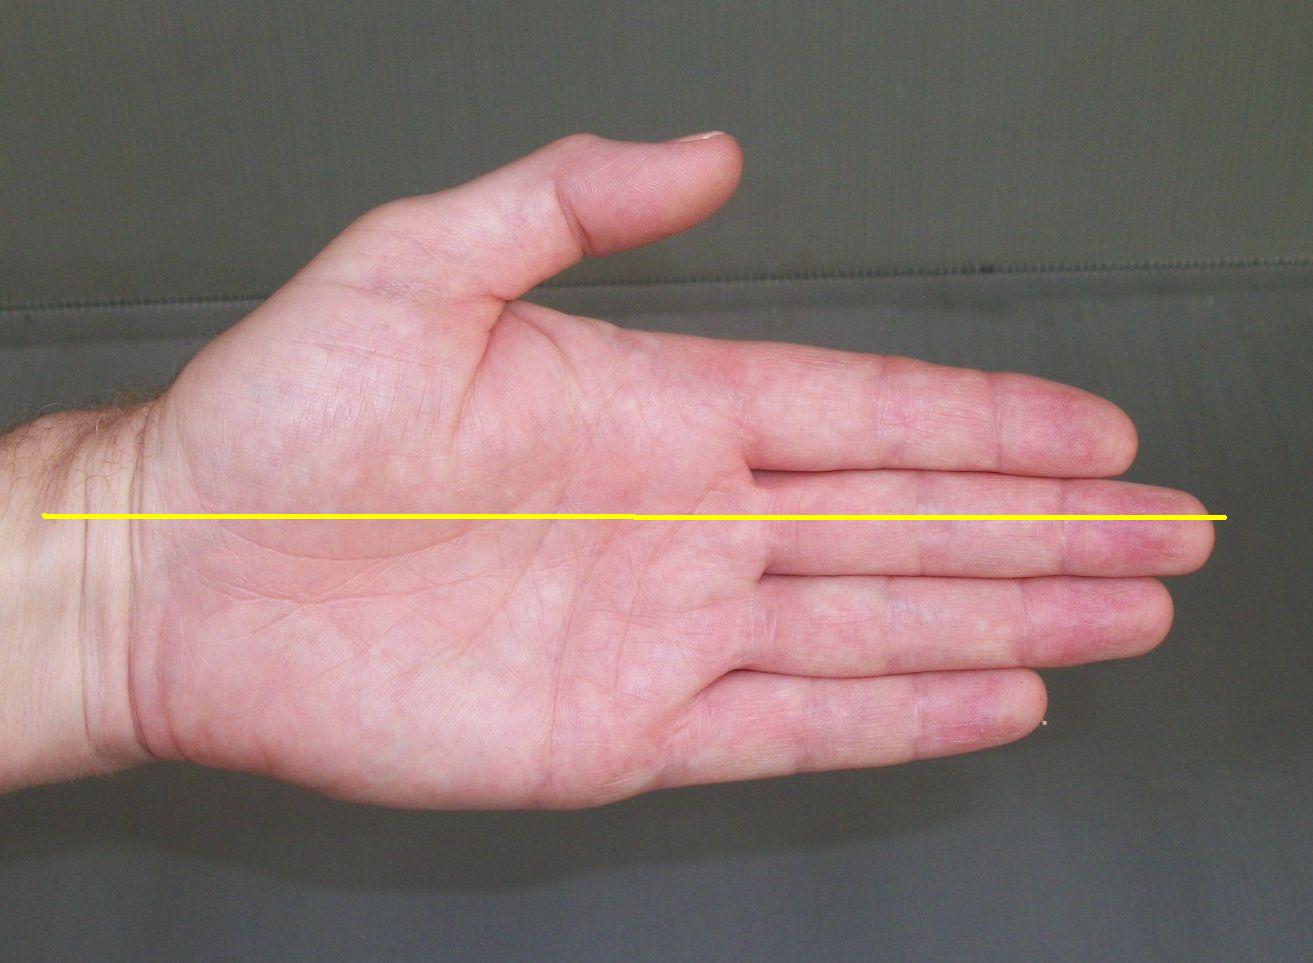 Wrist incorrect
So, it is common to see the wrist held almost straight when the support hand is applied to form the grip. This is incorrect and does not provide much stability to the pistol when it fires.
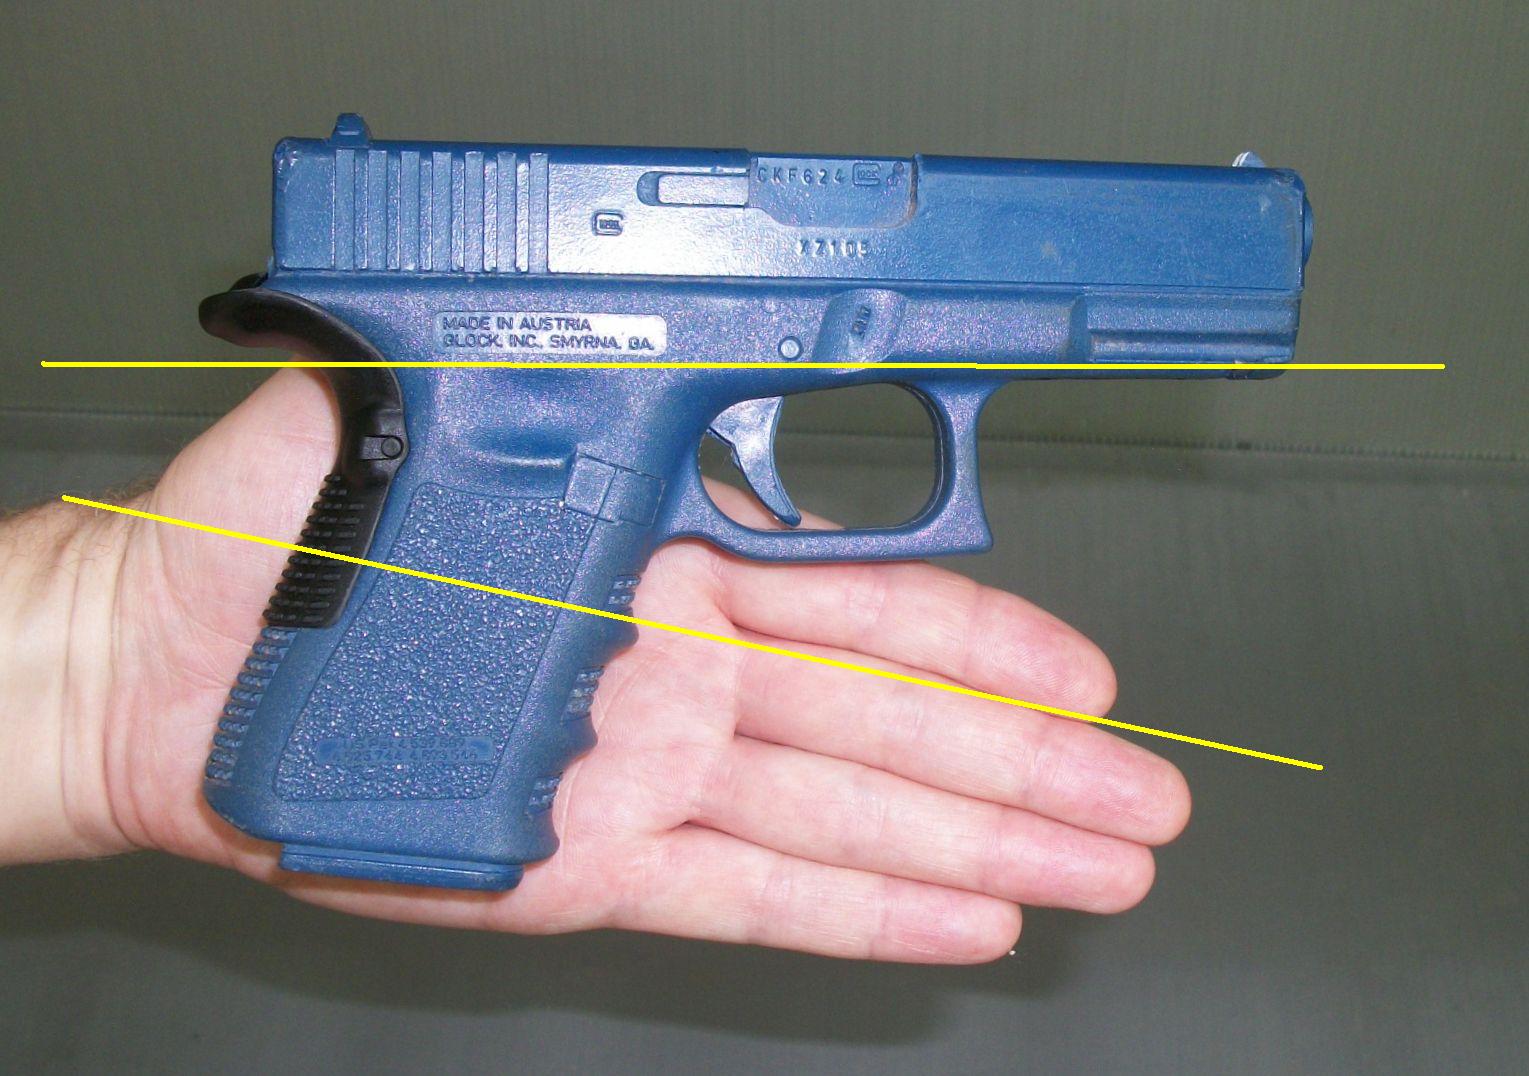 Firing thumb on support thumb
Consequently, the fourth index point is the contact point of the firing thumb on the support thumb. By knowing location of this point when the support wrist is properly extended downward, a shooter can immediately tell whether or not the best grip has been achieved. For most shooters, the tip of the firing hand thumb should be aligned in the area of the base knuckle of the support hand, rather than on top of the knuckle, as is commonly seen. The support hand thumb can either float free or lightly touch the frame of the pistol. It should NOT apply any significant sideways pressure to the pistol frame, as this can create a shift in the pistol’s point of impact.
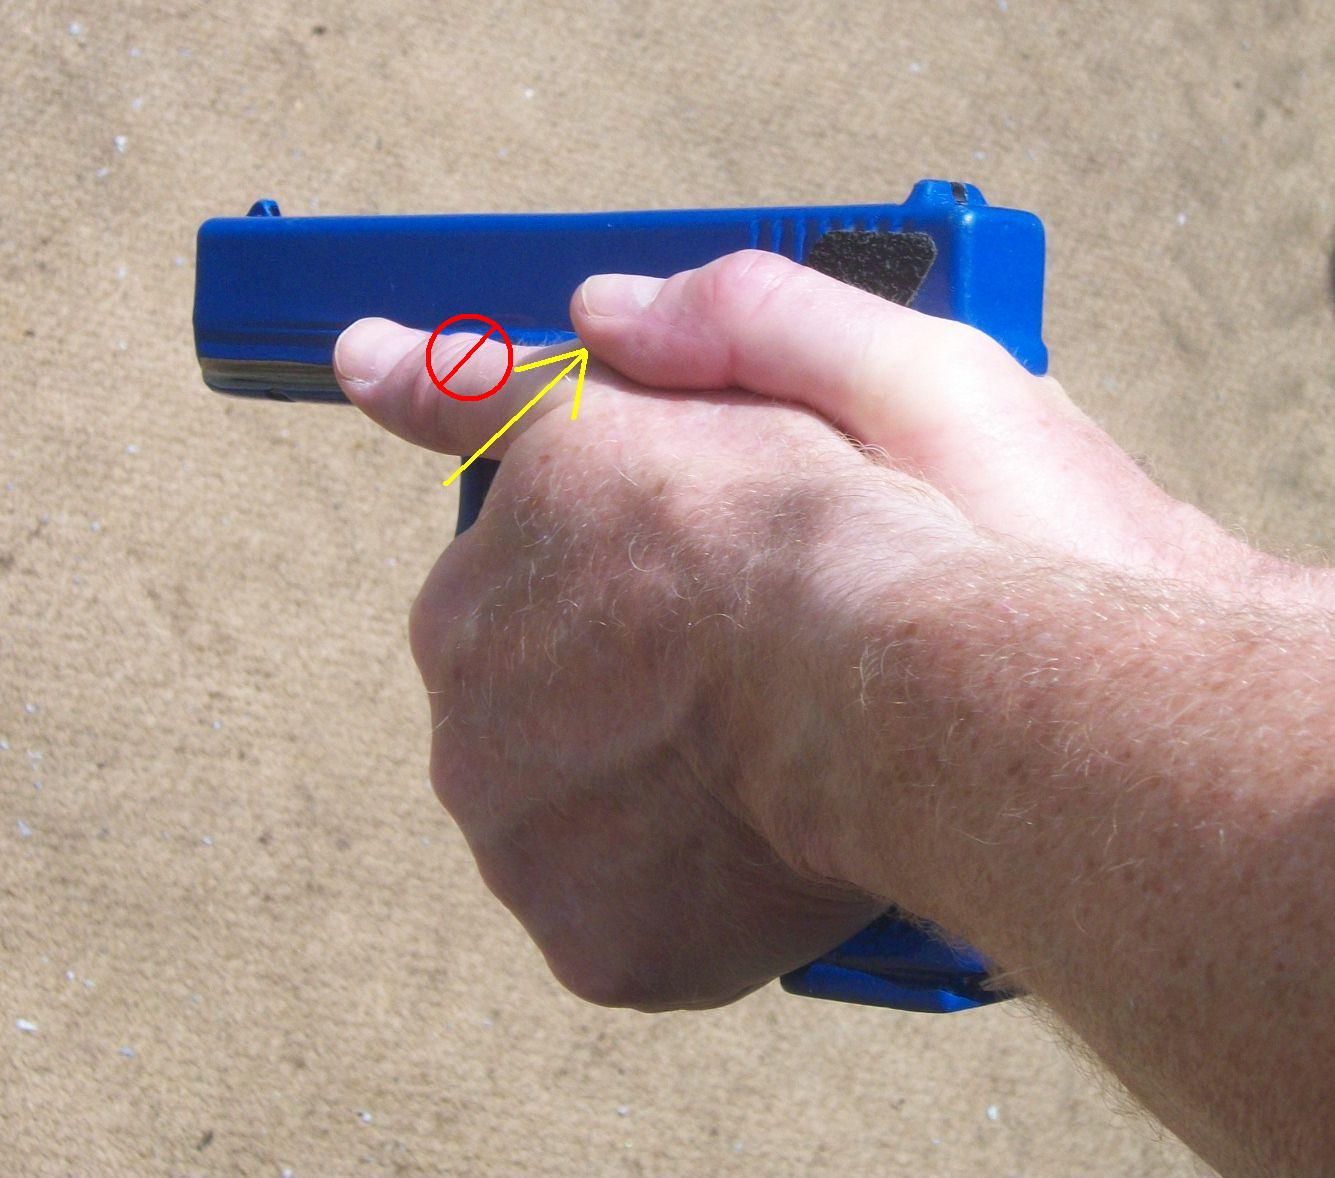 Two components of fourth index point
The fourth index point has two components. First, it verifies that the support wrist is extended downward. Second, it is located such that the firing hand thumb clears the slide stop to the maximum extent possible.
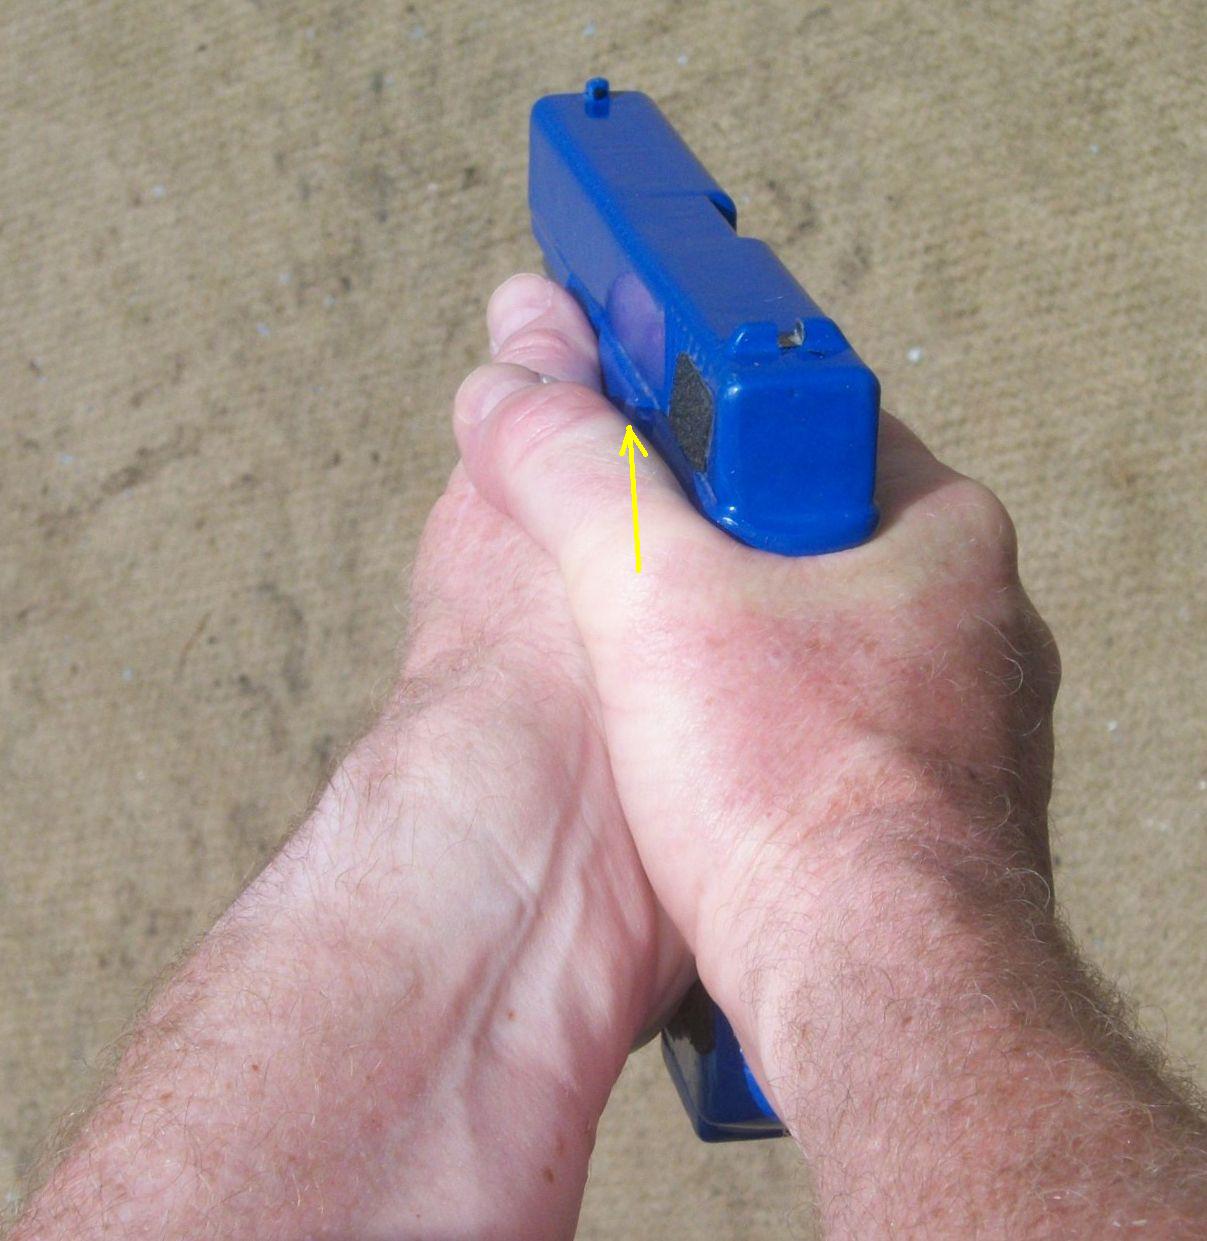 If the firing hand thumb is placed directly alongside the slide of the pistol, it’s easy for that thumb to prevent the slide stop from functioning. This will prevent the slide from locking back after the last shot fires. The subsequent click upon a firing attempt when the slide does not lock back can be either annoying or fatal, depending on circumstance.
For most shooters, the firing thumb should be placed directly in line with the support thumb, as opposed to beside it near the slide. Learning to place the firing thumb in line with the support thumb will minimize the possibility of interfering with the slide stop.
In summary, the four index points of the proper grip on an autoloading pistol are:
- Web of firing hand meets tang of pistol.
- Bases of both thumbs mate closely.
- Support hand trigger finger makes contact with trigger guard.
- Contact point of the firing thumb on the support thumb.
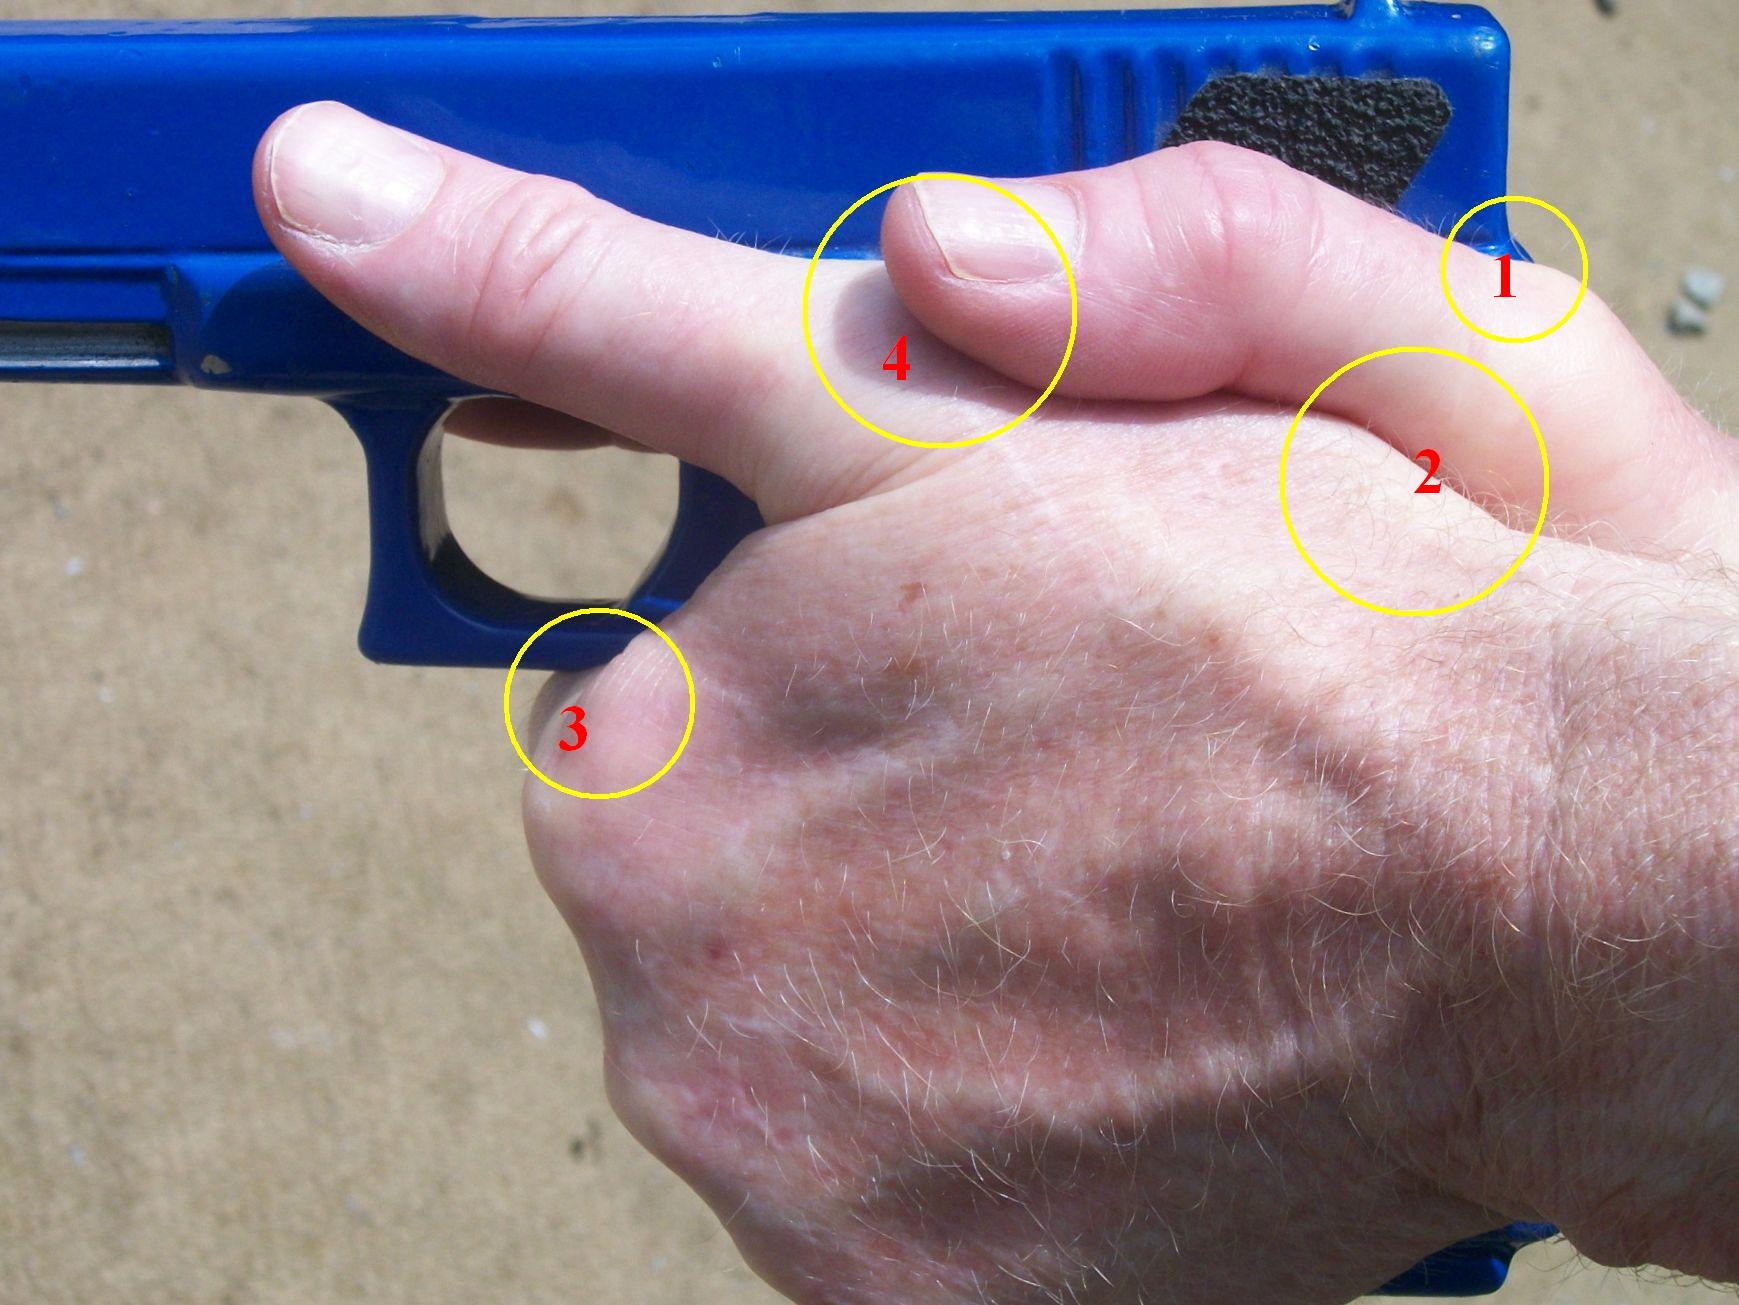 Developing a proper grip takes some effort and analysis but yields big dividends in terms of your shooting ability. Note that the issue of sights is important enough for me to cut a rear sight notch in my blue guns. I cannot abide a gun without functional sights, even when it is an inert gun. The sights discussion is for another time, however.
Friday Fundamentals (Segment 2)
We’re continuing on with the series of ‘Friday Fundamentals’. I’ve written about Sight misalignment, speed, and accuracy before. It’s a key fundamental to increasing your speed while still maintaining an acceptable degree of accuracy. This drill is part of the second session of my Pistol Practice Program.
Required equipment:
- Any silhouette target; B-27, B-21, Q, IDPA, IPSC, etc. Put a 2-3 inch aiming point on the silhouette in about the center of the target.
- Masking tape (preferred) or magic marker to mark the target.
- Pistol, 24 rounds of ammunition
- Eye and ear protection
Overview
This drill consists of three (3) Sequences of 8 shots each. You are going to deliberately misalign your sights so you can see the effect of this at increasing distances. The drill is to fire the pistol with the front sight on a spot on the target but with the rear notch deliberately misaligned. The Sequences are untimed.
Setup:
Place target at five (5) yards
Procedure:
Sequence 1 (8 rounds at 5 yards)
1) Start with handgun held in both hands. If possible, sit and rest your arms on the bench. You want to be as steady as you can for these three sequences. Do not let the pistol touch the bench; this can change where the bullets hit. Shift your support hand slightly under the pistol, if needed.
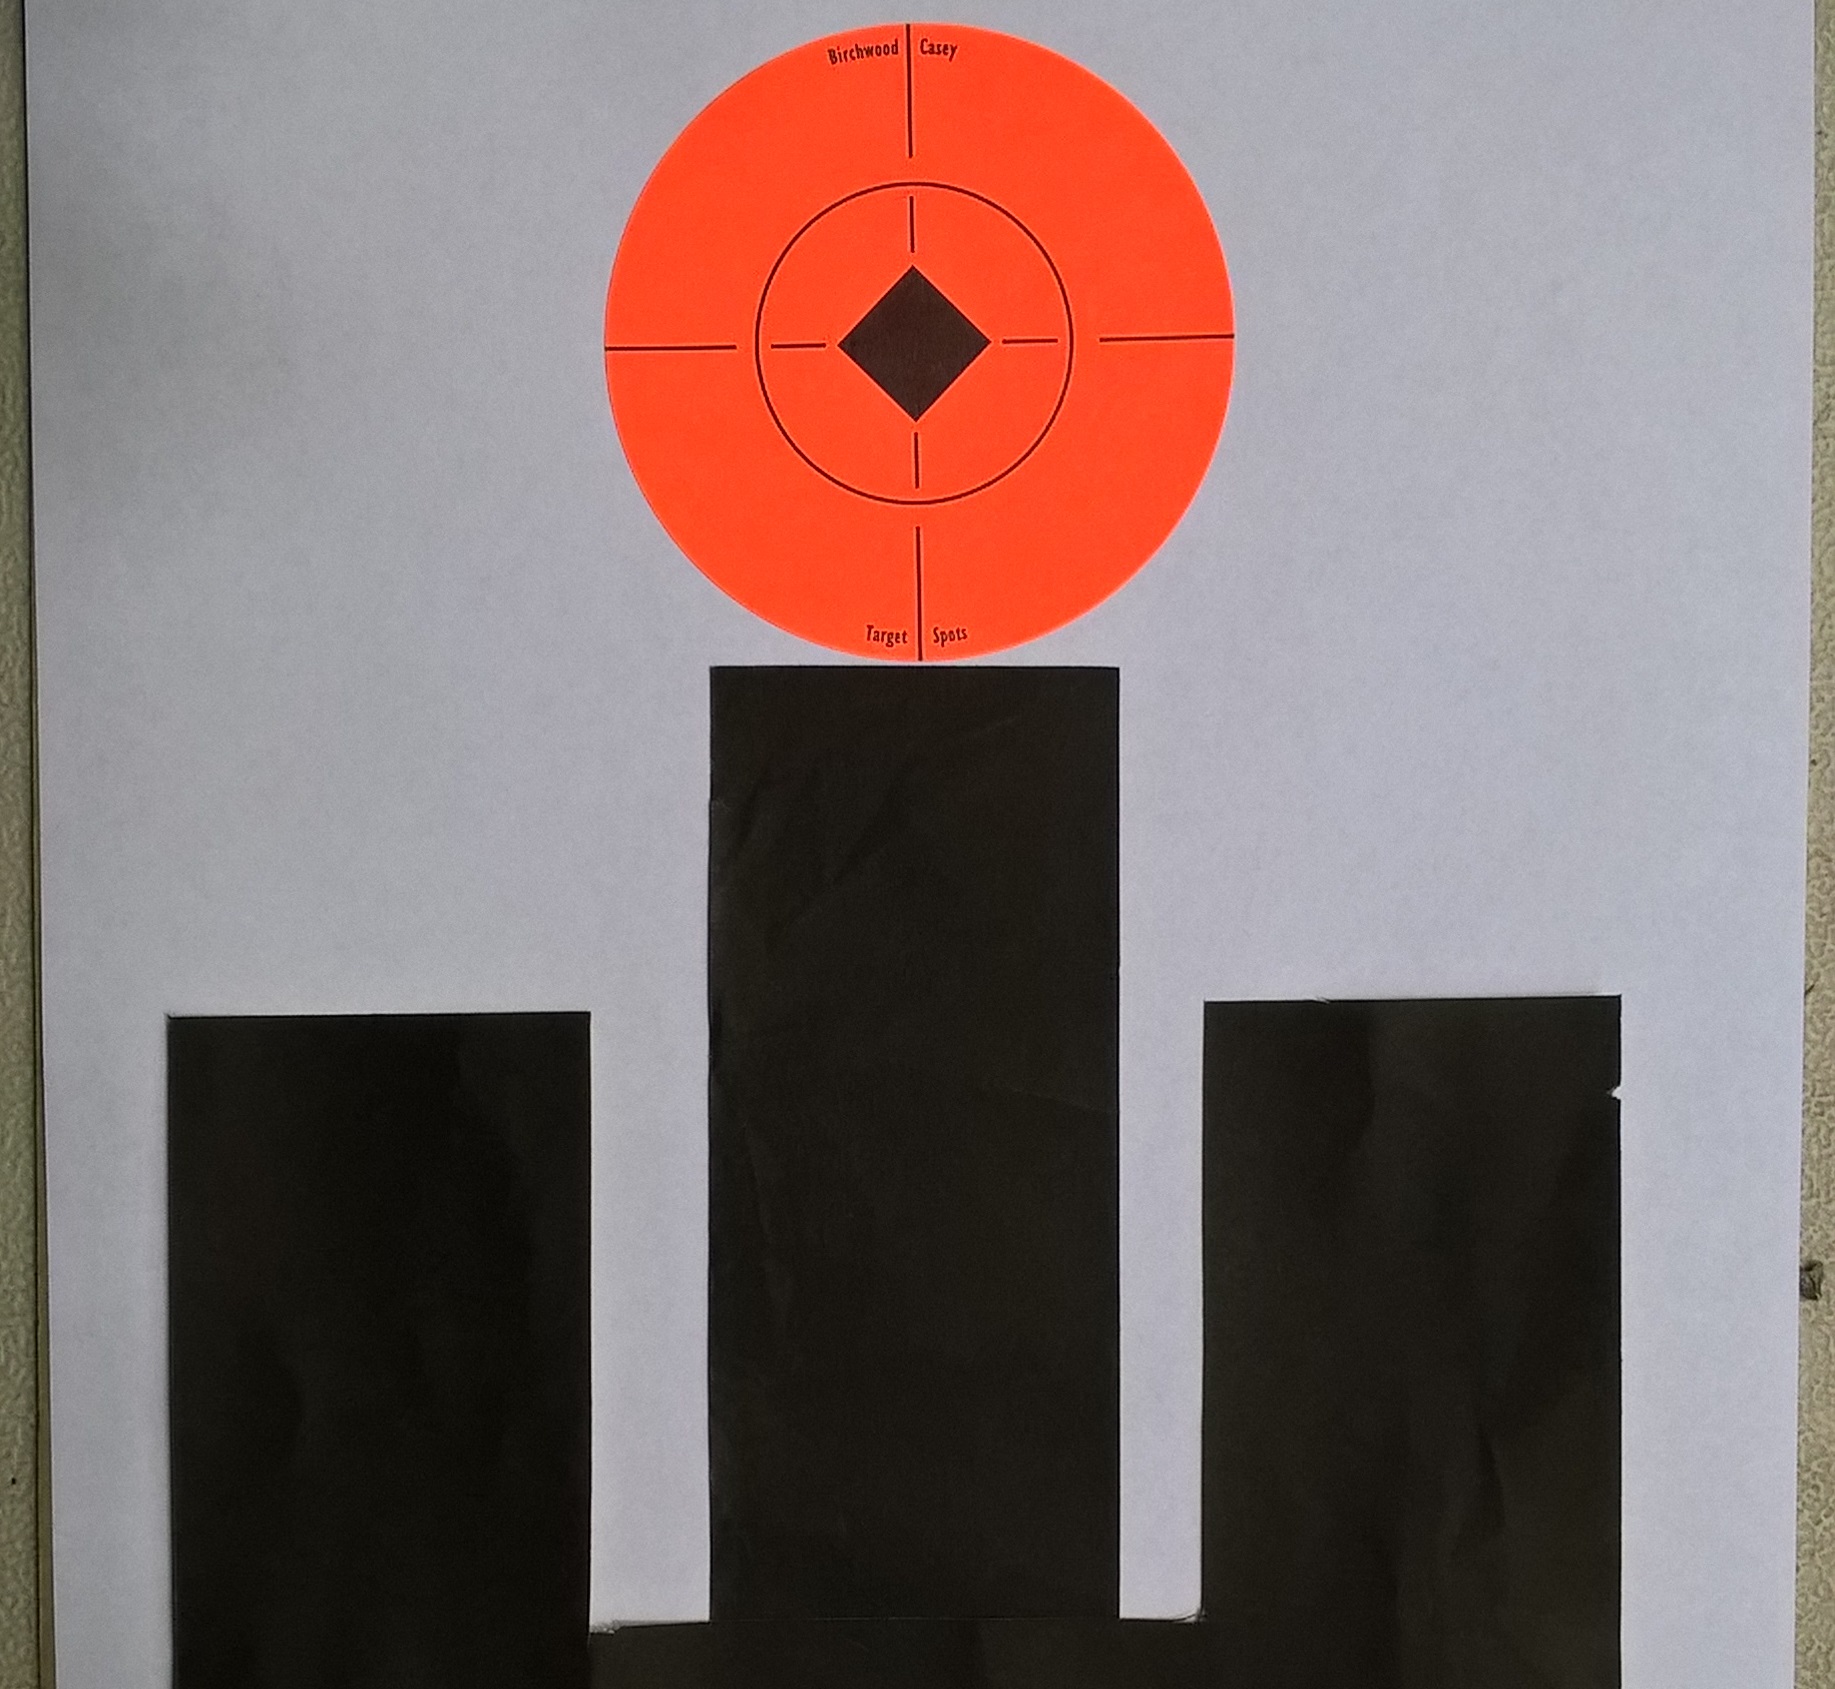
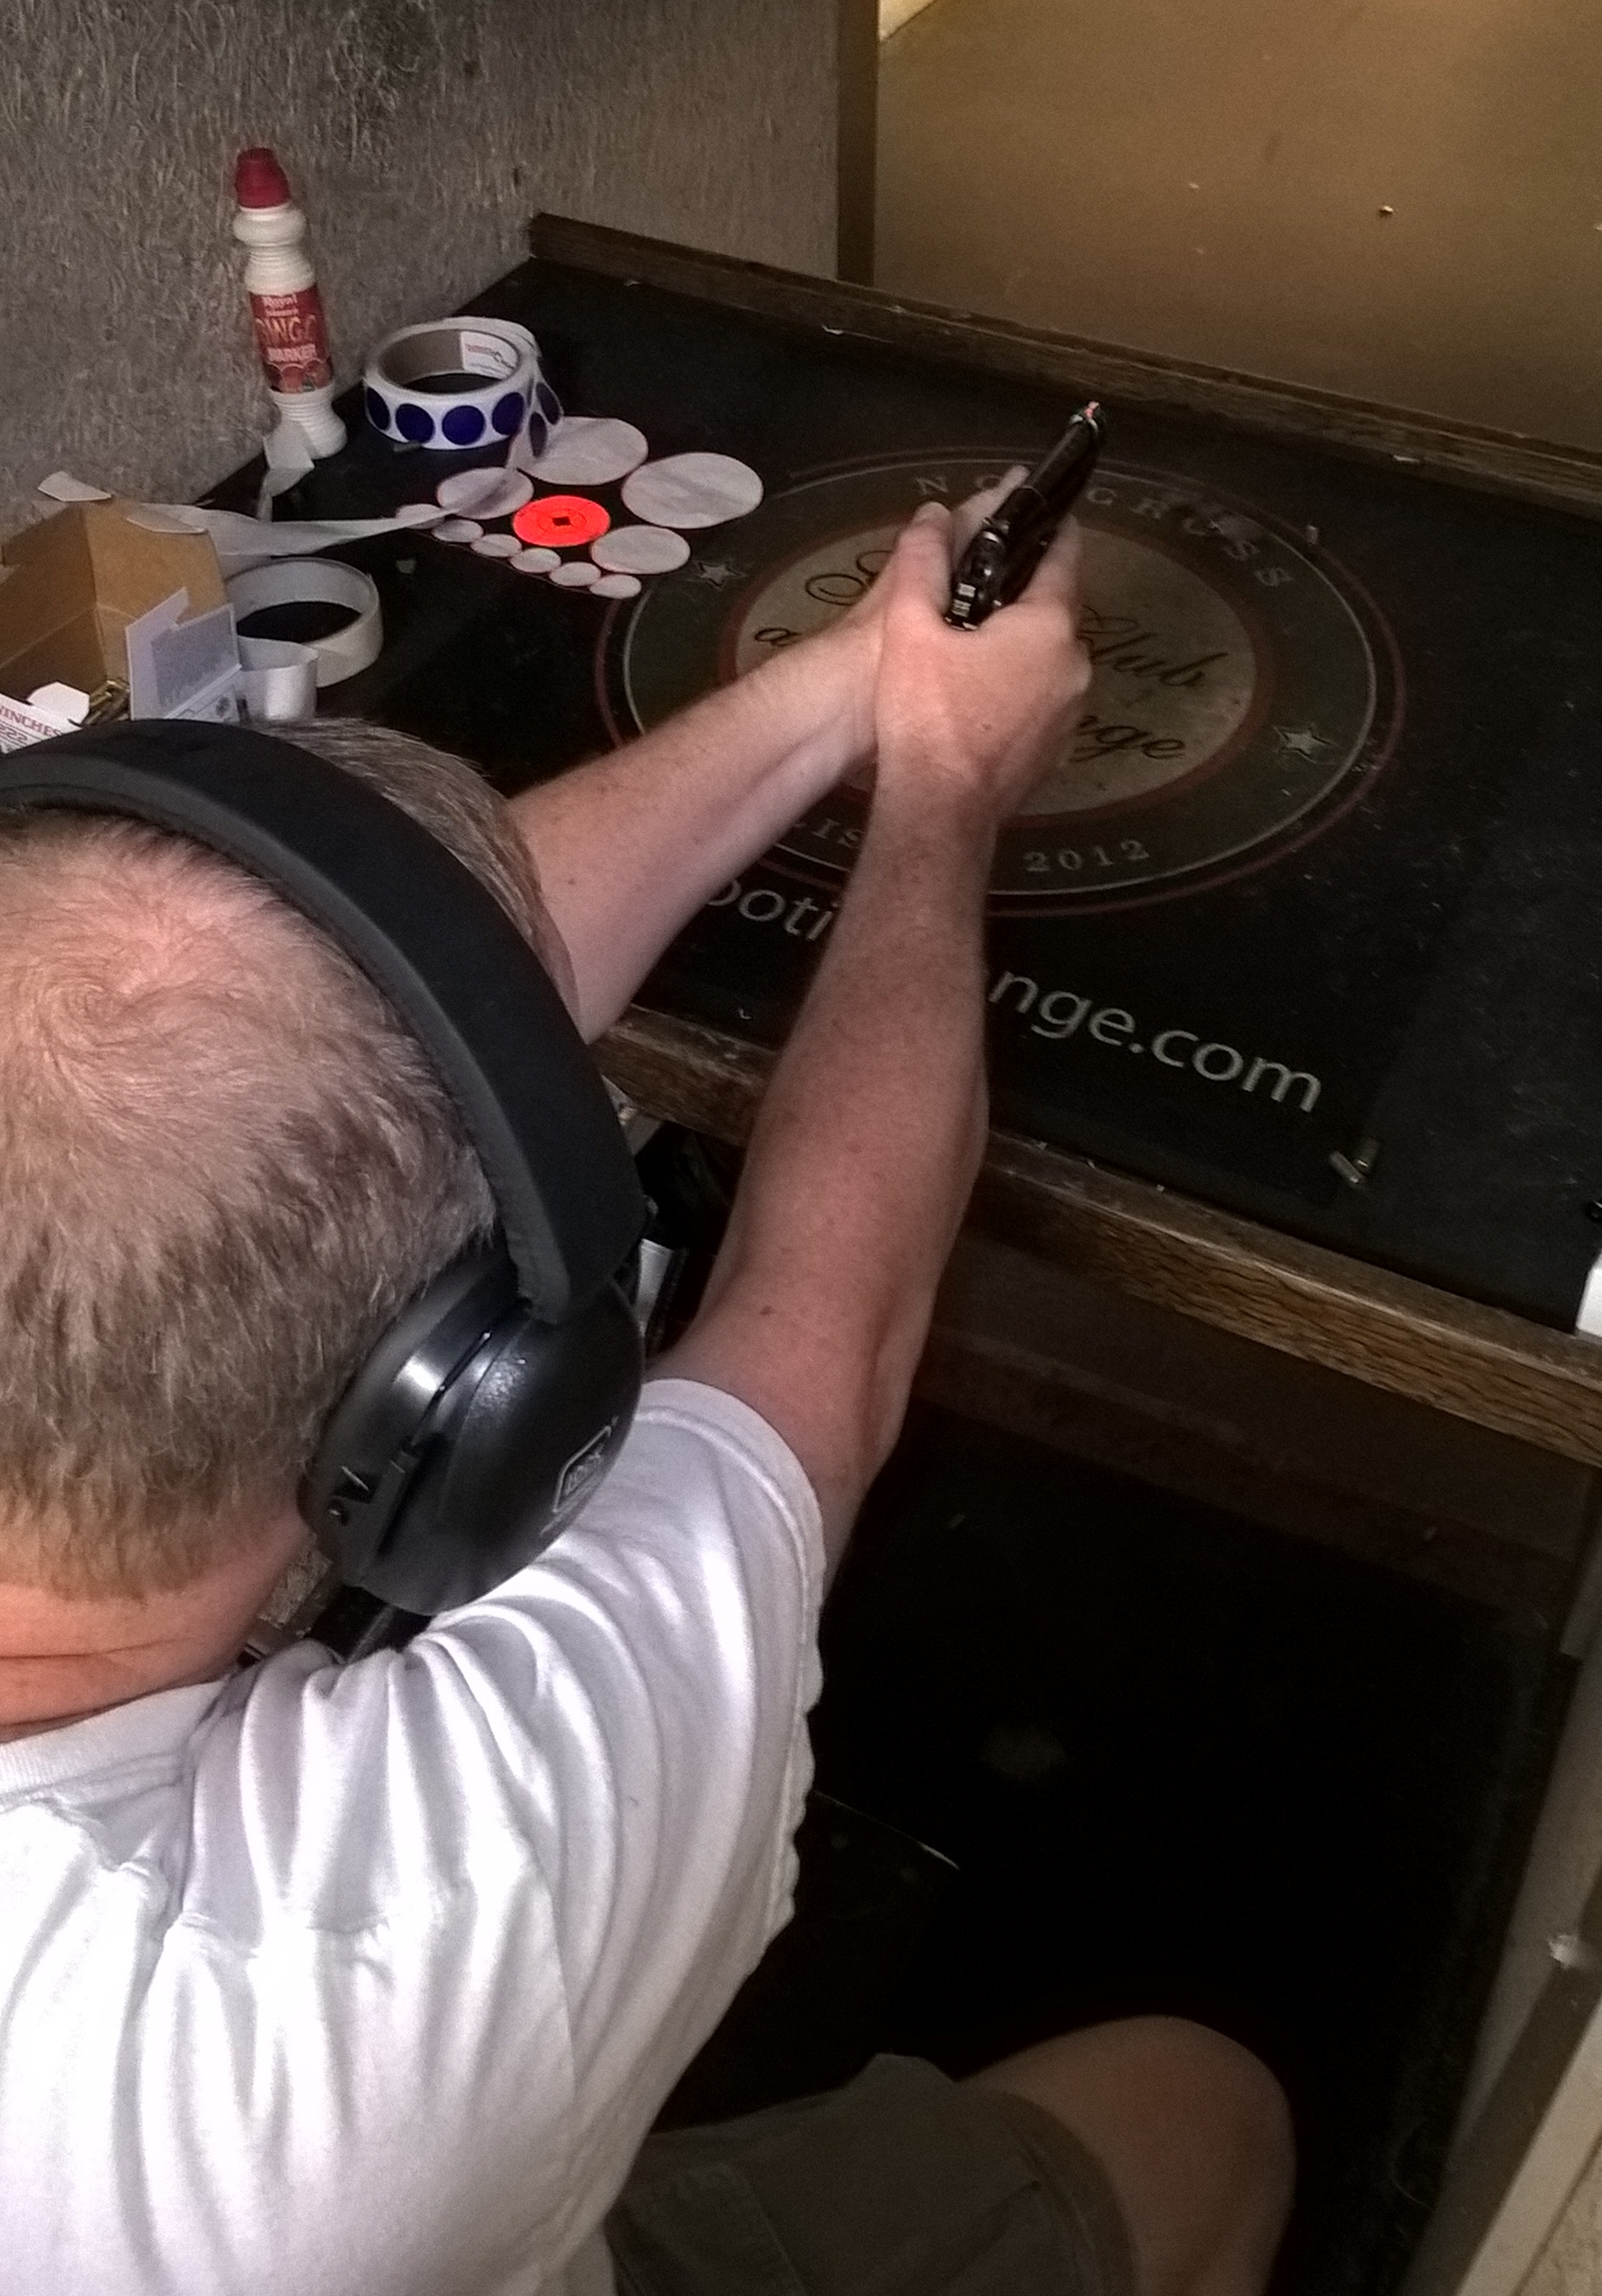 2) Put the front sight just below the aiming spot on the target with the front sight half way above the top of the rear notch. Carefully fire two shots. Your sight picture should look something like this.
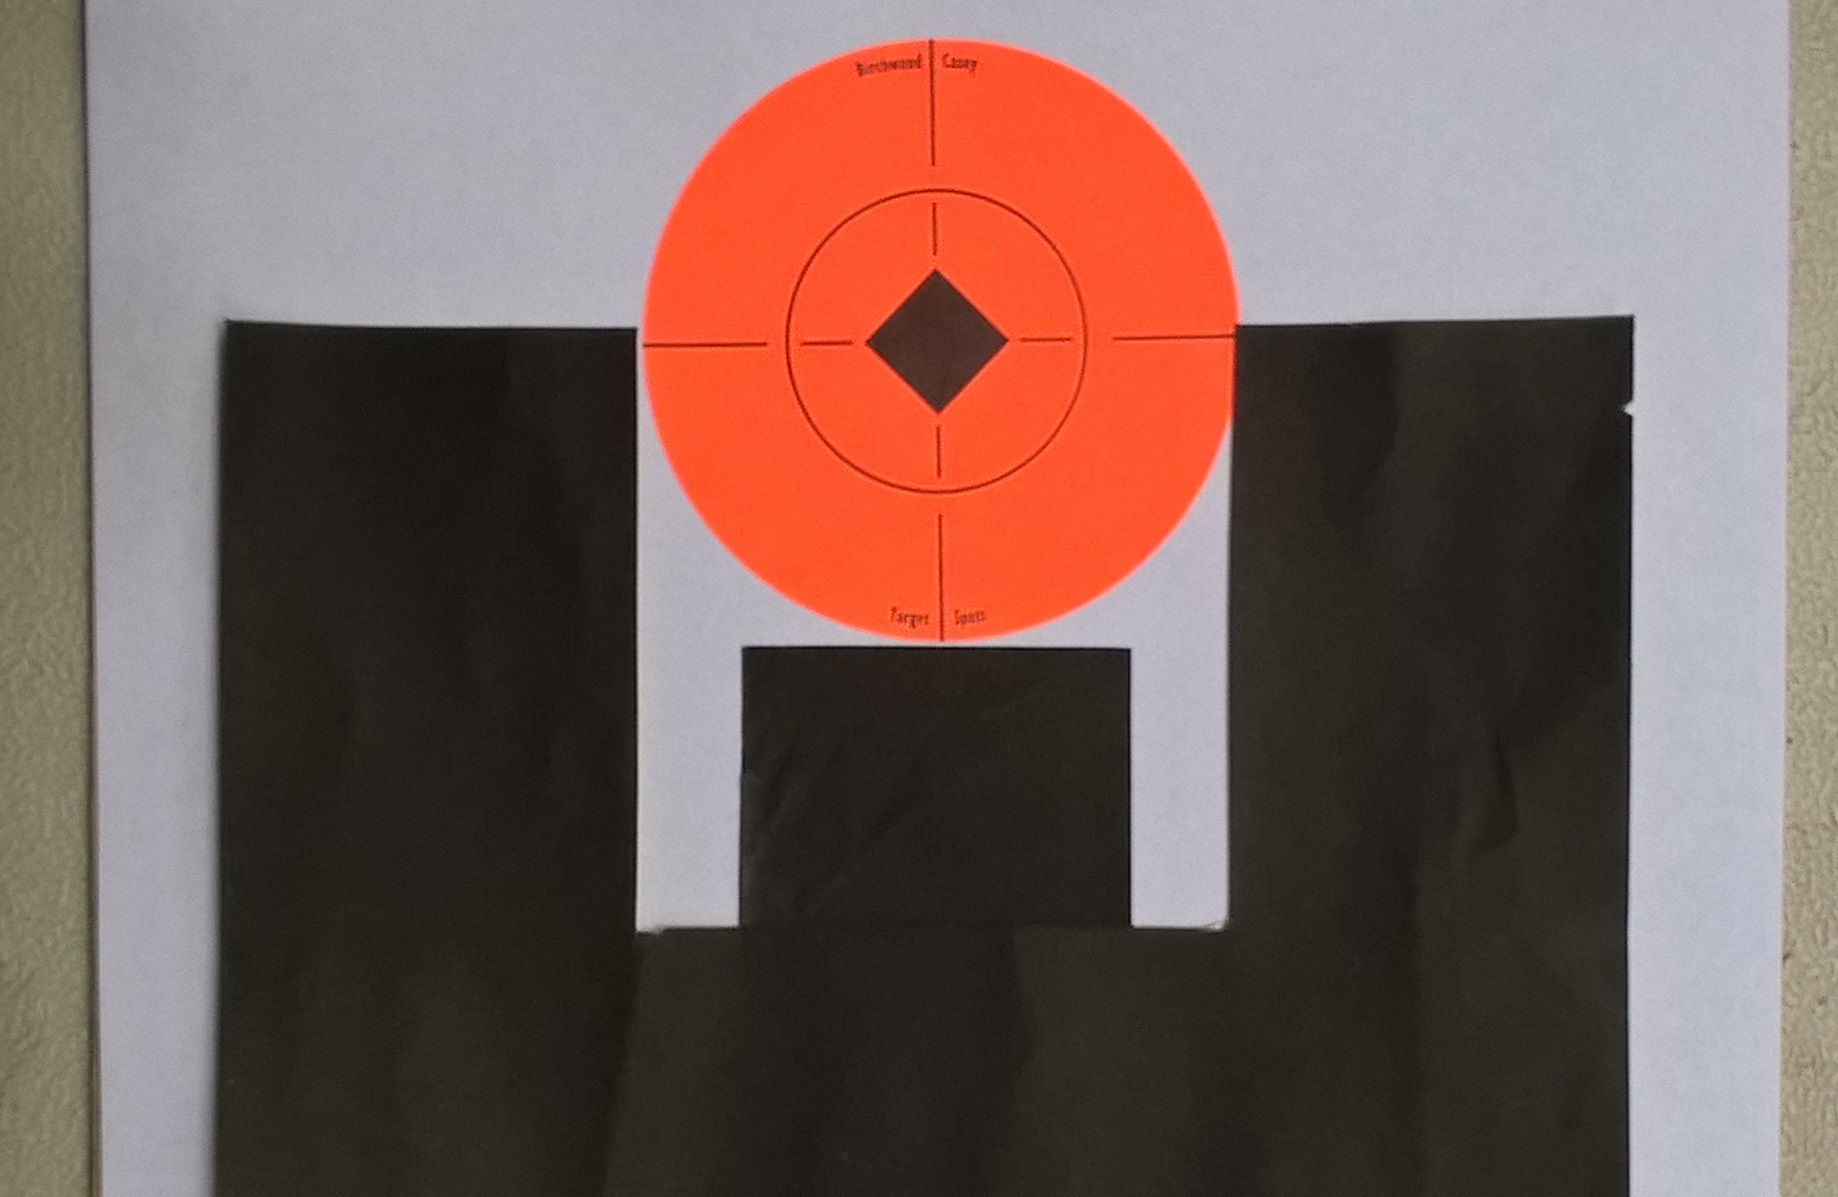
3) Put the front sight just below the aiming spot on the target with the front sight lowered so that its top edge is half way down in the rear notch. Carefully fire two shots. Your sight picture should look something like this.
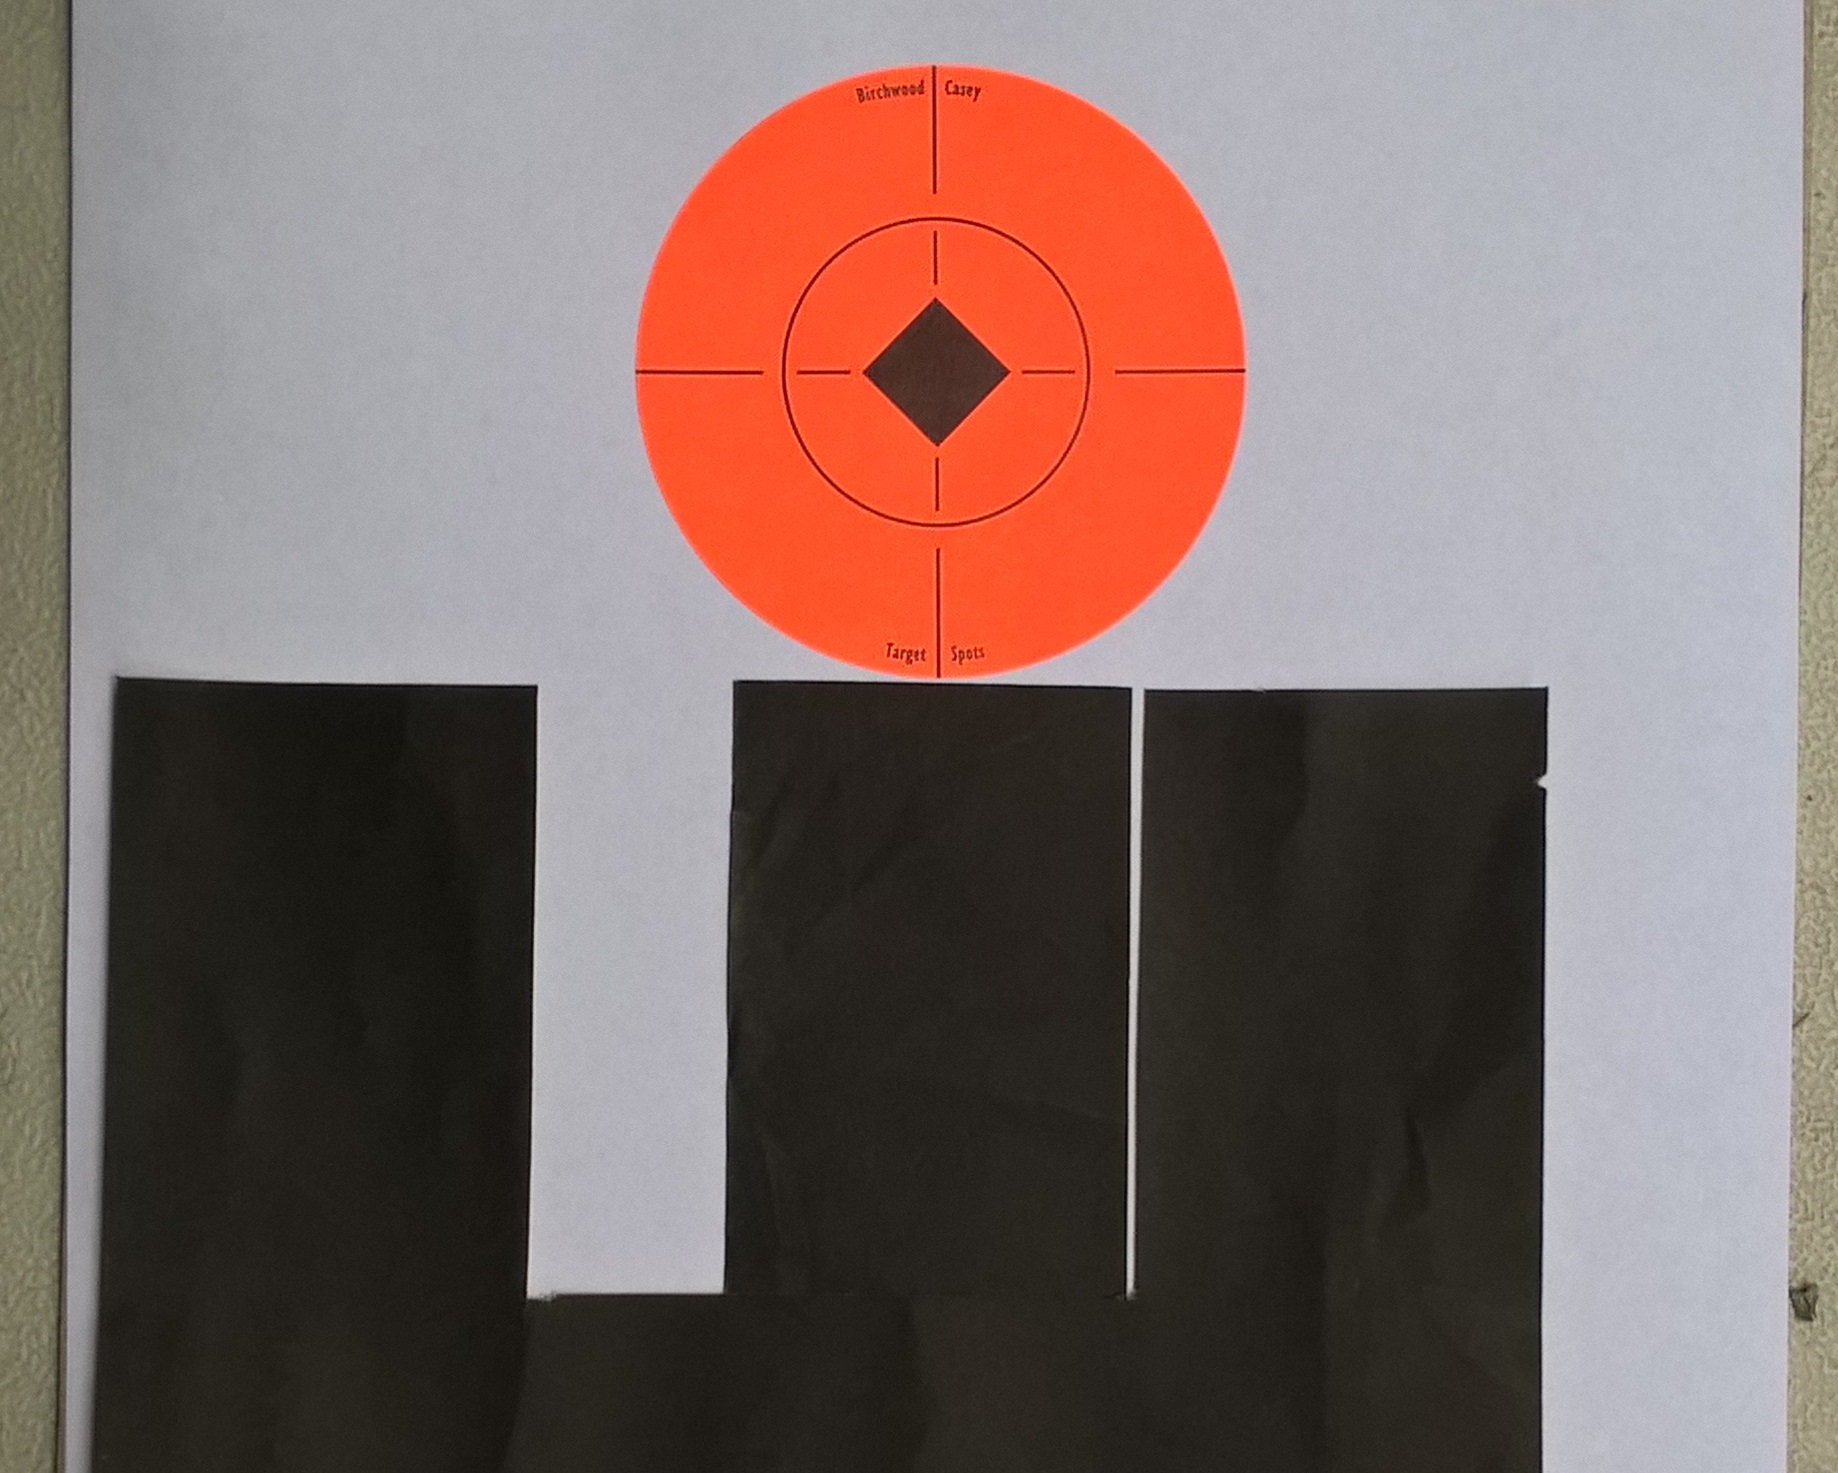
4) Put the front sight just below the aiming spot on the target with the front sight over to the right so that its right edge is touching the right side of the rear notch. Carefully fire two shots. The sight picture should look something like this.
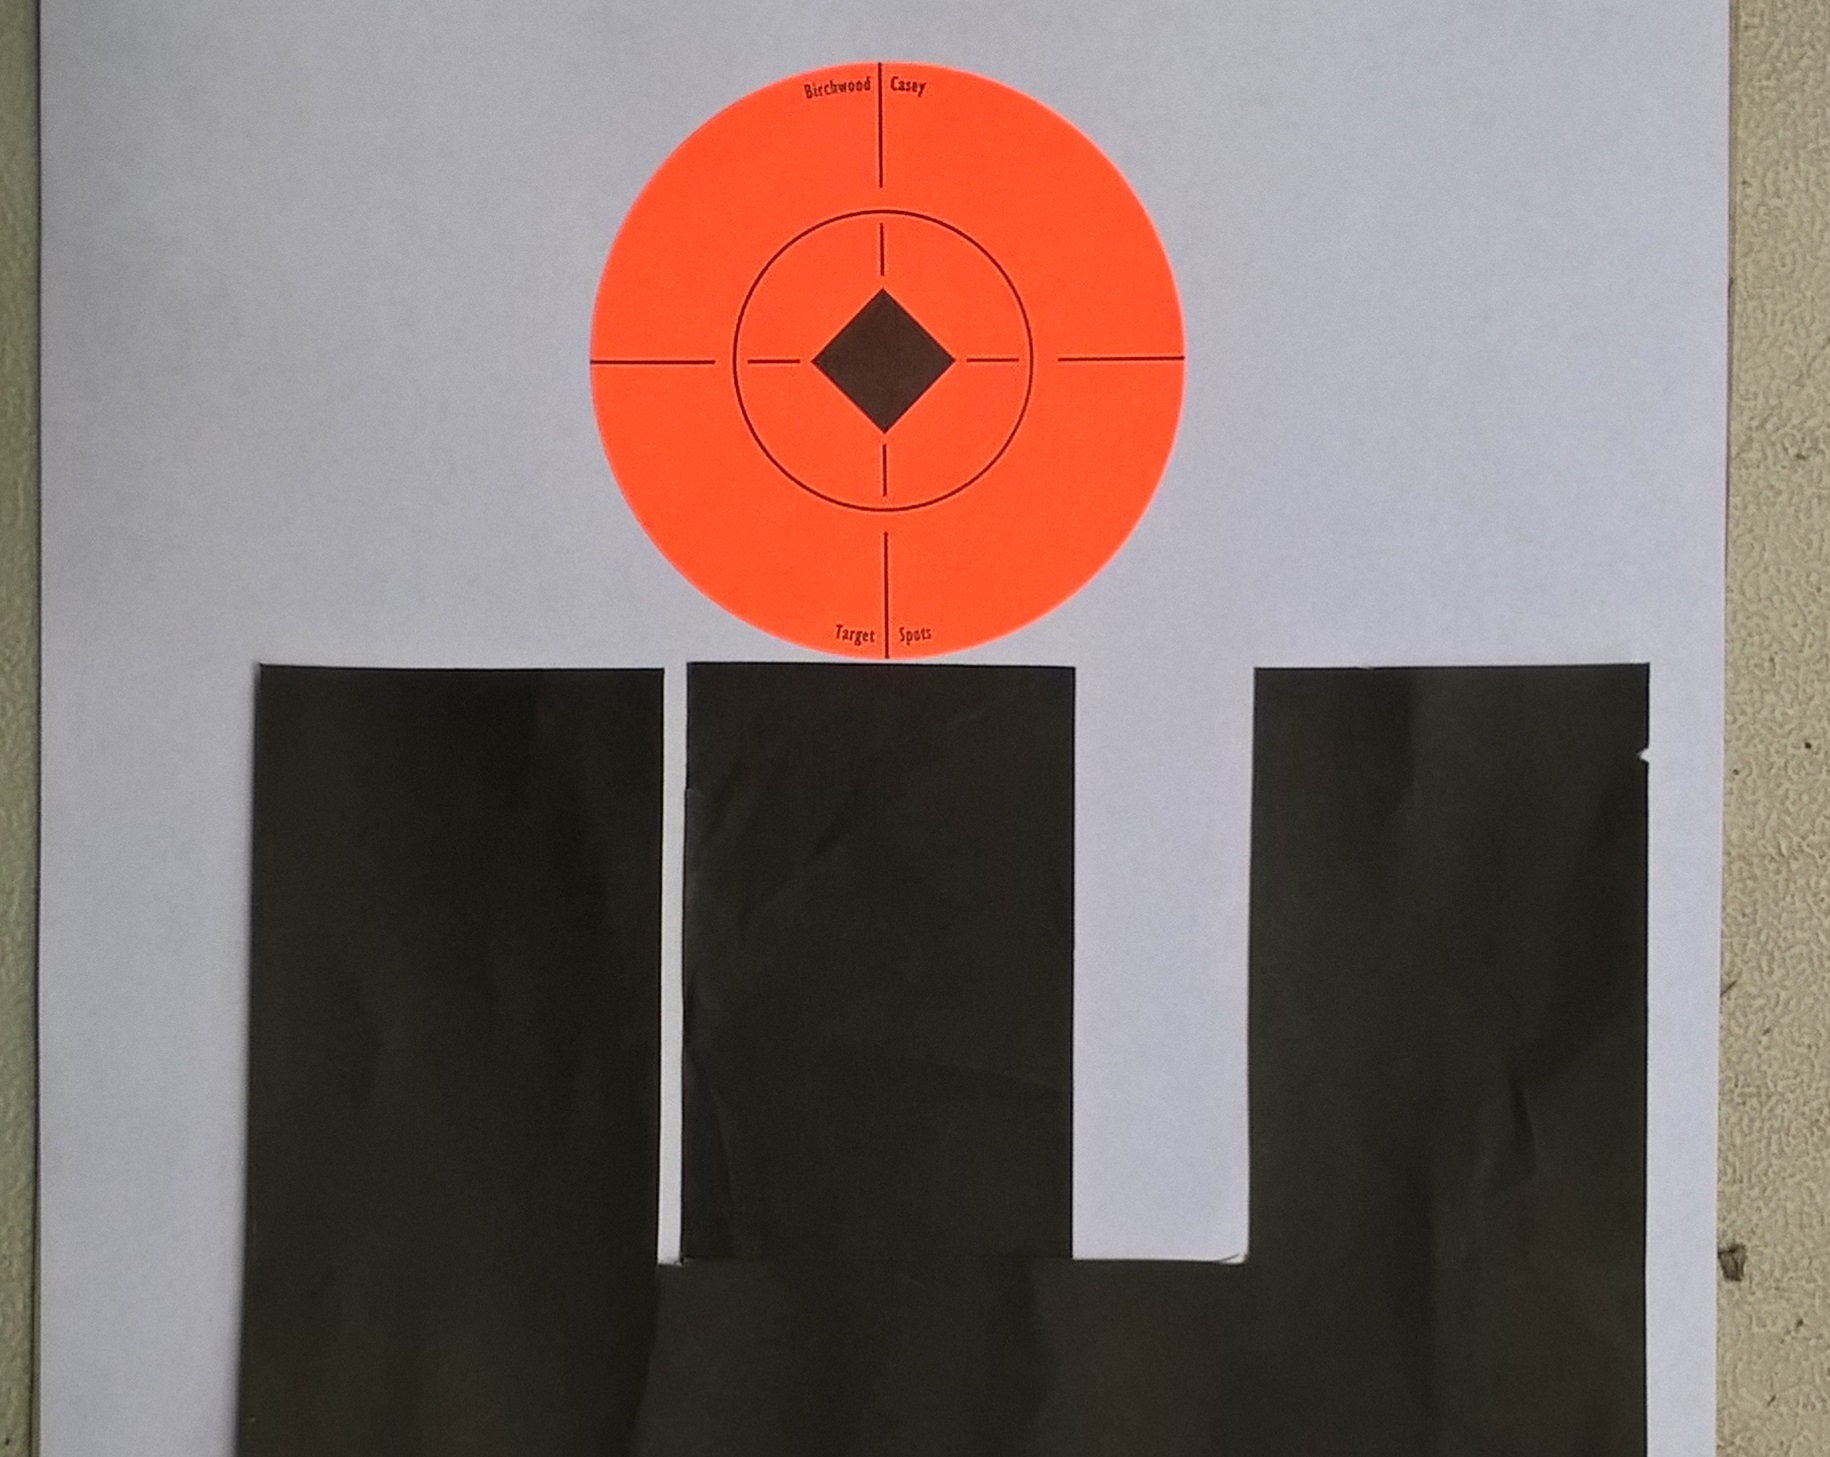
 5) Put the front sight just below the aiming spot on the target with the front sight pushed to the left so that its left edge is touching the left side of the rear notch. Carefully fire two shots. Your sight picture should look something like this.
 Bring the target back and mark your shots with masking tape, pasters, or a marker. You will end up with eight shots on the target that will be dispersed up, down, left, and right. The target should look something like this:
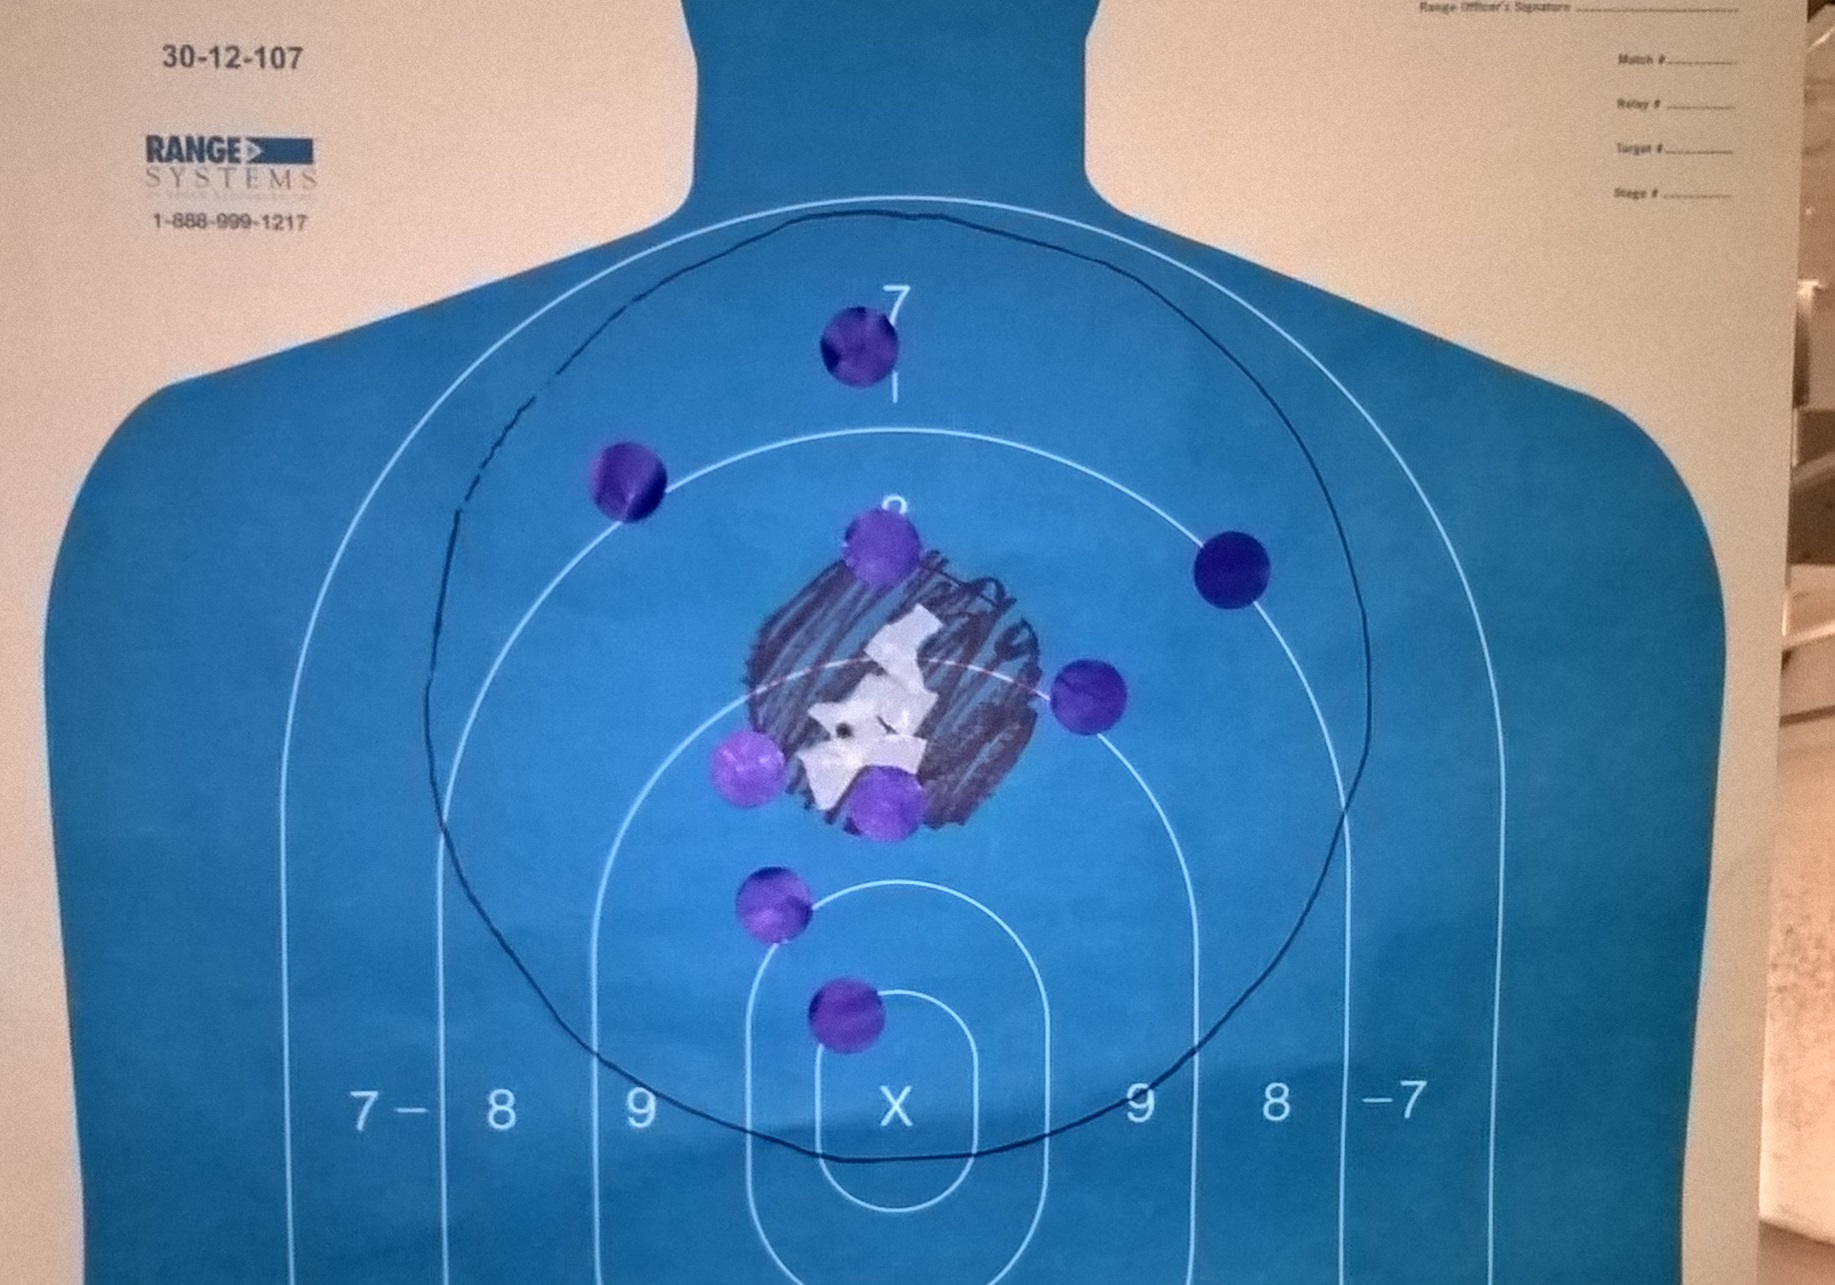 Sequence 2 (8 rounds at 10 yards)
1) Send the target out to 10 yards.
2) Repeat Sequence 1 but with the target at 10 yards.
3) Bring the target back and mark it.
Sequence 3 (8 rounds at 15 yards)
1) Send the target out to 15 yards.
2) Repeat Sequence 1 with the target at 15 yards.
3) Bring the target back and mark it.
Depending on your eyes and the nature of your sights, you may find that even at 15 yards your group stays on the target, despite the slightly misaligned sights.
Objective:
The purpose of this exercise is to demonstrate that the sights do not have to be perfectly aligned to get an acceptable hit on a silhouette size target. Many people waste time trying to get a perfect sight picture when it isn’t necessary. This principle of acceptable misalignment is the basis for what is called the “flash sight picture.” What we are trying to do is to get the front sight close to our aiming point and then refine the sight picture only to the extent we need to in order to get an acceptable hit. As your skill improves, your groups will get smaller and smaller but the principle remains the same.
How much work and practice?
Linda Ronstadt made the following comments [3:22] in an interview about how hard she worked at the process of learning to sing as well as she did.
In order to get good, you really have to spend 6 or 8 hours a day doing it.
You have to spend hours and hours and hours, day after day, year after year.
It took me about 10 years to learn how to sing, even after I was a professional.
It took me 10 years until I really had some control of my instrument and I could deliberately do what I wanted to do.
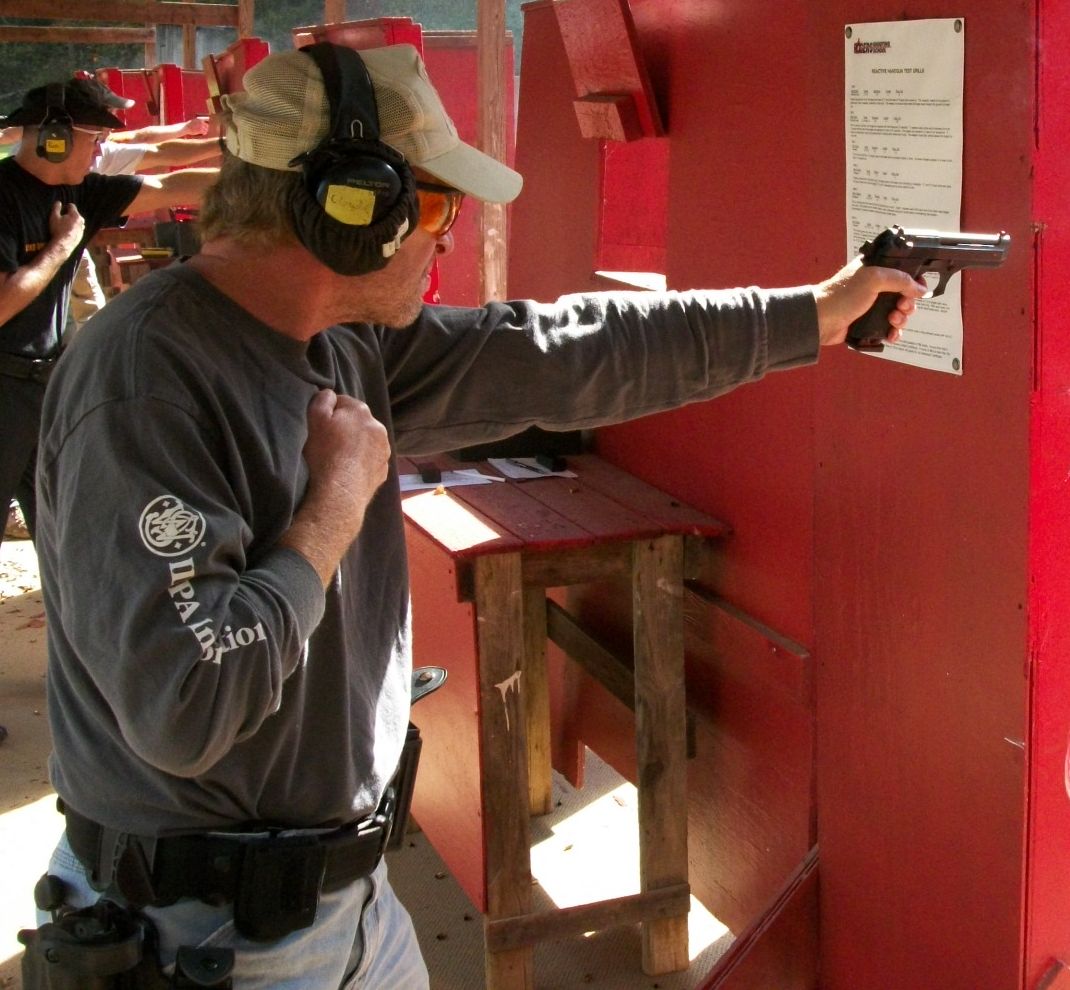
Sometimes, as I continue on with 1000 Days of Dryfire, going to the range weekly to livefire, or taking training from someone else several times a year, I wonder whether I work at it too much. Then Linda comes along and basically tells me that actually I’m only spending a minimal amount of time and effort at it compared to how hard people who are really good at their craft work. Thanks for that bit of motivation, Linda.
Friday Fundamentals 01 – Establishing Your Baseline
My friend Mark Luell, the author of Growing Up Guns suggested I provide a ‘Friday Fundamentals’ post weekly. We got the idea from my colleague Cecil Burch who wrote a blog post about Fundamentals. It’s a great idea to stay in touch with the basics.
The first installment is Session 01 of my Pistol Practice Program – Establishing Your Baseline. As in any journey, you have to know where you’re starting from before you can get to where you want to go.
The objective of this drill is to determine what distance you can make 100 percent hits on the vital area of a silhouette target. My feeling is that we need to work on achieving 100 percent accuracy because errant rounds in our homes or neighborhoods could be a major problem. Since I also think the first shot is the most important, I structured the session with a lot of first shots but also included multi-shot strings. A lot of people ‘walk their rounds’ into the target even with handguns. This is a huge problem and liability.
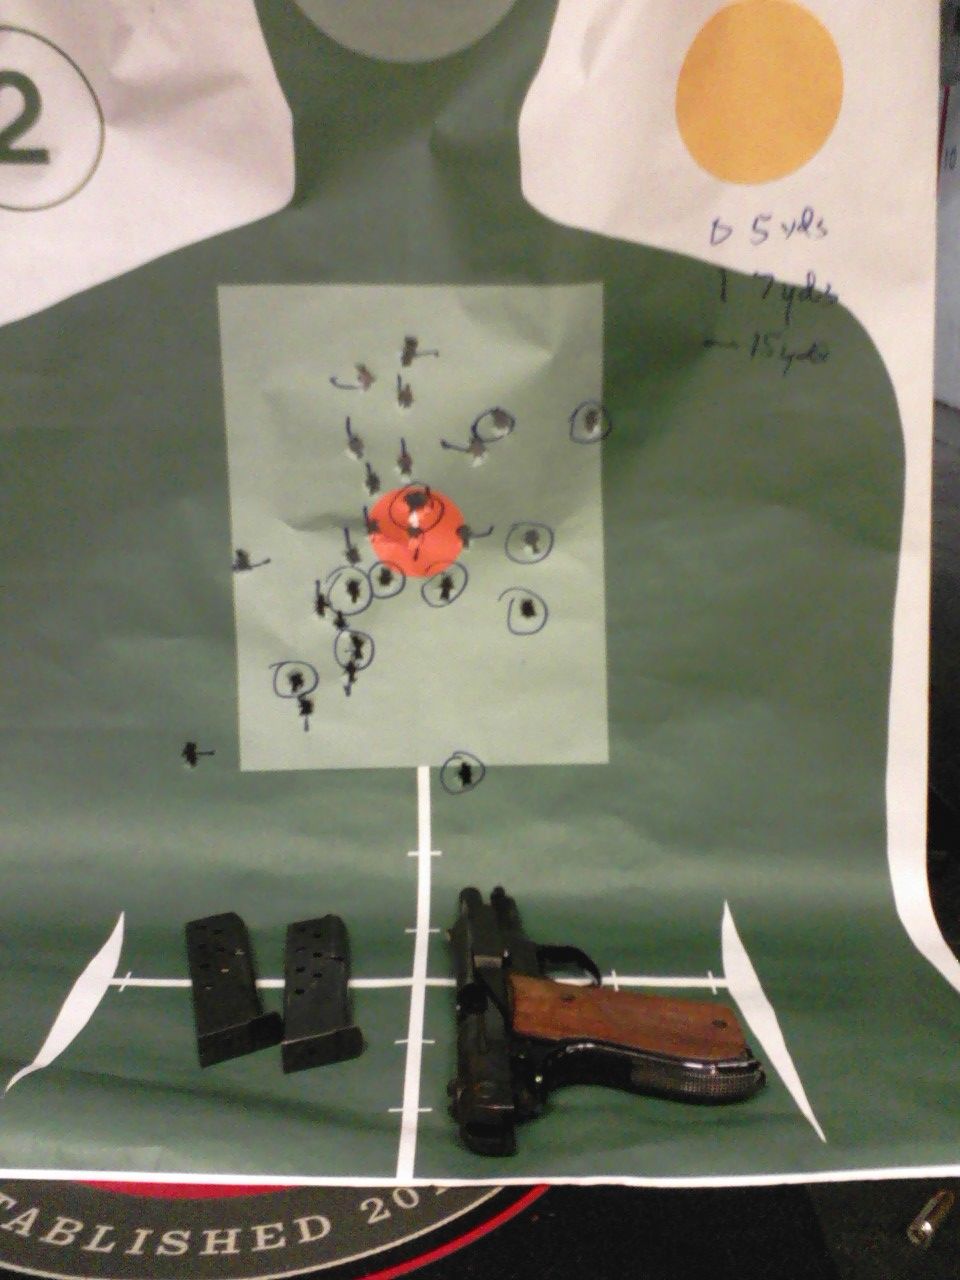 We don’t count hits on the head in this drill because they are actually misses if you are aiming at the body. The head is more than a foot away from the center of the body, if you hit the head when you’re aiming at the body, it’s just a lucky shot and doesn’t count in terms of performance measurement.
Required equipment:
Any silhouette target; B-27, B-21, Q, IDPA, IPSC, etc.
Masking tape (preferred) or magic marker to mark the target.
Pistol, 50 rounds of ammunition
Eye and ear protection
Overview
This drill consists of five (5) Sequences of 10 shots each. The Sequences are untimed.
Setup:
Place target at three (3) yards
Start loaded with five (5) rounds only.
Procedure:
The starting position is Low Ready. This means the pistol is aimed at the floor below the target. For double action pistols, you will decock after each Step.
Sequence 1 (10 rounds)
1) Start with handgun held in both hands, aimed at the floor below the target. Spare magazine loaded with 5 rounds or speedloader with 5 rounds or 5 loose rounds on the bench.
2) Bring the pistol up on target and fire 1 shot at the center of target. Followthrough for one second, then return to low ready. Decock, if appropriate.
3) Bring the pistol up on target and fire 2 shots at the center of target. Followthrough for one second, then return to low ready. Decock.
4) Bring the pistol up on target and fire 3 shots at the center of target. After two shots, the pistol will be out of ammunition. Reload it and fire the third shot. Followthrough for one second, then return to low ready. Decock.
5) Bring the pistol up on target and fire 4 shots at the center of target. After the shots, the pistol will be out of ammunition. Hopefully, the slide has locked back if it’s an autoloader.
6) Place your pistol down on the bench.
7) Bring your target back and mark all the hits, preferably with tape but a marker will do.
8) Write on the target how many hits you made in the body scoring area. I prefer to not count the outer scoring area as I mentioned in Why I hate the -3 zone. Use this format, (3) X/10, X being the number of hits. For this drill, do not count any hits in the head, they are actually misses.
Sequence 2 (10 rounds)
1) Send the target out to 5 yards.
2) Repeat Sequence 1 but with the target at 5 yards instead of 3 yards.
3) When you write on the target how many hits you made in the scoring area, it will be (5) X/10. The number in parenthesis is the distance in yards.
Sequence 3 (10 rounds)
1) Send the target out to 7 yards.
2) Repeat Sequence 1 with the target at 7 yards.
3) Write on the target how many hits you made at 7 yards. (7) X/10
Sequence 4 (10 rounds)
1) Send the target out to 10 yards.
2) Repeat Sequence 1 with the target at 10 yards.
3) Write on the target how many hits you made at 10 yards. (10) X/10
Sequence 5 (10 rounds)
4) Send the target out to 15 yards.
5) Repeat Sequence 1 with the target at 15 yards.
6) Write on the target how many hits you made at 15 yards. (15) X/10
When you finish the drill, record your score for each yardage. Make this a part of your practice record. Shooting this exercise will give you a good idea of what your current proficiency level is. That’s an important starting point.
The Tactical Professor’s Pistol Practice Program
Why a Practice Program and not a training program?
I created the Pistol Practice Program (PPP) to fill a need for many gunowners. Most gunowners are self-taught and generally are not familiar with a structured approach to skill development. There is a great deal of information available now on how to shoot a pistol. However, there is much less information available on how to practice firearms skills over a period of time to achieve greater confidence and proficiency. As Aristotle said:
We are what we repeatedly do. Excellence, then, is not an act, but a habit.
My goal was to create a program that would get gunowners into the habit of shooting well. I created a step by step approach tailored to the needs of the casual shooter but challenging enough to satisfy the enthusiast. Designed as a series of range sessions, you can practice at your own pace as your schedule permits.
In the case of those who have attended training, your instructor probably said that a firearms class only provides a foundation of skills. To maintain those skills and improve, people who own pistols need to practice after training. Having a program also makes shooting more fun because the shooter develops a sense of accomplishment from the practice. This program is not concerned with what particular technique the shooter uses. Over time and by working the PPP, shooters will determine what works best for them.
The vast majority of gunowners only have access to indoor or public ranges where the type of practice they can do is rather restricted. The PPP takes that constraint into account and presents drills that are indoor range friendly and yet relevant to skill development. The livefire range sessions are then supplemented by dryfire sessions that can be done safely at home. Doing so allows you to develop skills that usually cannot be practiced at an indoor range. How to practice at home safely is thoroughly explained.
The PPP is available on CD. Its contents are mobile device friendly so you can copy the drills to your smartphone or tablet. If your device can access a PDF reader, you can easily take the exact drills to the range with you without having to lug along a book or write down the contents of a DVD. You can also put the dryfire audio sessions on your device for maximum convenience.
Those who are teaching a friend or loved one how to shoot a pistol will find the PPP provides a solid structure for their time at the range. For those who have attended a training class, the PPP provides a way to maintain and build the skills they learned in class. Law enforcement officers can use the PPP to keep your shooting skills tuned up in between qualifications and make qualifications less stressful. Put whatever practice ammo you receive from the department to good use instead of frustrating yourself by shooting the qual course over and over.
Contents of the PPP
- A Program Guide to get you started
- A Log Sheet to keep track of your progress
- 12 Primary Livefire Sessions (50 rounds and Indoor range friendly)
- 12 Secondary Livefire Sessions (50 rounds) for those who want more practice activity each time at the range
- 12 Structured scenarios designed to emphasize and train the interactive aspects of personal protection
- 6 audio guided Dryfire sessions (less than five minutes each)
- Tip sheets on firearms safety, interacting with law enforcement, common mistakes, etc.
I have drawn on a wide range of training experience, from teaching NRA Basic Pistol classes to my time as the Chief Instructor of the elite Rogers Shooting School, to create this Program. There is no doubt in my mind that shooters at all levels of skill and experience can benefit from it.
The PPP CD is available on my webstore. At $19.95, it’s about the cost of one box of centerfire ammo. Bonus: the first 100 orders will receive a Rogers Tap-Rack-Training aid, a $5.00 value, at no charge.
Make the first shot count
This is an article I wrote for beginning shooters on the National Shooting Sports Foundation First Shots blog. That doesn’t mean experienced shooters can’t benefit from it, as well.
The shot that is missed most often in pistol shooting is the very first shot of a string of fire. One of the best ways to correct this is to make first shots the majority of your practice.
For this drill, take any large target at your range and turn it over. Make six dots about 3 inches in diameter on it, spaced roughly evenly apart. If your range carries the bright orange Tar-dots, those are ideal but a magic marker works fine, too. You will also need a magic marker for later in the drill. This drill consists of 48 rounds total. Many people will find that 5 yards is a good place to start. It’s deceptively challenging.
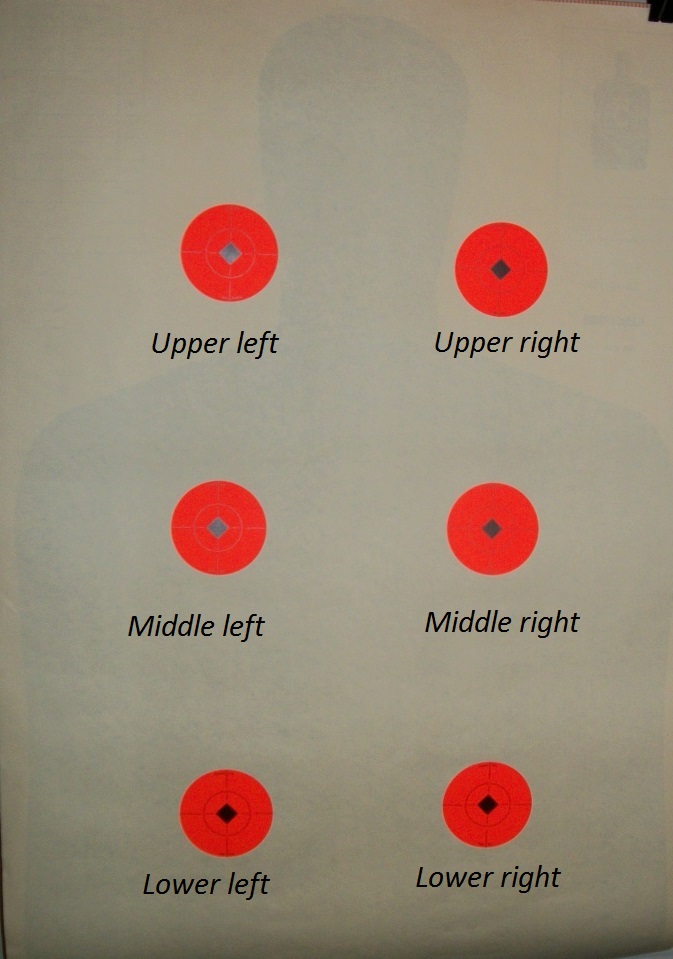
- Starting with pistol aimed at the bottom of target, fire 1 shot on upper left dot. Return to the bottom of target. Decock, if your pistol has a decocker. Repeat five more times for a total of six shots. Starting position for each shot is aimed at the base of the target and you will fire only one shot each time.
- Starting with pistol at a compressed ready, fire 1 shot on upper right dot. Return to compressed ready each time. Decock after every shot, if your pistol has a decocker. Repeat five more times for a total of six shots. Starting position for each shot is compressed ready.
- Starting with pistol aimed at bottom of target, fire 1 shot on middle left dot, then one shot on middle right dot. Return to bottom of target. Decock, if your pistol has a decocker. Repeat twice more for a total of three shots on each dot. Starting position for each string is aimed at the base of the target.
- Starting with pistol aimed at bottom of target, fire 1 shot on middle right dot, then one shot on middle left dot. You are moving in the opposite direction from String 3. Return to bottom of target. Decock, if your pistol has a decocker. Repeat twice more for a total of three shots on each dot. Start position each time is aimed at the base of the target.
- Starting with pistol at compressed ready, fire 1 shot on bottom left dot, then one shot on bottom right dot. Return to compressed ready. Decock, if your pistol has a decocker. Repeat twice more for a total of three shots on each dot. Starting position for each string is compressed ready.
- Starting with pistol at compressed ready, fire 1 shot on bottom right dot, then one shot on bottom left dot. You are moving in the opposite direction from String 5. Return to compressed ready. Decock, if your pistol has a decocker. Repeat twice more for a total of three shots on each dot. Starting position for each string is compressed ready.
- Mark all the hits on your target with a magic marker.
- On the dot where you had the least hits, i.e., your group was the largest/worst, fire six individual aimed shots, resting between each shot.
- On the next worst dot, fire a six shot slow fire group as one string of fire. That concludes the drill.
You will find that your marksmanship improves much faster when you concentrate on your first shot and you can tell where each shot goes.
Here is a PDF of the drill you can take to the range on your SmartPhone.
The Importance of Target Identification
Deputies found a 32-year-old man who said that he and his wife were sleeping when they heard a noise in the kitchen.
The husband took his handgun and walked in the kitchen area, where he shot the victim.
After the shooting the husband recognized the victim as his younger teenage brother.
Man shoots, kills brother thinking he was burglarizing home
Yet another tragic example of why I stress target identification so much. These situations are absolutely preventable. As I’ve said before, if you live with anyone else, my analysis is that there is a 97 percent probability that the ‘bump in the night’ is a member of your own household. With those kinds of numbers, gunowners cannot take the risk of shooting someone at home without establishing a positive ID.
This kind of situation is a further example of why I say we have to be very cautious of what we take of from our training, and even more so, what we read. Much of the good training available is conducted by former law enforcement or military personnel. Just as much as any of us, they are subject to unconscious biases resulting from their experiences and training. Since most reading now is done on the Internet, you have to assume everything you read is wrong because most of it IS wrong.
Responding with a firearm to a noise at night in the home absolutely requires that you visually verify your target before shooting. You probably will need a flashlight for that. And stealth is not your friend, it is your enemy. Therein lies a major divergence from the law enforcement officer or soldier, to whom stealth is an ally. The notions that ‘the light draws fire’ or that criminals will wait in ambush for you if they hear you coming are nonsensical. Those are bad paradigms for us to insert in our thinking. If your background is such that having assassins waiting in ambush for you in your own home is a concern, you need to work on some serious hardening of access points to your home.
If you keep a gun at home, put a flashlight next to your gun; no ifs, ands, or buts about it.
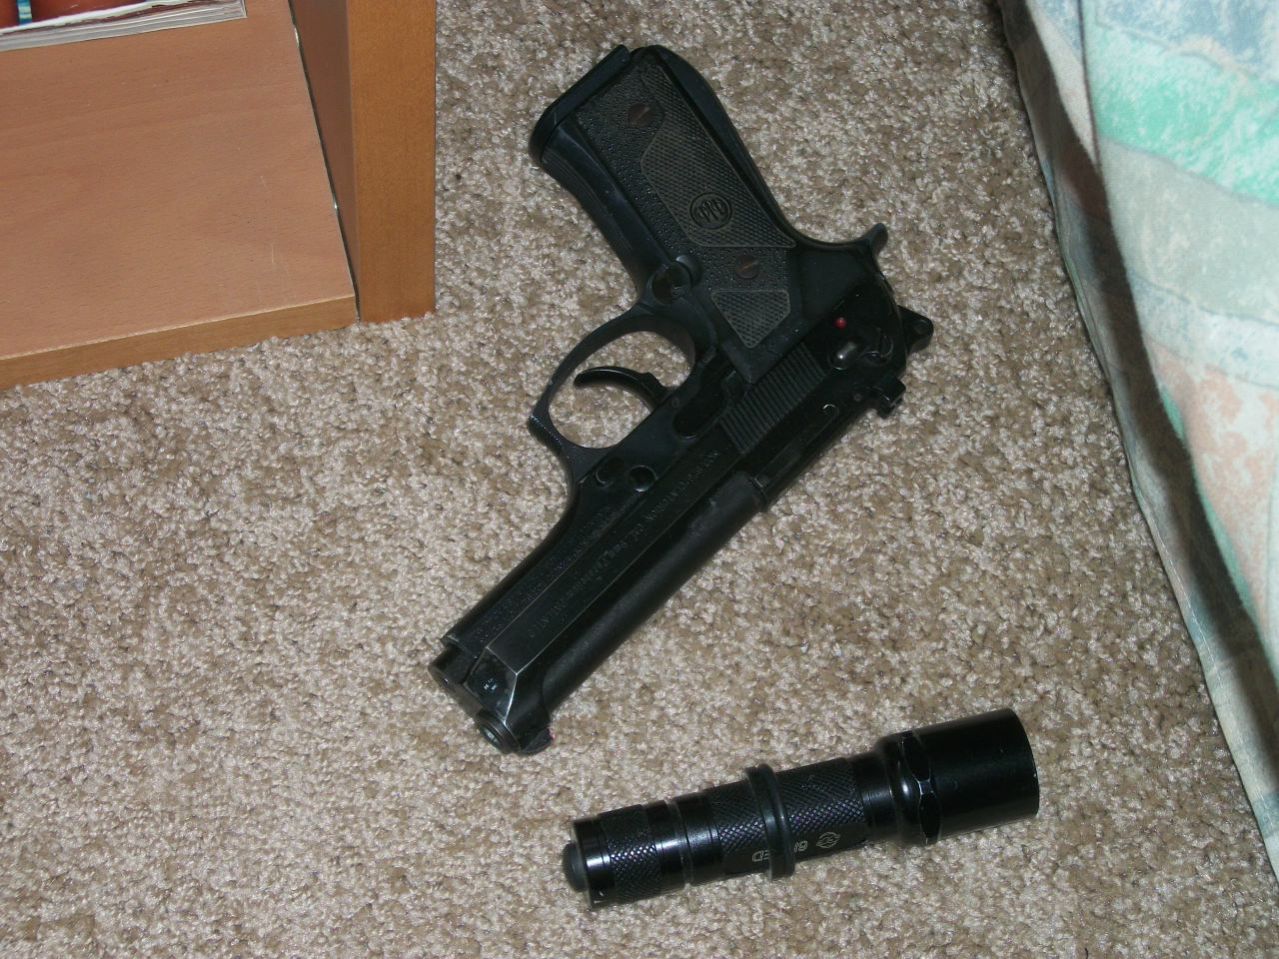
Next time you go to the range, take the flashlight with you. Instead of just blasting 50 holes in a silhouette, shoot two shots at the silhouette 25 times. Sequence is very important in how you do this.
- Have your gun in your shooting hand and your flashlight in your support hand. The gun is not pointing at the target and the light is off.
- Before each two shot string, say out loud “Who’s there?”
- Wait to listen for an answer. If you go to the range with someone, have them stand behind you and sometimes respond with “it’s me, Daddy” or something similar.
- If they say that, immediately put your gun down on the bench and abort that sequence.
- Then illuminate the target without pointing the gun at it.
- Finally, bring the gun up and fire the two shots.
One of the things you will find when using this sequence is that the worthwhile two handed shooting techniques don’t work well for it. Harries is both clumsy and dangerous to assume when you already have the light on the target and are keeping it illuminated while presenting the pistol. The Rogers/Surefire technique takes some time and manipulation skill to assume. What you will discover is that only the Cheek Technique or the FBI Technique work well in this context.
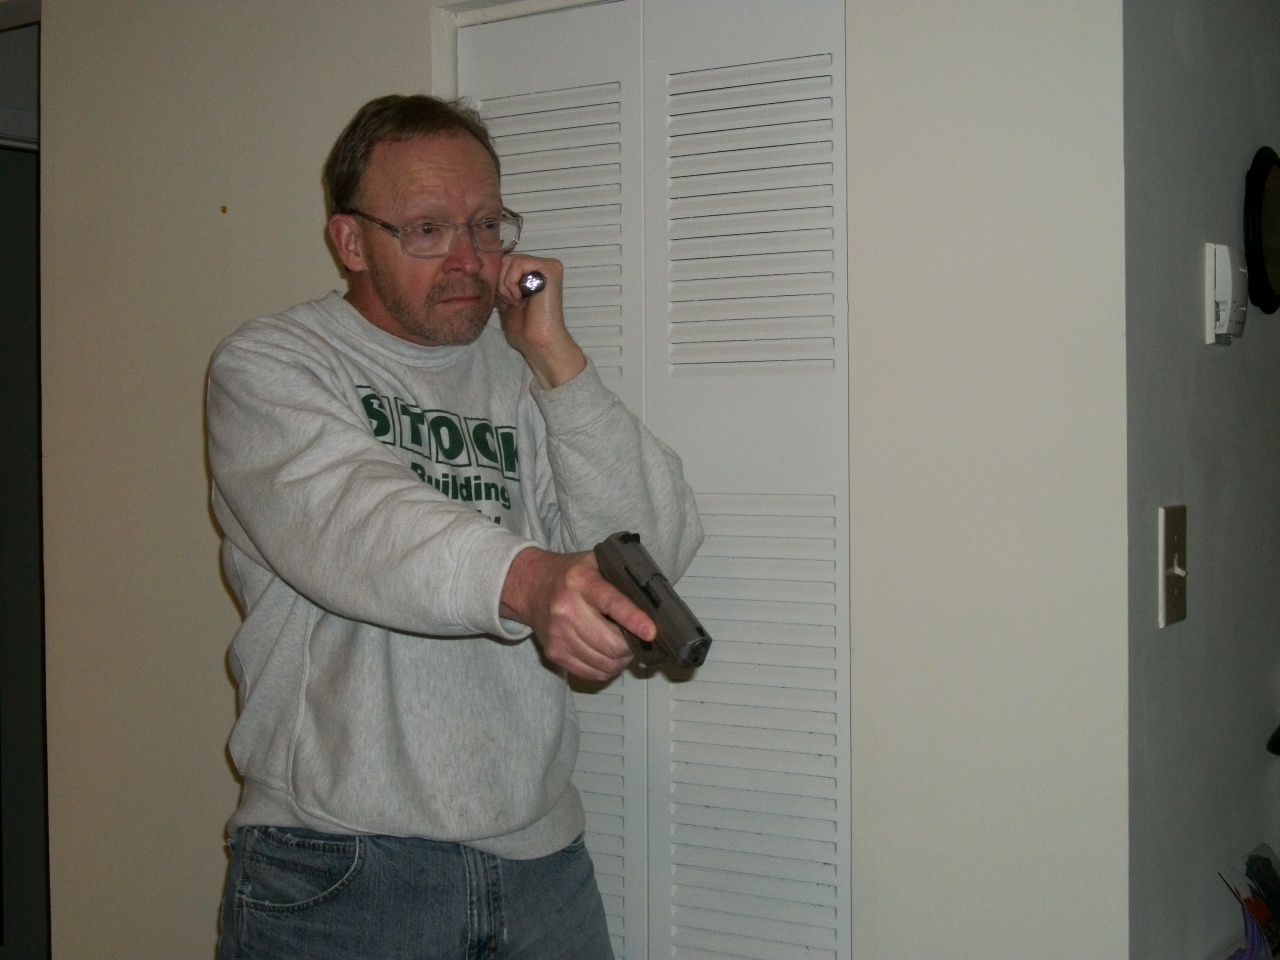
That means you have to learn to:
- Speak while holding your gun.
- Abort the shooting sequence if there is not a threat.
- Do a dissimilar task with the other hand, i.e., orient the flashlight and work the switch, while keeping your gun off target and your finger off the trigger.
- Shoot with one hand only while continuing to perform the dissimilar task.
- Manipulate the safety or decocker of your weapon with one hand while holding something in the other.
For the final 5 repetitions (10 rounds), put up a clean silhouette target and shoot the LAPD Retired Officer Course (10 rounds at seven yards). Measure how well you do. You’re going to find it’s a lot harder than you think.
That sequence is obviously rather involved; practice it before you have to do it for real or you’ll forget to do it or get it wrong. Forgetting to do it is what leads to tragedies.
Structured practice (Part II)
Part I of this series focused on Dryfire Practice. Now let’s focus on livefire practice, especially for those who are new to pistol shooting. To learn, maintain, and improve physical skills, we have to practice them regularly. We also need a plan for how we are going to practice. In that regard, shooting a gun is no different from learning to throw or hit a ball.
The problem many people have is that when they go to the range to practice, they have no plan and use no structure. At least a motivated police officer has the course required for periodic qualification as a structure for practice. Competitive shooters have courses of fire, either for Classification purposes or something that was appealing in a match. Few Private Citizens have either of these, which is why the most common ‘practice’ is blasting 50 holes in a silhouette at 5 yards. Shooting a bunch of holes in a silhouette gives familiarity with recoil and muzzle blast but not much else. Something further is needed to develop skill.
A very good starting point for new shooters is the NRA’s Marksmanship Qualification Program, which is really a marksmanship development program. This is a self-paced and self-administered program that the NRA has made available for decades. There are a number of different courses of fire available within the Program. The one I recommend for those who have just purchased a pistol for personal protection is Defensive Pistol I. DPI is designed to improve skills that contribute to a successful home defense.
Defensive Pistol I includes tasks such as:
- Hit a target to an accuracy standard
- Shoot within time limits
- Pick the loaded gun up from a bench and then engage the target
- Pick up and load an unloaded gun
- Move to a position of cover
- Shoot from behind cover
- Issue a verbal challenge
- Reload
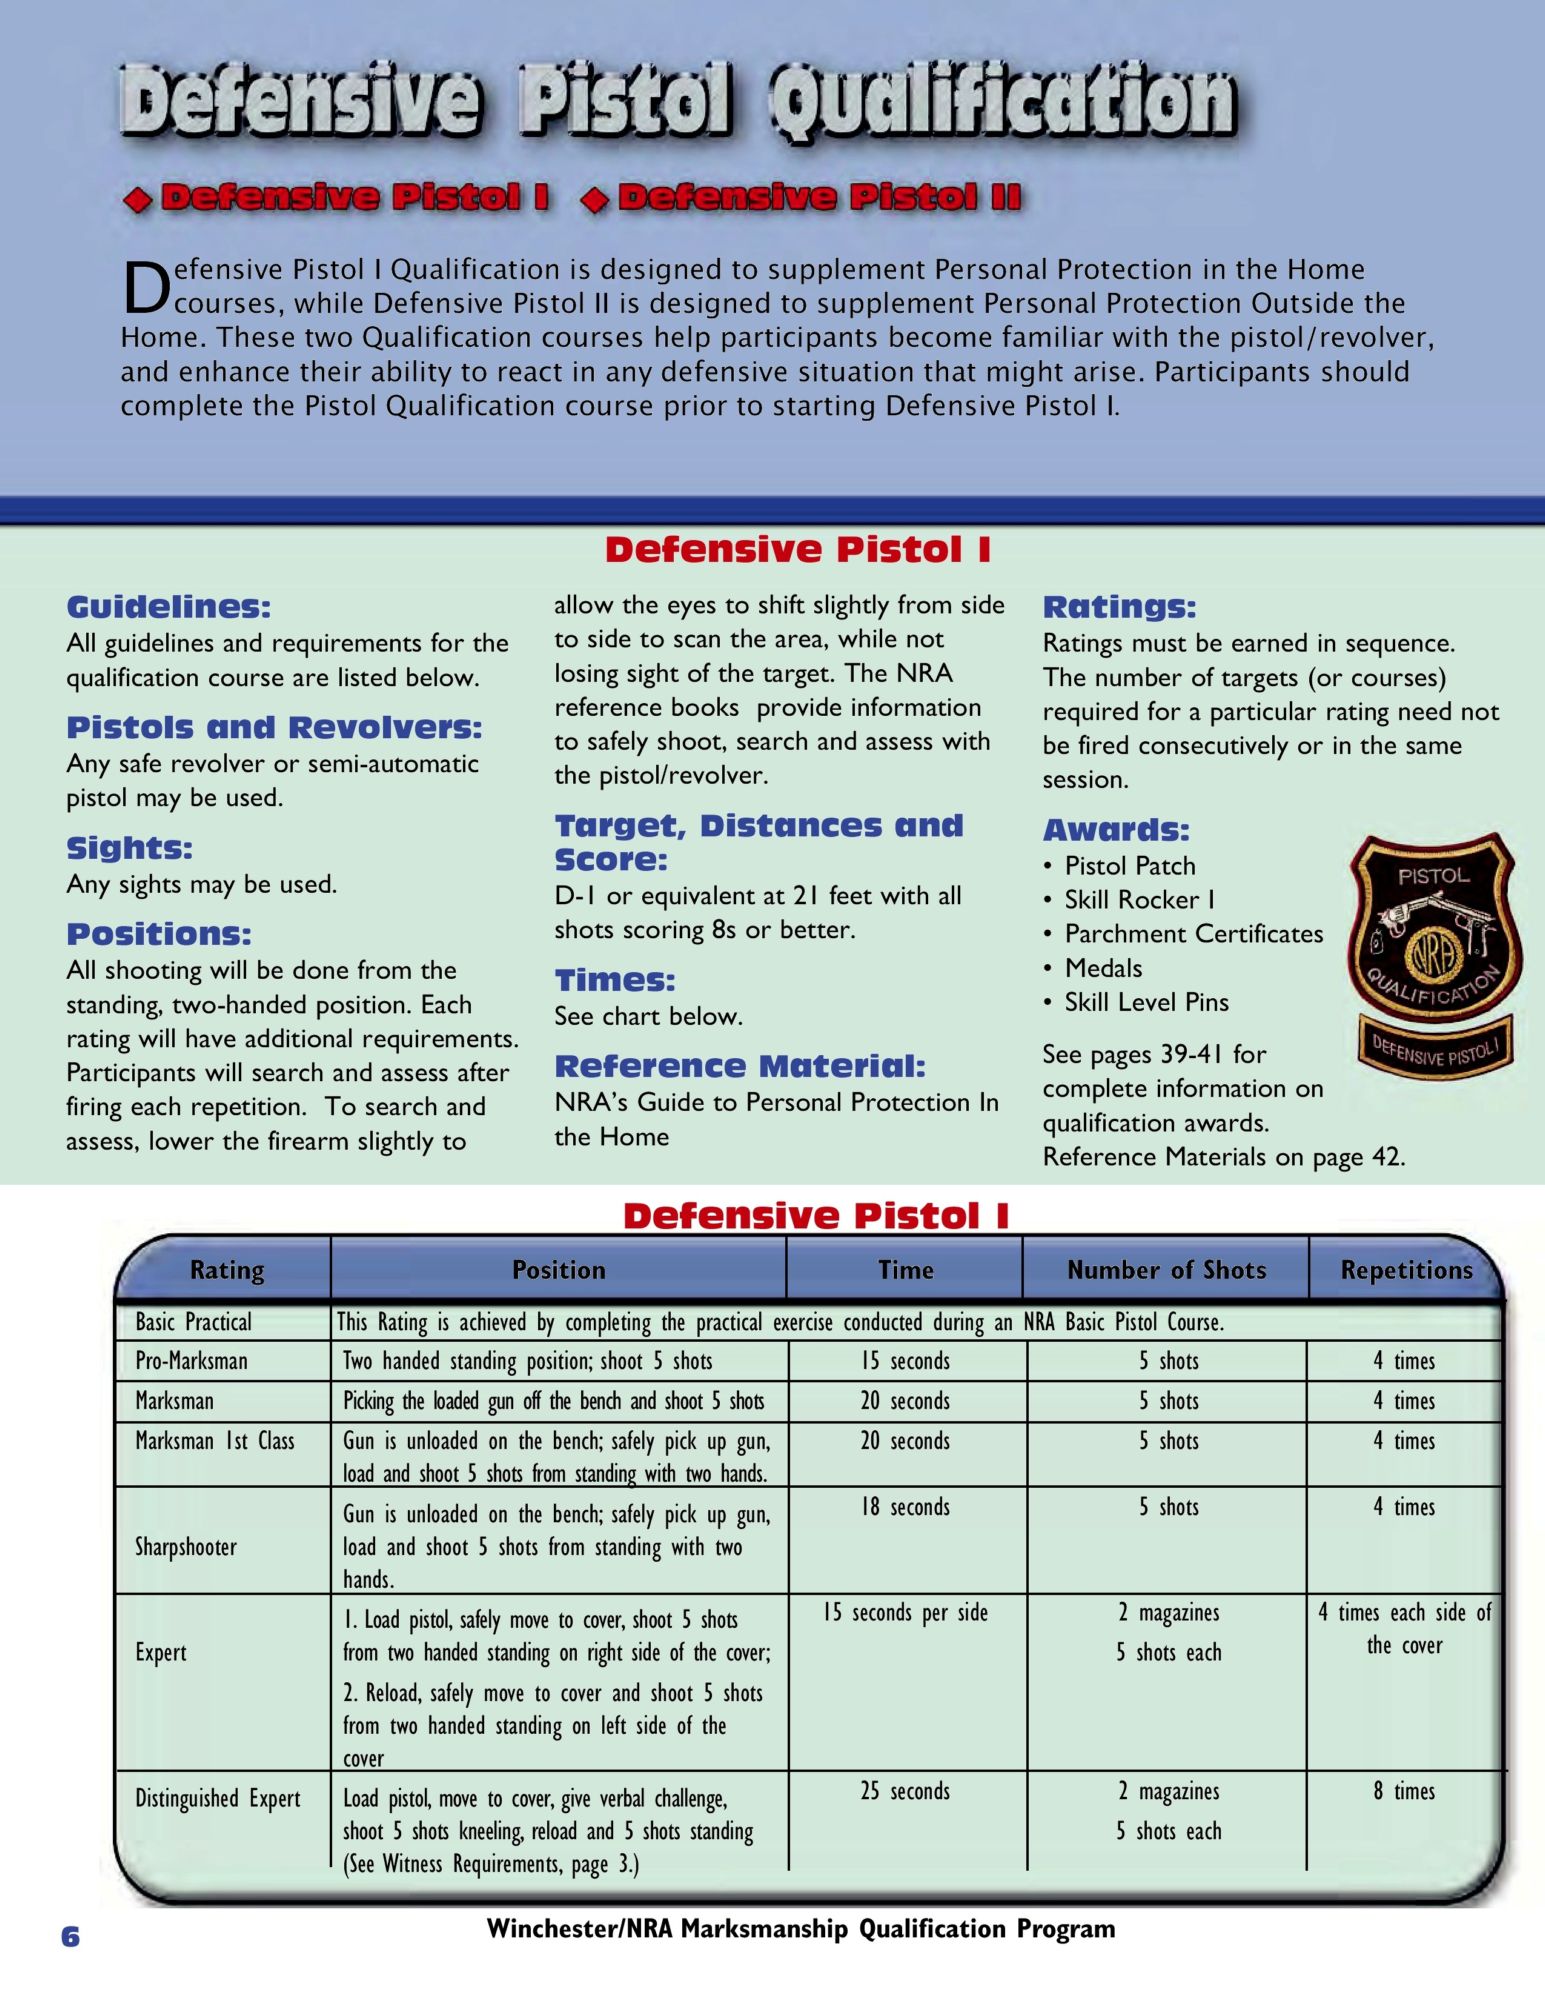
Courtesy of NRA Training Division
Something I really like about Defensive Pistol I and II is that the accuracy standard is 100%, not a fraction thereof. The allowable area and time limits are generous but you have to make every shot count. As I mention periodically, every bullet you fire in an urban area that doesn’t hit your target is heading for a busload of nuns and orphans being followed by a limousine full of personal injury lawyers on a conference call with the District Attorney. We have to get used to the idea that the only safe backstop for our bullets is the criminal’s body, period.
The target area specified for the NRA program is the 8 ring of the NRA D-1 (Bianchi Tombstone) or equivalent. The 8 ring of the D-1 is 12 inches in diameter. The shooter must place five shots in the 12 inch circle at 7 yards within a time limit of 15 seconds. Many shooters I talk to think this is a very simple marksmanship task. The reality is that because of the 100% standard it’s not as easy as people think. In order to meet the standard for the first level (Pro-Marksman) of the program, the task has to be done four times. Therein lies the rub. I have run over 100 people through the program and only about 10% have passed on the first attempt. What happens is that on one or two runs, one shot will not hit the 12 inch circle. Sorry, you didn’t make it.
The good news is that the four runs don’t have to be done consecutively. If you mess up a run, just shoot another until you have four that meet the standard. My experience has been that 10 percent of shooters can do it in four runs, another 40% will make it in five runs, another 40% will make it in six runs, and the final 10% need a lot of coaching to get through it.
While the Tombstone target isn’t available at all ranges, the allowance for an ‘equivalent’ means you can make a template of the 8 ring and apply it to whatever target is available. Just take your template and a marker with you to the range. I cut mine in half and then taped the halves together with duct tape so it folds and fits easily in my range bag.
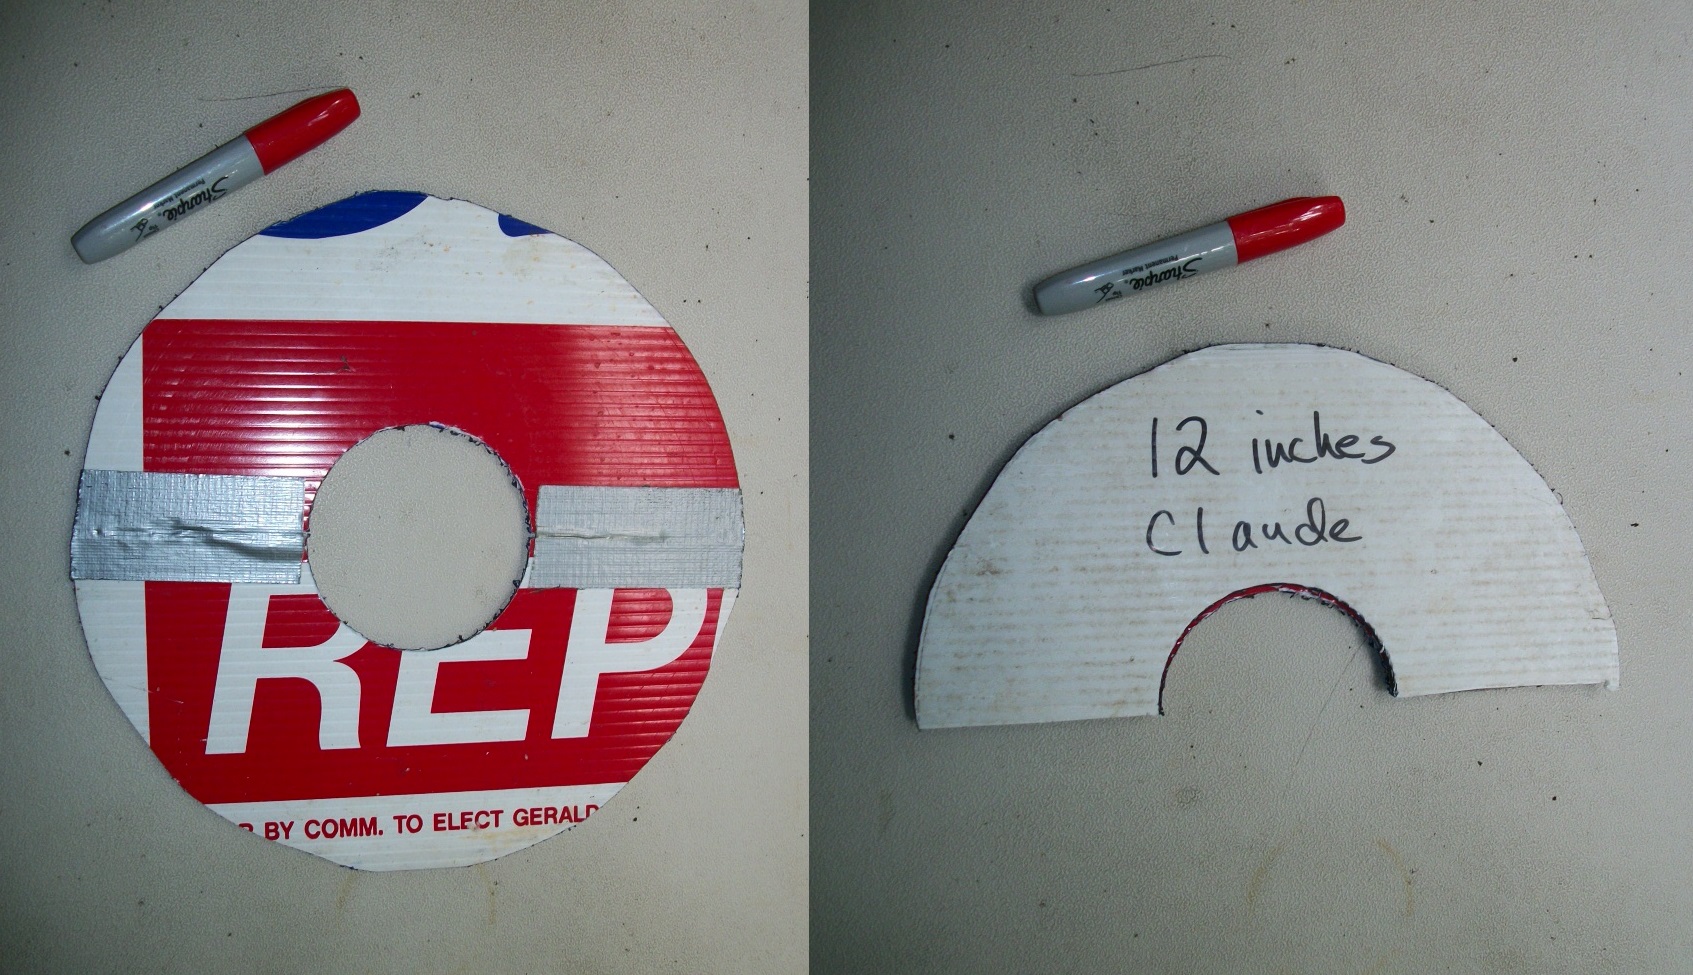
Once you get to the range, outline the template on your target and you’re ready to go. Be sure to take some kind of tape or marker with you so you can mark each run. Marking each run is how you learn to shoot well. As a general rule, I mark my targets after no more than 10 shots. When doing this program, you should mark your target after each string of fire, i.e., each five shots.
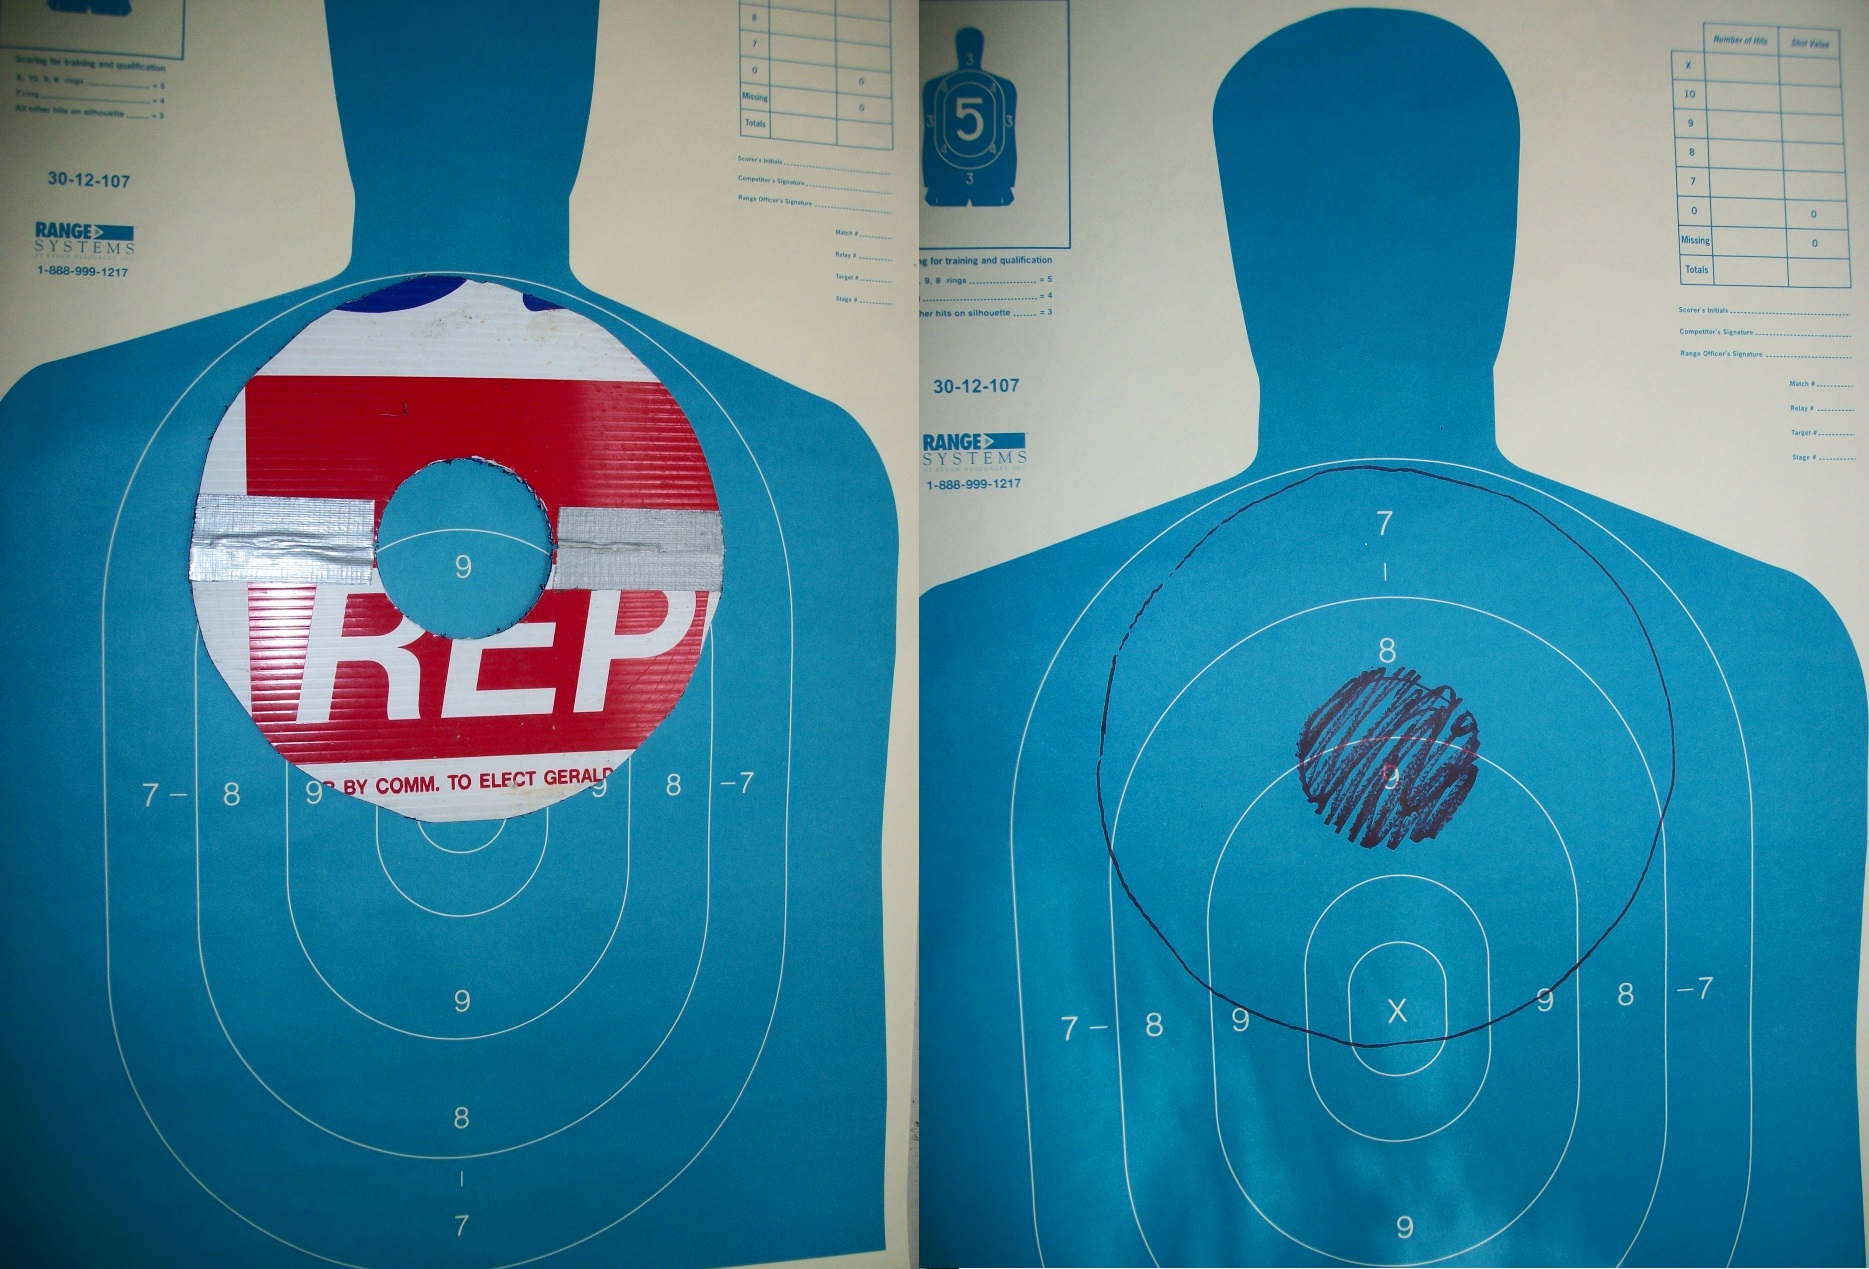
A new shooter can structure their practice sessions in many ways. What’s important is to plan what you do before you go to the range so you don’t waste your time and resources. The NRA program appeals to me because it’s already made up, it contains relevant skills, and it’s workable at most indoor ranges.
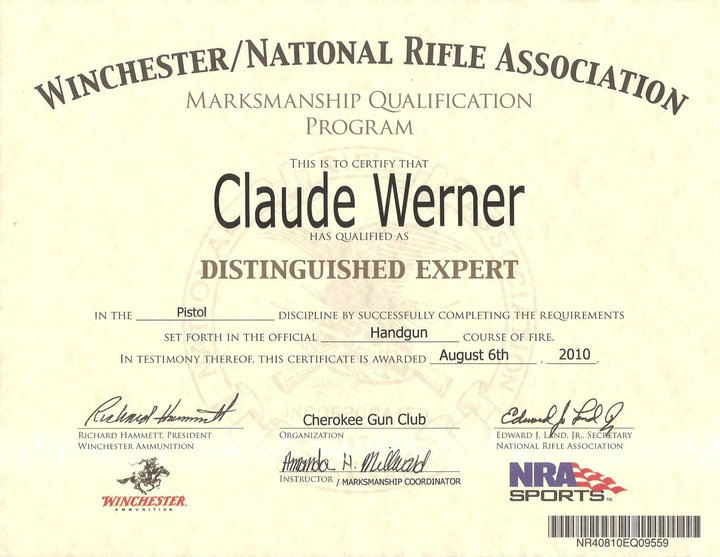
There are also awards available from the NRA for participating in the program. NRA membership is not necessary to participate. The NRA Marksmanship Qualification Program Booklet explains the entire program in detail. It is available for download from the NRA Training Division’s website.
Lima Goes to Hollywood and The Power of the Grey Man
There’s a lot to being a grey man. Many worthwhile observations in this post.

Amidst all the media attention surrounding my Babywearing and Carrying class was a call from CBS’s show, “The Doctors.” They thought my class was interesting and wanted to fly me out to California to talk about it. It took me a few days to get to the place where I decided to take the trip. I said yes on Tuesday, had a travel itinerary on Wednesday night and was on a plane on Thursday.
This is the first solo trip I’ve taken in a very long time to a destination that doesn’t include rendezvousing with friends or family or a firearms class.
No lie, the idea of two days in Hollywood by myself was very appealing though the reminders to be careful started in earnest along with concerns of, “Aren’t you nervous to be traveling by yourself?”
I don’t subscribe to that kind of worry and fear. Lots of people…
View original post 1,365 more words
Why don’t people train?
Owning a handgun doesn’t make you armed any more than owning a guitar makes you a musician.
–Jeff Cooper
Of all the things Jeff Cooper said, the above saying has become the most prevalent mantra within the firearms training community. It has been memed in many ways. The latest I saw was ‘Without training, you are just pretending.’ The original saying and its various memes allude to the need for gun owners to be trained, ‘regulated’ in the sense of the Second Amendment, in order to be able to effectively use their weapons for personal protection. Why, then, don’t more gunowners pursue training beyond the bare legal minimum, where required?
First of all, let’s confront the validity of the statement itself. We should note that there are quite a few capable musicians and singers who are self-trained. With regard to firearms, the firearms training industry has really only existed since the mid-1970s, when Jeff Cooper founded the American Pistol Institute at Gunsite. Before then, even many police officers didn’t receive much in the way of training. There were virtually no venues available for formal training for Private Citizens, other than the Boy Scouts or Camp Perry. Does this mean that in the 200 years of US history preceding the foundation of API, the American people were ‘unarmed?’ Of course not. Americans have a rich history of shooting predatory no-goods without a moment’s hesitation, even before the foundation of the Republic.
On an almost daily basis, we read and circulate reports of Armed Private Citizens defending themselves, their families, and their neighbors with firearms. The vast majority of these incidents are successfully solved by people who have not one bit of formal training. What this means is we trainers can’t have our cake and eat it, too. Every time we celebrate a successful defense, and rightfully so, we essentially invalidate Cooper’s saying.
What are the reasons a gunowner might cite for not taking training, assuming it’s available, which is a separate issue? There are any number of reasons, such as:
- Time
- Expense
- Accessibility
- Scheduling
- Lack of motivation
- Lack of incentive
- Lack of understanding
Time and expense should be discussed together because they are both personal resource constraints. The time demands on most people are extensive, especially in a single parent family. Similarly, money is tight for the majority of Americans. The question “How much is your life worth?,” another popular meme in the training community, is moot when the rent is due tomorrow and your kids want to eat.
Accessibility and scheduling are another pair of related issues. According to the US Census, 80.7 percent of Americans live in urban areas. Where are most training facilities? Out in the boonies, in what the Census describes as ‘rural areas.’ While there is some instruction that goes on at indoor ranges, my experience is that it is best described as ‘familiarization’ rather than training. This is a huge disconnect. The location of training facilities is a factor that impacts the time issue I previous mentioned. If a person has to budget several additional hours or days, just for travel purposes, that becomes yet another resource constraint.
To its credit, the NRA Training Division is trying to address this issue through the use of a ‘Blended Training Model’ of both online and in-person training. The result among the NRA Instructor community has been mostly anger and serious pushback. Much of the dissension is based on pure economics. I’ll let you draw your own conclusions about that.
With regard to scheduling, when do trainers tend to schedule training mostly? I submit that we schedule when it’s convenient for us, not for the students. That’s one reason I have gone exclusively to short evening classes and one day only weekend classes. Asking people to spend both days of a weekend, out in the sticks, is simply an unreasonable demand on their time.
Lack of motivation, incentive, and understanding are allied factors, as well. About them I will say we in the community simply haven’t made a good case for what we teach and why we teach it. This is especially true in light of the regular reports of people who successfully defend themselves and their families without any training. Although we trainers spend a certain amount of time talking about what we teach, we still haven’t made a good overall business case for “What is the value of training?” Until we do, folks just aren’t going to come. I think the training community might benefit from some Dale Carnegie training for itself.


You must be logged in to post a comment.