Repetition and Progression (Part 2)
#fridayfundamentals
The most important Fundamental of all is to be sure your gun works. A recently purchased used revolver seemed okay in most aspects except the cylinder lockup had a hitch. Upon actually shooting it, it worked fine for the first 10 rounds. After that, the trigger could not be pulled with the cylinder closed. As I suspected, something was wrong with the center pin spring and the center pin would not push the bolt into position when the cylinder closed. Moving the bolt into position before it will fire is fundamental to double action revolver design.
Upon examining it later, there was no center pin spring, hence the issue. Someone had obviously messed with it because the extractor rod came free quite easily. Fortunately, the sear/bolt spring for a S&W fit adequately and fixed the problem.
As my colleague, the late Paul Gomez, was fond of saying, “Shoot Yor ….. Guns.”
After repairing it, I used it for another form of progression in practice, increasing distance incrementally. Starting out at a close distance, marking your target after each string, and then increasing the distance gives you an indication of where your strengths and weakness lie. Knowing them gives you an idea of what to practice next.
The Value of Standards
When planning any journey, knowing where you’re starting from is a necessity. For those new to Concealed Carry and for those who have been carrying for a while, having some kind of Standard to benchmark your ability against is the way to determine where you’re at, skills wise.
Marksmanship skill is not the be all and end all of the skills involved in Concealed Carry, as my Serious Mistakes and Negative Outcomes commentary shows. However, understanding where your capability fits in the big picture helps decision‑making more than is often realized. Some degree of skill helps a gunowner focus on the solution to the problem of a criminal encounter instead of focusing on possession of the gun as the solution.
Comparative Standards – Double Action Autos
I enjoyed the #wheelgunwednesday Comparative Standards exercise enough to repeat it. This time the test was with Double Action autoloaders. Five different autos, three Double Action Only and two Traditional Double Action were the test subjects. Four were 9mm and one was a .22.
- SCCY CPX-2
- Sig P250
- Smith & Wesson 6906
- Beretta Centurion 92D
- Walther P22 (Remington Golden Bullet bulk ammo)
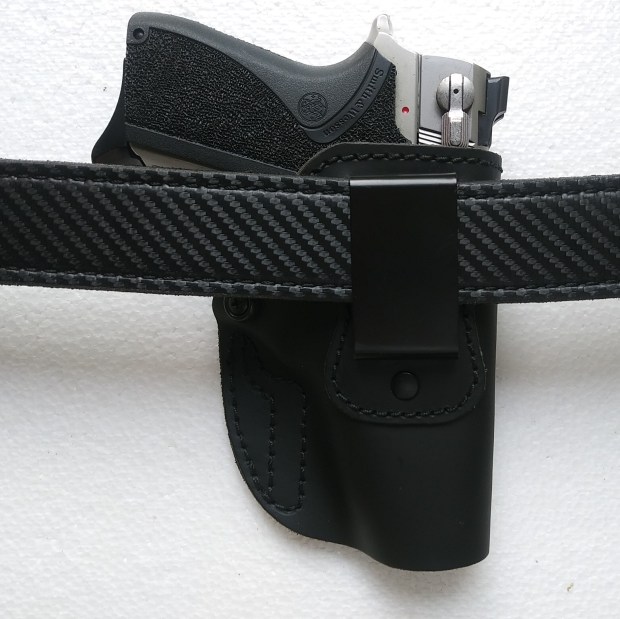
All the guns were similarly sized enough that I used the same Mister Softy holster for all of them. The Mister Softy is interesting in that the gun sits low enough in the pants that a full firing grip can’t be gained in the holster. I didn’t notice the lack of a full firing grip was an impediment. The need for a full firing grip in an AIWB holster is another one of the industry maxims I have doubts about. Maybe I just have clever hands.
I used the same protocols for shooting and scoring as last time so I won’t reiterate them.
#Wheelgunwednesday – Comparative Standards
The Editor of a publication I occasionally write for asked me to participate in a project about comparing different handguns. Being the revolver guy I am, he asked me for some input about how wheelguns fared. His concept is:
[R]each an objective: identifying a short (20-rounds) base of standards for defense handguns to (1) compare similar format guns, one to another, (2) compare formats of handguns (small, single stack or subcompact), (3) “shoot out” duty/defense ammo for replacement while evaluating personal skills, (4) yet another “cold course” of fire to identify skills areas that need attention.
This is the Course of Fire he developed.
- Basis: 3-second strings
- Lots of draws
- Few reloads (on the clock)
- Limited Vickers: use a target, feature .5 second added for 1-down; shortest time “wins.”
- 25 yards – singles from holster – 5x – 5 rounds
- 15 yards – single from holster – 1x
- single from guard – 2 x — 3 rounds
- 10 yards – Pair from holster – 1x 2 – rounds
- 7 yards – Failure from holster – 1x – 3 rounds
- 5 yards – Pair SHO from holster – 1 x – 2 rounds
- Pair WHO from guard – 1x — 2 rounds
- from holster, 1-Reload-1 – 1 x – 2 rounds
- from holster, 1 head – 1 x – 1 round
Total: 20 rounds
The breakdown:
- Draws – 7
- From ‘ready’ (guard) – 3
- Singles – 6, one to ‘brain housing group’
- Weak Hand Only – 2, Strong Hand Only – 2
- Shots to smaller target – 2; one is transition from larger target.
- Pairs – 4
- Reload – 1 (under time)
All in a 20 round box of ammo.
It’s an interesting concept, so I shot it with four different revolvers and two autoloaders.
- Smith & Wesson Model 65 – one of my favorite wheelguns and what I shot at the 2018 Rangemaster Tactical Conference
- Smith & Wesson Model 642– perhaps the most ubiquitous revolver encountered today
- Ruger LCR – another commonly carried wheelgun
- Smith & Wesson SD9VE
- Beretta PX4 Storm Compact, modified to G configuration
- Smith & Wesson 43C – a nice little .22 snub revolver
All were shot from Appendix Inside the Waistband carry except the SD9VE. The centerfire revolvers were reloaded using a speedloader carried in a centerline carrier. The 43C was reloaded using a QuikStrip carried in the watch pocket of my jeans. I used Remington Golden Bullet bulk ammo in the 525 round box for the 43C. Despite it having a 9 pound mainspring, which I have been told will get me ‘kilt in da streetz,’ there were no Failures to Fire.
We were free to use any target we wanted, so I used the printable target from my ebook Concealed Carry Skills and Drills. Per his instructions, the scoring was Vickers Count with ½ second added per point down. I used the Circle as the -0, the paper target as -1, and the balance of an IDPA target backer as -3.
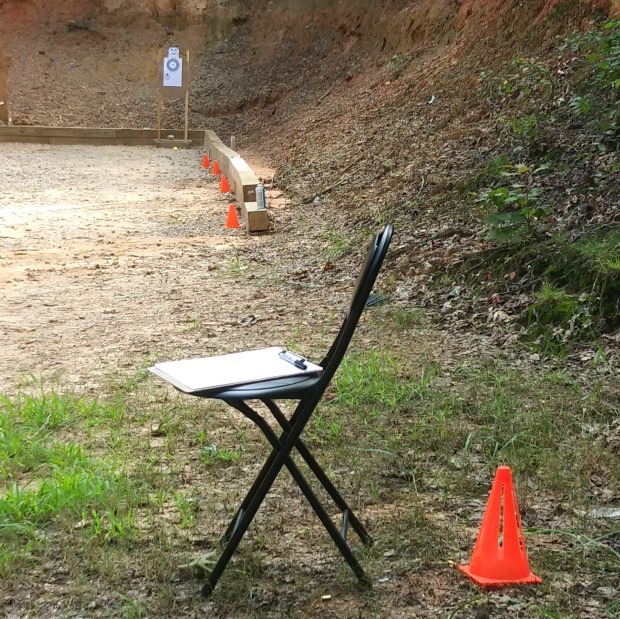
An interesting aspect of the Course is that every shot or two is scored individually. This involves a lot of walking, especially for the five shots at 25 yards but gives a lot of feedback about the efficacy of one’s shooting. In the spirit of the analysis, I marked the target at every distance change to keep track of where the bullets were hitting.

Range setup

Model 65

Model 642-2

Ruger LCR

SD9VE

Beretta PX4 Storm Compact

Model 43C
Here’s how the results came out.
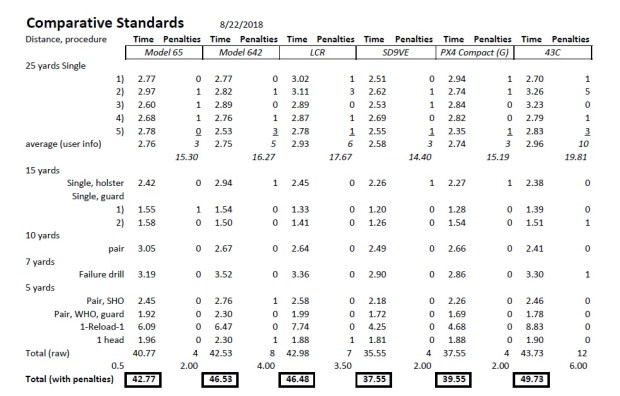
It’s a demanding benchmark analysis. I’m looking forward to seeing the results of the other testers.
If you would like to purchase Concealed Carry Skills and Drills, the link to the downloadable ebook is here. http://concealedcarryskillsanddrills.com
The Origin and Evolution of Dot Torture
Dot Torture is a well known practice regimen among skilled shooters. Its origins and evolution are less well known, however.

Shooting on dot targets, i.e., small filled in circles from 1.25 to 5.54 inches in diameter, as a speed shooting training and practice exercise, was originated by John Shaw, a World Champion shooter, in the early 1980s. In his book, You Can’t Miss: The Guide to Combat Pistol Shooting, he explains the training standard he established for his students. Until they could consistently hit the black bullseye (5.54 inches) of an NRA B-8 bullseye target from the holster in two seconds at seven yards, he didn’t allow them to move on to more advanced drills.

Shaw’s school, the Mid-South Institute of Self-Defense Shooting evolved the concept of dot shooting to a high level. Combined with shooting at steel targets, as originated by Bill Rogers, founder of the elite Rogers Shooting School, dot shooting became a standard component used in the practice regimens of knowledgeable shooters who aspired to a higher level of competency.
The concept of dot shooting was so effective at teaching shooters to hit the target, it quickly became part of military counter-terrorist pistol training. The US Army Special Forces developed a course called ‘Special Operations Training’ [SOT] during the 1980s to train its personnel to use the 1911 pistol at a level not seen before that time in the military.
Comparing capabilities
For a long time, I’ve wanted to do a comparison of two very popular pocket pistols; the Airweight J Frame and the Ruger LCP. This #wheelgunwednesday, I made it happen. In this case, I used a S&W 642-2 for the Airweight.
The test I used for the comparison was the Nevada Concealed Firearms Permit Qualification Course. I used this as the graduation exercise in my Snub Nose Revolver Classes many times. It’s still one of my favorite CCW qualification courses. The course goes as follows:
The humanoid target, B27 or B21 or equivalent as determined by the firearm instructor shall be utilized.
For 6 shot or higher capacity:
3 yards 6 rounds No time limit Freestyle
5 yards 12 rounds No time limit Freestyle
7 yards 12 rounds No time limit Freestyle
For 5 shot or lower capacity:
3 yards 5 rounds No time limit Freestyle
5 yards 10 rounds No time limit Freestyle
7 yards 10 rounds No time limit Freestyle
A total of 30 rounds for 6 shot or larger capacity, 25 rounds for 5 shot capacity must be fired. A 70% minimum (18/25, 21/30) must be scored to pass.
Notice that as with the majority of State Qualification Courses for Private Citizens, drawing from the holster is not required. Nevada is not one of the States that forbid drawing from the holster, so I include a little holster work.
The way I did the test was to:
- Use the -1 zone of the IDPA target. Then, I fold the bottom tapered part up behind the target. This gives an area approximating the FBI QIT target, which I like.
- Shoot 25 rounds with both guns, even though the LCP would fall into the ‘6 shot of higher capacity’ category. This gives an apples to applies comparison of the two guns.
- Conduct the first Stage as five individual one shot draws.
- Do the second and third stages as two individual strings of five shots each.
- Carry the 642-2 in an AIWB holster, concealed under a polo shirt.
- Carry the LCP in a pocket holster.
- Start the draws with hand on gun.
- Start the Five shot strings with the gun at Low Ready, aimed below the base of the target.
In the end, I was able to achieve slightly better results with the 642-2 (19.87 seconds) than with the LCP (20.71 seconds). I’m not sure a 4% difference is worth writing home to Mom about, though.


Both guns were mostly stock. The front sights on both are painted with Fluorescent Orange paint. The LCP has a Hogue Hybrid Handall installed. This makes the gun much more pleasant to shoot and I highly recommend it. The 642-2 wears Sile rubber stocks, which are no longer made, unfortunately. No special trigger work has been done on either, other than a fair amount of dry practice.
In the end, either of these in your pocket will provide more personal protection than some big honking clunky autoloader that gets left home. What’s the best concealed carry handgun? The one you have on you.
How much does barrel length matter?
The timer and the target sometimes tell interesting and unexpected tales. A long held opinion is that a longer barrel is easier to shoot, both in terms of accuracy and shot to shot recovery, than a shorter barrel. For #wheelgunwednesday, I decided to put this theory to the test. Several different revolvers of varying frame sizes, weights, and barrel lengths were used to shoot a standard drill and compare results.
Justin Dyal wrote an article for SWAT Magazine about a drill he created called Five-Yard Roundup. It was used as the semi-final test at the Rangemaster 2018 Tactical Conference. Especially in the context of snub revolvers, it’s a good test of skills that may be required for personal protection.
Friday Fundamentals – Understanding Zero for Handguns
Zeroing any firearm is the process of understanding the relationship of Point Of Aim (where the shooter aims the firearm) [POA] to Point Of Impact (where the round actually strikes the target) [POI].
For Soldiers to achieve a high level of accuracy and precision, it is critical they zero their [sighting system] to their weapon correctly. The Soldier must first achieve a consistent grouping of a series of shots, then align the mean point of impact of that grouping to the appropriate point of aim.
–Appendix E – Zeroing, Department of the Army Training Circular 3-22.9 – Rifle and Carbine, May 2016
This is the process most shooters are familiar with regarding zero. However, zeroing a fixed sighted handgun is different than zeroing a rifle.
Bottom Line up front: With rifles, we zero the sights to the ammunition. With fixed sighted handguns, we zero (adjust) the ammunition to the sights.
Snubby recommendation
I was emailed the following question. It’s a good question with an involved answer.
Which snubby do you recommend?
This was my reply:
It depends on the person, their ability, their needs, and their desire to achieve an acceptable standard of performance. The S&W 642 and Ruger LCR .38 Special have become the default purchases for people who want to carry a snub. They work for some people but not everyone.
Determining Your Ability – Friday Fundamentals
The famous Chinese philosopher Lao Tzu is quoted as having said:
The journey of a thousand miles [li] begins with one step.
This is only partially correct. The journey really begins with knowing where you are in the first place. This is also true about the journey to proficiency with firearms. Especially for newer gun owners, it’s important to gain an understanding of what their current capabilities are, if they want to improve. Many people who have purchased handguns made the purchase with the intent of personal protection. In this light, a good first step in gauging proficiency is the Michigan State CCW Basic Pistol Safety Training Assessment Course of Fire. It is a simple course of fire that can easily be done at any indoor or outdoor range. It’s also extremely manageable with a J Frame revolver. The Michigan course of fire is the first evaluation in the Indoor Range Practice Sessions program. It also can serve as the basis for a more challenging evaluation.
The target consists of three 11 inch x 8½ inch letter size pieces of paper stacked vertically. The combined sheets of paper are quite close to the FBI Q target both in area (280.5 square inches v. 275 square inches, respectively) and in general shape (a target much taller than it is wide). The target is placed at 4 yards,

(Note: FBI Q drawn for reference)
Four yards happens to be the boundary between Public Space and Social Space in the study of proxemics. Proxemics is a subject that is worthy of study by anyone interested in the Art of personal protection.

Diagram by WebHamster
There is no time limit. Shooting is done with both hands. You will shoot 5 rounds in three separate sequences. Start with the handgun loaded with five rounds and aimed below the target.
- When ready, aim at the target and fire all 5 rounds.
- Reload with five rounds and repeat the firing sequence.
- Reload with five rounds and repeat the firing sequence one more time.
- At this point, you should have fired five shots at the target three separate times.
- To successfully complete the assessment, at least 2 out of 3 of the sequences must have had five (5) hits within the 25½ inch by 11 inch outline of the three pieces of paper.

While experienced shooters will consider this course quite easy, for new owners of J Frame revolvers, it frequently is not. This course can also be used as a measure of the effectiveness of Indexed Shooting (shooting without using the sights) by taping up the sights of the gun, in this case a Model 36 S&W snub nose revolver.

To use this method, bring the gun into the eye-target line and then place the outline of the cylinder or slide on the target. The great NYPD gunfighter Jimmy Cirillo taught this technique to NYPD Officers as a way of effectively using their revolvers at close range in situation where the sights could not be seen. It’s sometimes referred to as ‘metal on meat.’
If the group shot in the first three sequences meets the requirement, then try reshooting the exercise with only one piece of paper. Taking the tape off and using the sights may yield better results.

While this course of fire is simple, many newer gun owners may find it challenging. As can be seen in the pictures, the target is smaller than the silhouette target that many Private Citizens and POlice Officers are accustomed to shooting at. It also has the requirement of a 100% standard for the sequences. The 100% standard is the start of having a mindset of being accountable for every round.

You must be logged in to post a comment.