Once you can shoot…
Some instructors, including myself, had an interesting discussion on Facebook about the phrase “once you can shoot.”
My question to the group was ‘What does that mean?’ I asked it as a serious question. The personal journey I’ve made in answering that question over time has been interesting. My answers to myself about it have changed dramatically as a result of some related research I’ve done. The two most significant areas of research were Negative Outcomes and what higher level thinkers in the POlice community had to say. The discussion was involved enough that I wrote a Patreon post about it.
https://www.patreon.com/posts/43213970
I’m making the Patreon post public because I think it’s a much neglected philosophical discussion. At The Mingle this month, I asked the ladies present to write out their personal policy about when to draw or present a weapon. It was the first time that many of them had ever been asked to do that. We need to realize that ‘Have Adequate [Hard] Skills’ is only one aspect of the issues we face.
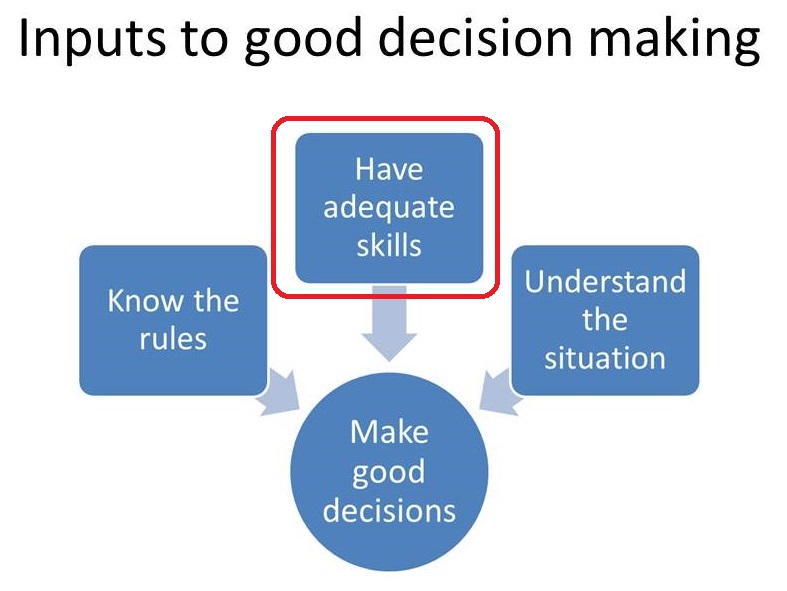
Marksmanship is a hard skill but soft skills are important too.
Gripping an autoloading pistol correctly to reduce malfunctions
Gripping the gun firmly, including stiffening the wrists, is important in terms of running autoloaders without having malfunctions aka stoppages (Unintentional Interruptions in the Cycle of Operation). This has been demonstrated several times in classes I’ve taught this month; Personal Performance http://www.thecompletecombatant.com/personal-performance.html and The Mingle. http://www.thecompletecombatant.com/the-mingle.html During both classes, simply increasing the tension in a shooter’s wrists completely eliminated malfunctions in guns that had previously been troublesome.
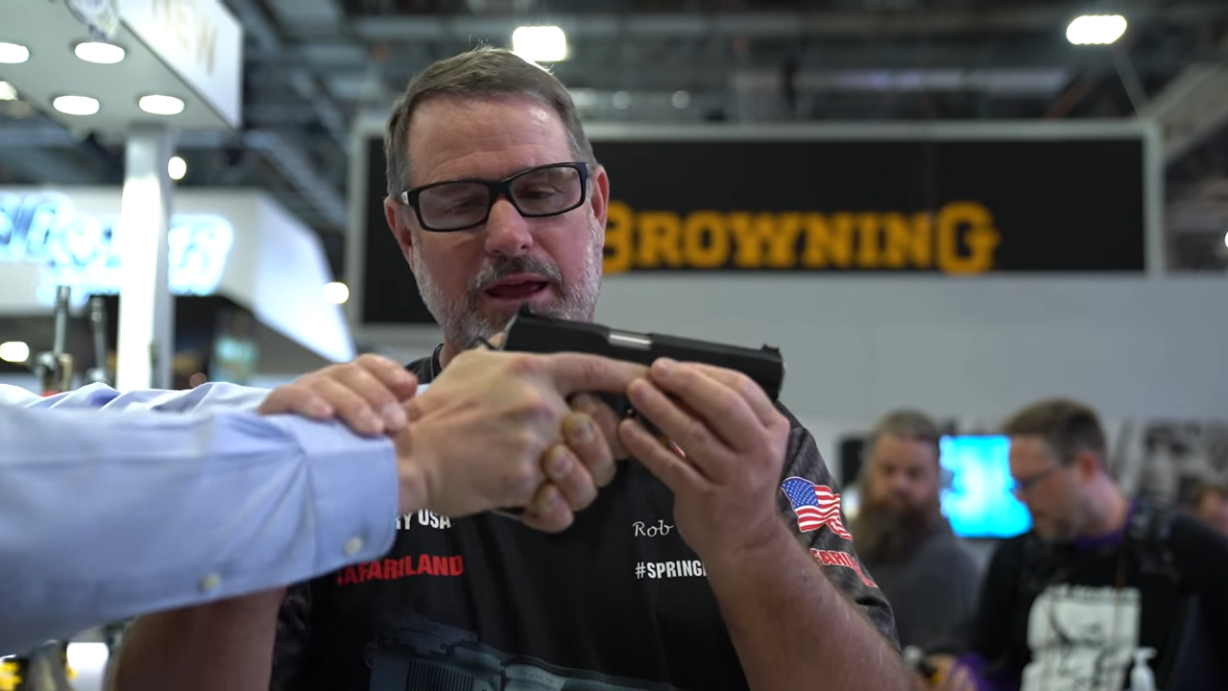
Rob Leatham gives an excellent explanation about gripping the pistol in this video. Although his video addresses shooting speed, the concept applies equally to increasing reliability of a pistol.
Note how he tests the tension of the shooter’s wrists at 1:05. With a handheld recoil-operated firearm, tensioned wrist(s) are a key input for the gun’s functionality. If the shooter’s wrists are not adequately tensioned, the receiver of the gun moves at the same time the slide is cycling. When the receiver moves simultaneously with the slide cycling, the possibility of the slide not completing its travel fully to the rear increases. Failure to maintain tensioned wrists is often referred to as ‘limp-wristing.’
Knowing the mechanical steps in the operation of an autoloading firearm is useful to understand this problem. Once a loaded magazine has been inserted, the eight steps in the cycle of operation for a locked breech firearm are:
- Feeding
- Chambering
- Locking
- Firing
- Unlocking
- Extracting
- Ejecting
- Cocking
The steps most affected by limp-wristing are Feeding, Chambering, and Ejecting. Feeding is the step wherein the round rises completely up in the magazine and presses against the feed lips. Chambering occurs when the breech of the firearm strips the round from the magazine’s feed lips and pushes it completely into the chamber. Ejecting occurs after the entire case has been pulled from the chamber and the case is completely expelled from the firearm.
If the slide does not move fully to the rear because the receiver is moving at the same time, the breechface may not clear the rear of the cartridge. If so, Feeding will not be complete. The front of the cartridge will rise to the feed lips but the rear of the cartridge cannot because the lower part of the breechface is obstructing it. This is a Failure to Feed. Then, when the slide moves forward, friction between the bottom of the breechface and the cartridge will push the nose of the cartridge into the feedramp. However, because the round is presented at the wrong angle, a Failure to Chamber occurs with the nose of the round jammed against the feedramp. In some pistols, a Failure to Cock will also occur but this is incidental to the problem.
This stoppage must be cleared by using Remedial Action.
Remedial Action
- Strip the magazine out. This may or may not require locking the slide to the rear, depending on the type of pistol. There are two schools of thought about what to do with the stripped out magazine, however, neither is relevant to reducing (clearing) the stoppage.
- Work the slide several times to ensure that no fired unejected brass remains in the gun.
- Insert and seat a magazine.
- Operate the slide completely to chamber a new round of ammunition.
- Get back to work.
An even more exaggerated of the issue can occur if the slide’s rearward travel is so shortened that that the base of the cartridge doesn’t make contact with the pistol’s ejector. This then will result in a Failure to Eject in addition to the Failure to Feed and Failure to Chamber. This stoppage must also be reduced by using Remedial Action. The Failure to Eject aspect is why the step of working the slide several times is included in Remedial Action. Theoretically, a Failure to Extract could occur but this is almost universally ammunition related (oversized, dirty, or grossly underpowered) rather than due to Operator Error.
Working with a partner and a completely unloaded pistol or Blue Gun, as demonstrated in the video, to test and increase the tension of the wrists is a simple way to increase the reliability of the pistol.
Gripping the wrists while moving the pistol.
Tactical Professor books (all PDF) (not Free)
- Serious Mistakes Gunowners Make http://seriousgunownermistakes.com
- Indoor Range Practice Sessions http://indoorrangepracticesessions.com
- Concealed Carry Skills and Drills http://concealedcarryskillsanddrills.com
- Advanced Pistol Practice http://bit.ly/advancedpistolpractice
- Shooting Your Black Rifle http://shootingyourblackrifle.com
- Package deal of Serious Mistakes, Indoor Sessions, Concealed Carry, and Shooting Your Black Rifle (20% off) https://store.payloadz.com/details/2644448-ebooks-sports-shooting-drills-package.html
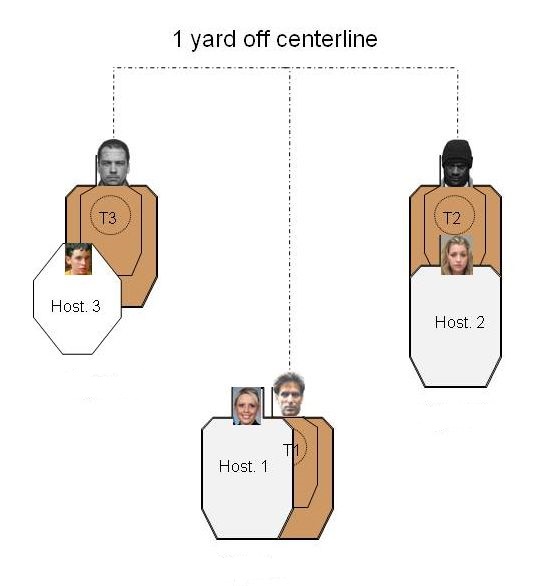
Downrange drill target
My only question is whether you might have an alternate suggestion for target set up comparable to the one in this post and the one before. I shoot at two restrictive ranges without the ability to shoot targets spaced as indicated in your diagram.
Almost all indoor ranges are restrictive that way. There are still things you can do even if you can’t accomplish everything you’d like.
This is a target from my upcoming Dry Practice book you can print on letter size paper.

Downrange drill target
Tape it to the head of a silhouette target. It is anatomically sized correctly by using the ocular distance indicated by the line with arrows on the male mugshot of Dennis Rader, the notorious BTK Killer. https://www.biography.com/crime-figure/dennis-rader The dashed circle is sized to four inches in diameter. The pretty lady is a mug shot too, unfortunately, but she serves the purpose of occupying the place of a NO SHOOT.
Place the target at 10 feet, which is the mid-point of the far phase of Social Space in Proxemics. The object of the drill is to place one round in the circle as rapidly as you can. Do it five times in a row. If you hit the lady, you’ve shot a loved one; consider that in your evaluation of your abilities. As Dirty Harry said, “A man’s got to know his limitations.”
Even if you don’t have a lot of flexibility at your practice range, there are still things you can do to up your game.
Tactical Professor books (all PDF) (not Free)
- Real Shootouts of the LAPD http://realshootoutsofthelapd.com
- Serious Mistakes Gunowners Make http://seriousgunownermistakes.com
- Indoor Range Practice Sessions http://indoorrangepracticesessions.com
- Concealed Carry Skills and Drills http://concealedcarryskillsanddrills.com
- Advanced Pistol Practice http://bit.ly/advancedpistolpractice
- Shooting Your Black Rifle http://shootingyourblackrifle.com
- Package deal of Serious Mistakes, Indoor Sessions, Concealed Carry, and Shooting Your Black Rifle (20% off) https://store.payloadz.com/details/2644448-ebooks-sports-shooting-drills-package.html
Why we practice marksmanship – number 2
Investigators say Mills walked into the bathroom where the female homeowner was showering. She screamed and her husband ran in to confront Mills. Police say Mills had a knife and stabbed the husband in the face and stomach before running from the home.
A downrange drill including standoff.
Once again, we’re more likely to need to do a close range precision shot on a predator than a 25 head shot on a terrorist. Let’s use ‘hit a 4 inch circle at 10 feet’ as a definition of ‘close range precision shot.’ That’s the standard to pass the NRA Basics of Pistol Shooting course. Just like BOPS, our standard should be 100% hits for a five shot string.
Why we practice marksmanship
Man shot multiple times while trying to steal couple’s SUV at gas station
“The suspect walked away from his truck and toward a couple that was at a gas pump with their SUV, investigators said. Officers said the suspect then entered the driver’s seat of the SUV while a woman was in the passenger seat.
At some point, police said the man saw the suspect inside of the SUV. He then fired at the suspect sitting in the driver’s seat, striking him multiple times, investigators said.”
Note the position of the bullet holes in the windshield.
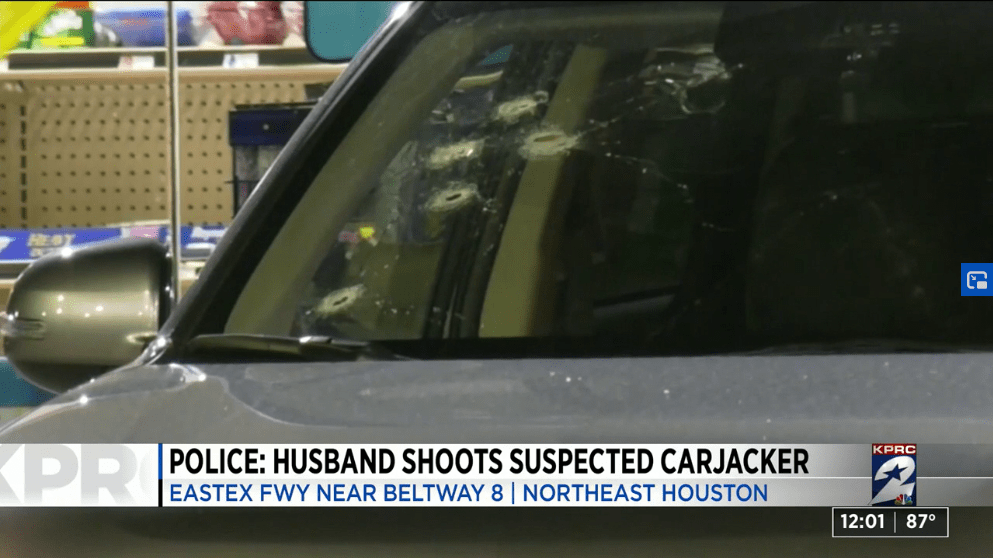
Hopefully, the wife exited the vehicle before the shooting started. If not, that was a scary downrange drill, i.e., friendlies or non-threats somewhere downrange between the defender and the criminal. Scary for both the shooter and the downrange friendly. Consider the position of the shooter when the shots were fired.
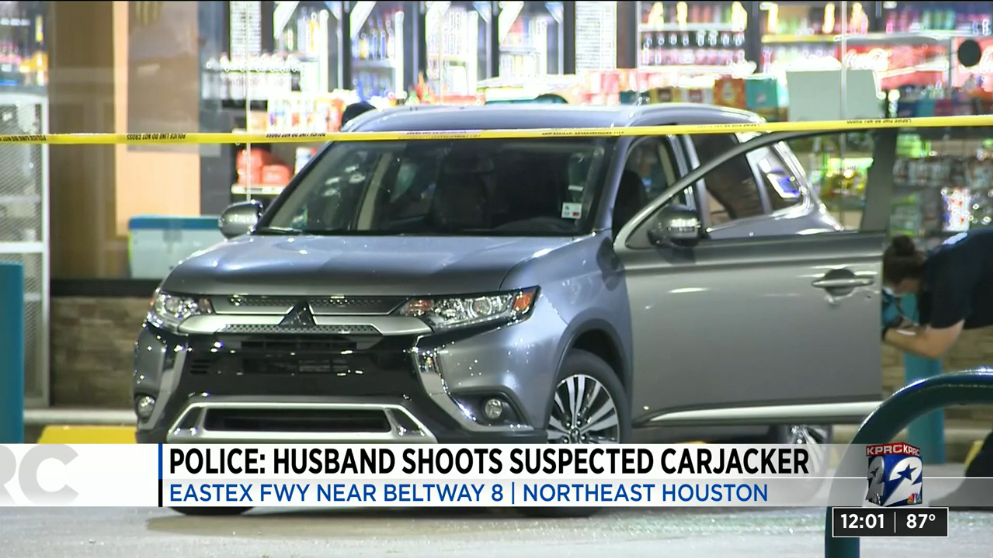
Armed Citizens are far less likely to have to make a 25 yard headshot on a terrorist than we are to need to make a close range precision shot with no-shoots downrange. It’s something that very few gunowners practice but ought to. In this situation, the hit ratio needs to be 100%, not 70% or 20%.
Even during the Beer Plague, we’re often out of our homes with our loved ones and there’s no guarantee that they will be behind us when trouble starts.
Tactical Professor books (all PDF) (not Free)
- Serious Mistakes Gunowners Make http://seriousgunownermistakes.com
- Indoor Range Practice Sessions http://indoorrangepracticesessions.com
- Concealed Carry Skills and Drills http://concealedcarryskillsanddrills.com
- Advanced Pistol Practice http://bit.ly/advancedpistolpractice
- Shooting Your Black Rifle http://shootingyourblackrifle.com
- Package deal of Serious Mistakes, Indoor Sessions, Concealed Carry, and Shooting Your Black Rifle (20% off) https://store.payloadz.com/details/2644448-ebooks-sports-shooting-drills-package.html
Priorities of Work
Someone on Instagram asked me about doing 65 yard headshots with a pistol. My response was that it doesn’t really concern me. I’m much more interested in teaching as many gunowners fundamental skills as I can and then integrating decisional training along with those skills. As long as a person can pass an entry level CCW Qual Course, they’re probably ready to start working on the decisional aspects of Personal Protection.
Skip Gochenour, who ran the National Tactical Invitational for many years, and I had a conversation about this years ago. Skip’s opinion was that we need to get training about human dynamics and decision-making into the training sequence much earlier. I agree with him 100 percent. Decision-making is what makes us or breaks us when the situation starts getting dicey.
I’ll be testing my theory at The Mingle 2020 in a couple of months. In the meantime, I’ll be starting a new 3 dollar Patreon tier for teaching marksmanship and manipulation skills early next month (September).
The way it’s going to be structured is by using CCW Qual courses as a baseline and a learning vehicle. The head of the US Army Ranger School once commented that the purpose of Ranger training is to teach leadership under conditions of stress. Patrolling is just the vehicle or method used to teach leadership to Ranger Students. I think we can use qualification courses in the same way. Given the ammo shortage, it will be largely dry practice with an occasional live fire session.
Here’s the first set of videos that show the first Course of the series. There will be demos for both autoloaders and revolvers.
One using the SCCY pistol:
One with a 317 revolver:
As always, Tactical Professor books can be purchased from the menu at the top of the page. They are NOT FREE but if you would be interested in knowing how to better operate the firearms you own during the American Insurgency, they will be useful.
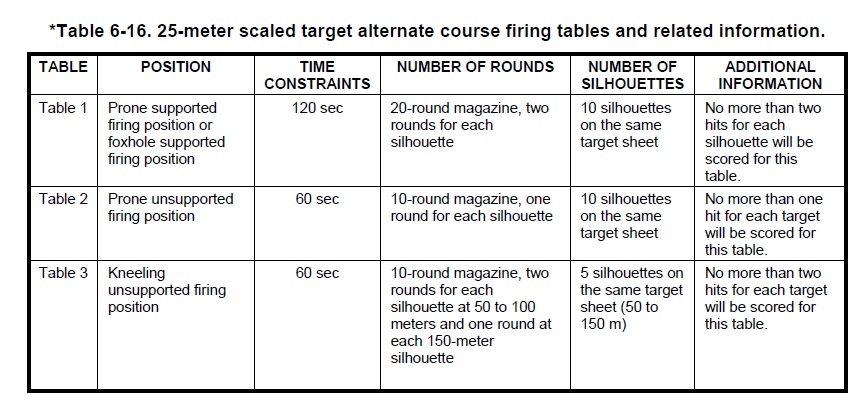
Scaled target rifle qualification
One of the challenges with rifles is evaluating proficiency with limited resources. One approach is the US Army Scaled Target Alternate Qualification Course. The Course is found in Field Manual 3-22.9 . It can be shot on any range that has 25 meters (28 yards) of space. Even if your range only has 25 yards, it’s still a good course; just recognize that the targets are 10 percent closer than the values on the target.
There are three Tables (stages) totaling 40 rounds.
Press the trigger smoothly
#fridayfundamentals
One of the components of NOT producing buckshot targets with a pistol is pressing the trigger smoothly and straight to the rear. With Double Action handguns, either revolvers or autoloaders, this is especially true but it applies to any handgun or rifle. Revolver shooters must master this skill if they want the wheelgun to be anything more than an “arm’s length gun.”
Buckshot with a handgun
Now that the weather is turning colder and, for some folks, snowy, we have the opportunity to work on our trigger press in dry practice. Here are two drills that can dramatically increase your ability to manipulate the trigger correctly.
NRA Personal Protection Courses
Last weekend, I traveled to Florida to take the NRA Instructor Basics of Personal Protection Outside The Home Course (PPOTH). I was asked by several people why I would want this particular “Basic” Certification in light of my background and training experience. It’s simple,
I like training new shooters.
My colleague Grant Cunningham made a pertinent blog post about this shortly after I took the PPOTH Student Basic and Advanced Student Course. Experienced instructors often shy away from training the newest students. There has been a massive increase in people licensed to carry firearms over the past few years. In addition, several States have adopted Constitutional or Permitless Carry. That market base probably needs experienced trainers and coaches.
And I don’t feel the need to reinvent the wheel. It’s unfortunate that the NRA Training Department’s best marketing statement for its Personal Protection training is contained in the PPOTH Instructor manual. “The NRA Basic Personal Protection Series is based on the building-block approach, moving from the simple to the complex.” The most effective training courses I have taken over the past two decades have used a step by step approach to skill building.
The Training Department sees the progression of the courses for new gun owners interested in learning how to defend themselves and their loved ones as follows.
- NRA Basics of Pistol Shooting Course, the first course, develops the basic skills of handling, shooting, and cleaning the firearm, as well as a thorough grounding in firearm safety.
- NRA Basics of Personal Protection In The Home Course, the second course, teaches:
- the defensive or flash sight picture,
- firing single shots and/or aimed pairs from various shooting positions
- shooting using a center-of-mass hold,
- effectively using cover and concealment,
- employing point-shooting and multiple target engagement techniques.
- techniques for improving awareness and promoting mental preparation,
- methods of enhancing home safety without a firearm, and
- legal aspects of the use of deadly force in self-defense.
- NRA Basics of Personal Protection Outside The Home, the third course in the series, covers:
- Introduction to Concealed Carry Safety and The Defensive Mindset,
- Introduction to Self Defense and Concealed Carry,
- Legal Aspects of Concealed Cary and Self-Defense,
- Carry Modes and Handgun Concealment,
- Presenting the Handgun from Concealment, and
- Presentation, Position and Movement.
- Another offering in the series is the NRA Defensive Pistol Course. This is a shorter course than PPOTH. It teaches:
- How to apply the NRA Rules for Safe Gun Handling when carrying a concealed firearm,
- basic principles of concealment,
- drawing from a hip holster
- levels of mental awareness,
- developing the proper mindset when using a pistol for personal protection,
- flash sight picture
- reloading
- clearing common stoppages,
- shooting a qualification course,
- use of pocket pistols,
In addition to the Courses themselves, the Training Department provides additional Skill Development Exercises for NRA Instructors to use with students after PPITH and PPOTH.
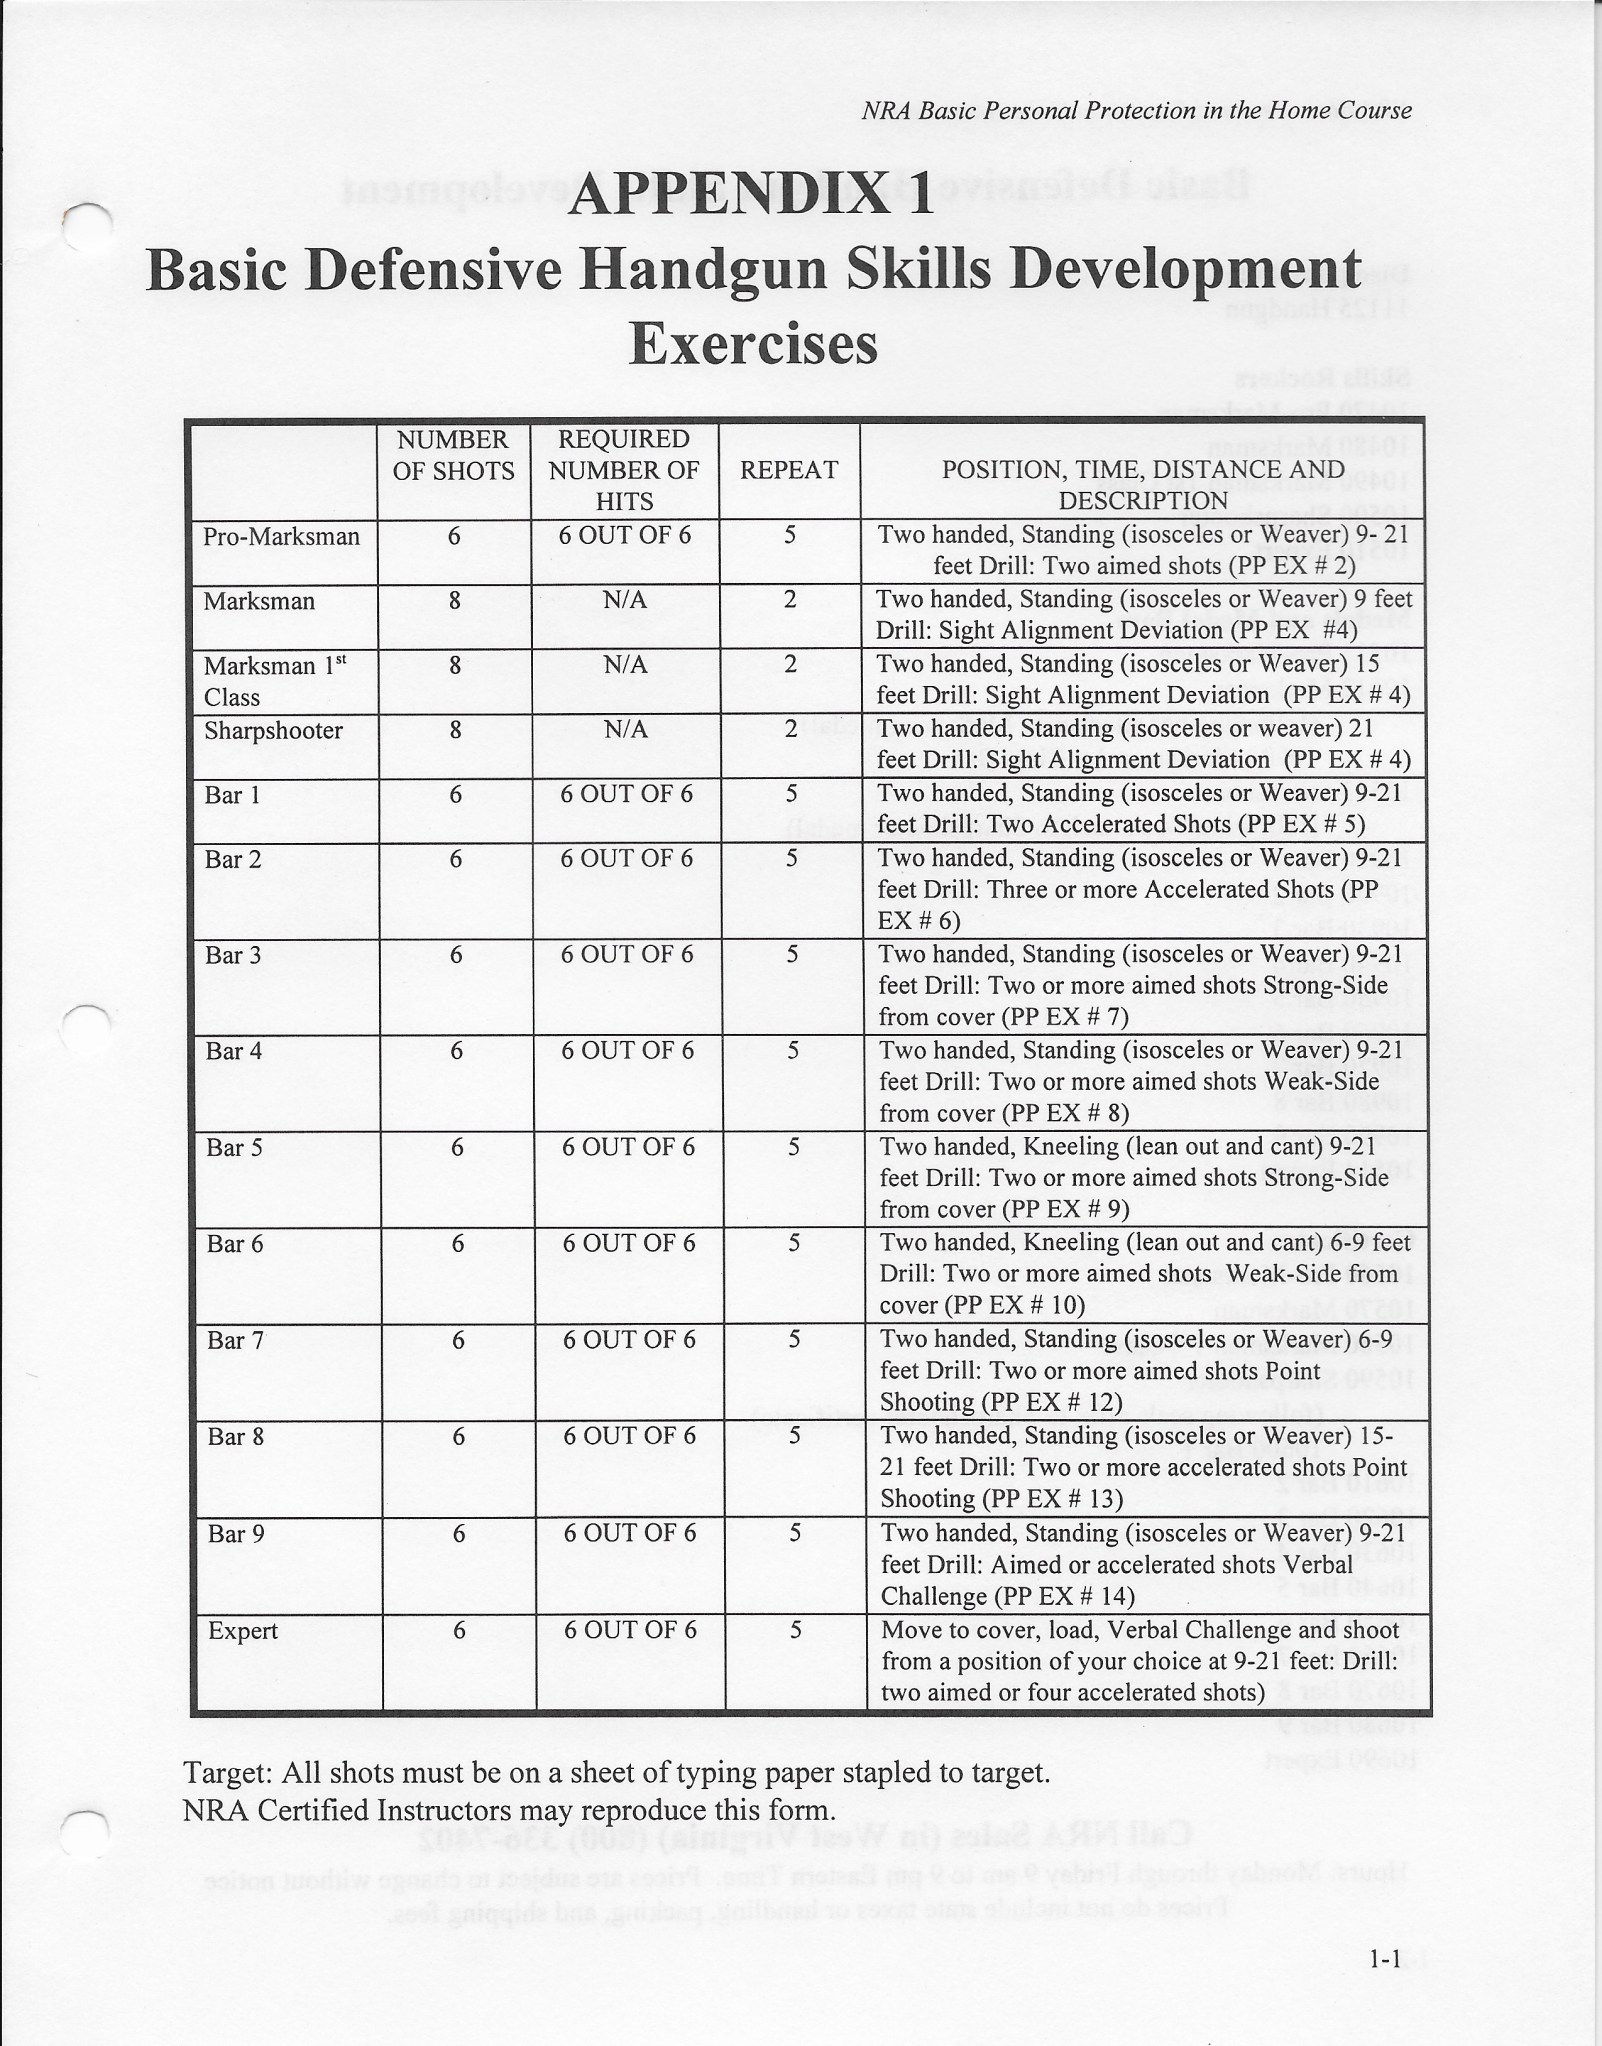
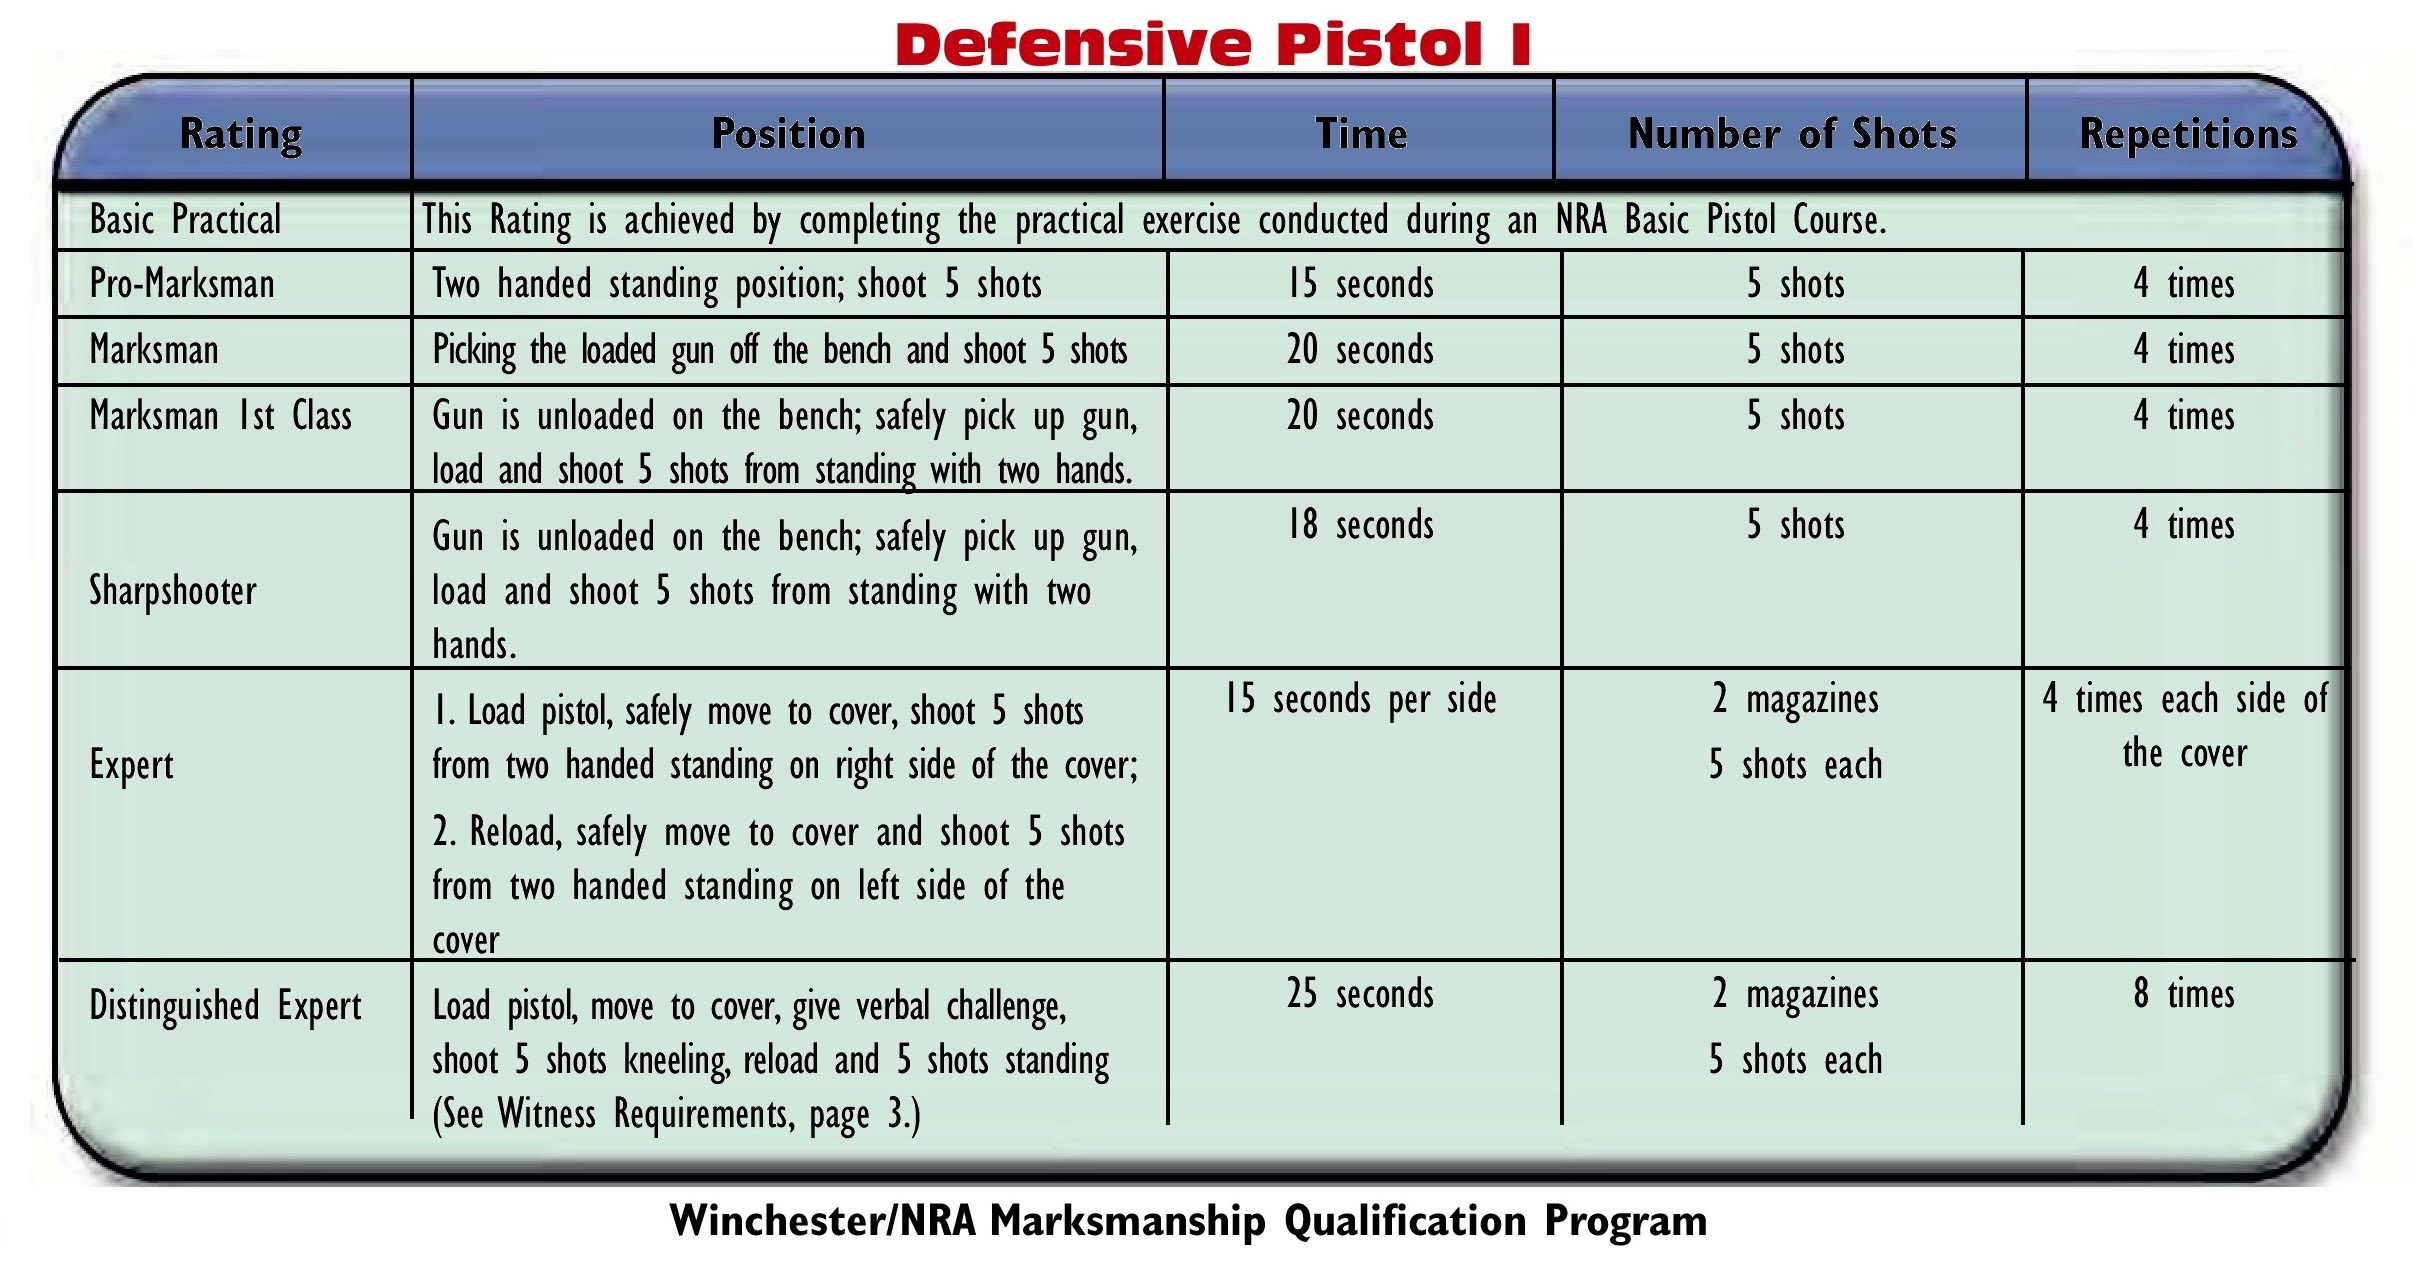
And the NRA Marksmanship Qualification Program has even more exercises that interested shooters can use to increase their skills and earn awards from the NRA.
Looking at all the topics covered, that’s a really comprehensive training program. Those who are interested in a defensive firearm as more than a talisman to ward off evil can really get a lot out of such a “Basic” program.
There are a number of aspects of the NRA’s series that I really like. First of all, the classes are between 4 to 9 hours long. Because they’re constructed in modules, even the 9 hour classes don’t have to be conducted in a single day. Most people’s lives are quite busy and asking new shooters to take an entire weekend or even week of training is both difficult and sometimes counter-productive.
The NRA’s program is really the only one in the industry that is built around the student’s capabilities and time constraints rather than a trainer’s weekend convenience. Mea culpa; I’ve done both the traveling trainer and hosting trainer routines, so I’m as guilty of it as any of my colleagues. It’s something I want to try a different approach to.
There’s a place for both newer trainers and experienced trainers in the NRA’s Personal Protection Series. I’m very much looking forward to seeing how I can implement that.
Standards (A Series)
Standards (Part I – Introduction)
While I’ve been on hiatus, I’ve been thinking a great deal about Standards. The Free Dictionary lists the first noun definition of Standard as: An acknowledged measure of comparison for quantitative or qualitative value; a criterion.
In the area of personal protection, standards can apply to many different facets of our skills and body of knowledge. Standards imply measurement, something that many people are deathly afraid of. While ‘public speaking’ is often mentioned as being the most prominent fear, that is merely a subset of a larger body, individual performance measurement.
The most obvious and contentious type of standard regarding Private Citizens who own firearms is the concept of marksmanship standards. The discussion comes up regularly among the training and gun communities without any general consensus about what is appropriate. Generally, the topic revolves around Citizens who have some form of of License to carry a weapon. We should keep in mind that it can also apply to those who keep firearms for home defense.
Opinions vary widely about what standards are appropriate for those who carry weapons. On one end of the spectrum, some people feel there should be no standards at all. Rob Pincus of I.C.E. Training holds this view as do advocates of Constitutional Carry. On the other end of the spectrum, there are very difficult standards such as the FAST Drill developed by the late Todd Green, the Humbler popularized by Larry Vickers, or the Handgun Testing Program developed by Bill Rogers of the elite Rogers Shooting School.
In the middle are the Qualification tests used by many States as one of the prerequisites for obtaining a Weapons Carry License or whatever name the State puts on the card. For those who wish to carry a weapon in those States, the discussion of what standard is appropriate starts with what their State’s requirement is and how to meet it. No two States having a Qualification requirement are alike
The difficulty of these State Qualifications varies quite widely. Anywhere from 10 rounds to 50 rounds have been mandated. The distances shot at fluctuate from six feet to 15 yards. Some are timed but most are not. The targets may be large or much smaller. Interestingly, very few States have a test requirement that includes drawing from a holster. In fact, some States specifically prohibit the Qualification test from including drawing from a holster. While this might seem paradoxical, it is not because of liability and fairness issues.
What this series will explore is the various types of standards that exist, what skills are required to meet them, and how to choose what is appropriate for you, if anything.

You must be logged in to post a comment.